Recording Sports Video – Chapter 3
Written by Paul Richards on February 10, 2025
Capturing sports on video is essential not only for coaches and athletes, but also for athletics directors, volunteers and dedicated media professionals. By recording practices, games and competitions, you create a resource that allows a chain of new value to be created. Video allows coaches to pinpoint areas for improvement, gives players visual feedback on their performance and provides fans with enriched content and deeper engagement. Once recorded, sports video can be shared and viewed online through modern, cloud-based platforms, providing athletes, coaches, scouts and fans with convenient, on-demand access to the sports they love and player performances they may need to see.
Why Recording Matters
At its core, sports video recording serves several critical functions. For coaches and athletes, having access to recorded material means no longer relying solely on memory or subjective impressions. Instead, footage can be reviewed methodically, frame by frame, to analyze tactics, player positioning and technical execution. This visual feedback loop leads to more targeted training, strategic adjustments and ultimately, improved performance on the field.
Common Challenges in Recording Sports
Sports differ from many other types of video production because the subjects are constantly in motion and the action can shift unpredictably. This is why Chapter 11, is dedicated to setting up cameras for different types of sports. A single key play may unfold in seconds, requiring the camera operator to anticipate movement and quickly adjust framing.
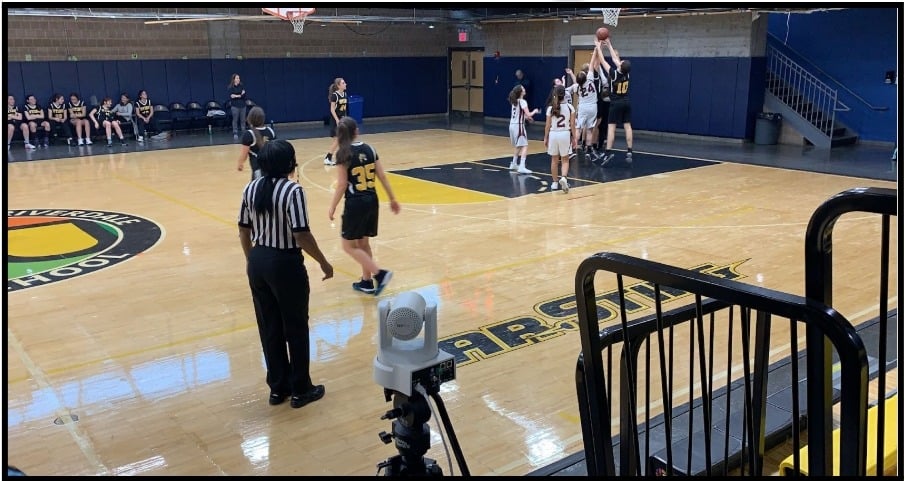
Basketball sports video system at the SAR High School.
Increasingly, coaches are relying on AI-enabled cameras that can follow the play from a single angle and record the game automatically. These cameras, such as Pixellot, Veo and Hudl Focus, use advanced computer vision (and stationary multi-lens, non-motorized cameras) to track the ball and players without a dedicated camera operator. Not only do they free up staff time and resources, but they also integrate with analytics platforms to help coaches break down game footage for strategic insights. As a result, even smaller teams and amateur clubs can access professional-level video production and performance analysis.
While AI-cameras are convenient they often only offer one camera angle. Balancing wide coverage with close-up detail for sports analysis is often a priority as coaches grow their sports video programs. A long shot from a high vantage point might capture the entire field of play, allowing viewers to see strategies develop. But and this is an important ‘but”it may not clearly show individual player actions or subtle details. As of this writing, none of the cameras in this category are capturing 4K 60 fps video and don’t have optical zoom lenses, vs. PTZ cameras that provide both; offering much clearer, higher-resolution video with significantly greater close-up capabilities. Conversely, zooming in too much risks missing the broader context of how players move and interact. A key skill in sports videography is learning to dynamically shift between these perspectives, ensuring you never lose track of the essential story playing out on the field, court or rink.While AI-enabled cameras offer remarkable convenience and help streamline the recording process, there’s still tremendous value in having real camera operators on hand. With a dedicated operator—whether a member of a school’s broadcast club, a student-athlete currently sidelined by injury or a group of trained volunteers—it’s nice to have someone dynamically adjust framing, zoom levels and focus to capture the exact angles that yield the most useful insights.
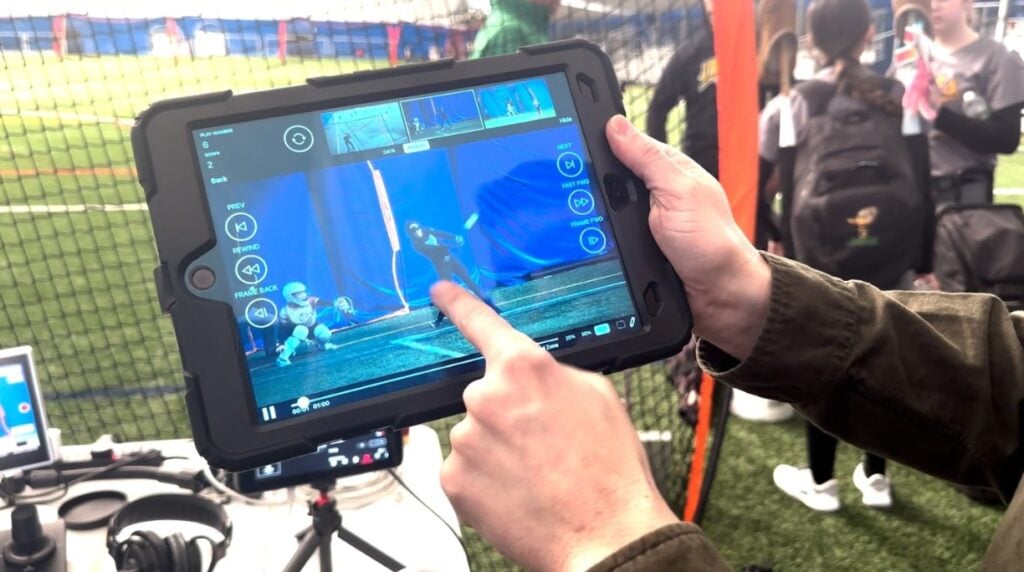
For example, in American Football, you might see video zoomed into the kicker or the player holding the ball. In Lacrosse, there are key plays like faceoffs which have critical details that need to be zoomed -n on. By involving people who understand both the sport and the storytelling aspect of videography, you create more engaging, context-rich footage. As your sports video program evolves, consider recruiting dedicated team members who can master the nuances of PTZ (Pan-Tilt-Zoom) camera control, coordinate with coaches and respond in real time to the ebb and flow of the game. Over time, this human touch not only enhances your production values but also ensures that you’re always getting the angles and details needed to support meaningful sports analysis.
Understanding the Basics of Composition and Framing
Recording sports is about more than just pointing a camera at the action—it’s about capturing the essence of the game in a way that is visually clear, engaging and informative. Good composition and framing give the audience a front-row seat to the athletes’ effort and skill, while also revealing the strategies unfolding on the field or court. Mastering these basics ensures that your footage is both watchable and useful, whether for post-game analysis, highlights or live broadcasts.
Choosing Angles and Perspectives
One of the first decisions in sports videography is selecting where and how to position your camera. Different sports and playing surfaces present unique challenges and opportunities. An elevated angle from the stands can offer a broad, tactical view—useful for coaches wanting to analyze team shape or player positioning. In contrast, a lower, field-level vantage point might highlight the intensity of one-on-one battles or showcase the skillful footwork of a forward breaking past a defender.
Certain sports have long traditions of “ideal” camera locations that will be explored in the upcoming chapters of this book. For instance, a central, elevated position near the half-line in soccer or basketball often provides the best overall perspective on the match. In basketball, a position at midcourt but slightly elevated captures full-court transitions while still allowing viewers to see details like foot placement during a three-point attempt. A camera like this is often 20-30’ above the court and can be captured from a tall vantage point or with a PTZ camera on a 20’ tripod. By understanding these conventions and experimenting with different viewpoints, you can find the sweet spot that best suits your team’s needs and your audience’s expectations.
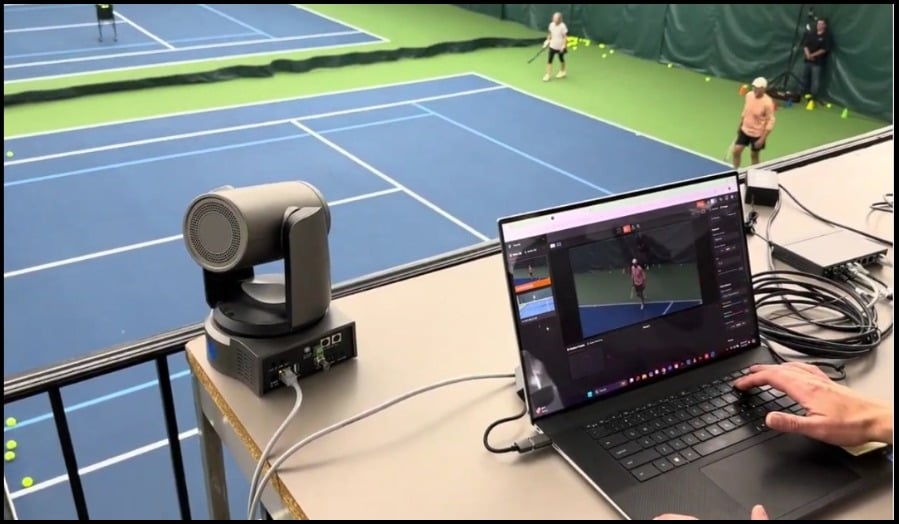
Elevated PTZ cameras on balcony area for tennis match.
Following the Action
Sports move fast. Players sprint, balls fly through the air and the play can shift direction on a dime. Chapter 14 is dedicated to sports video camera operations, to give detailed instructions to your team. The camera operator’s goal is to keep the subject of interest—usually the ball or the leading players—in frame and in focus. Anticipating the flow of the game becomes second nature with experience: operators learn to track the ball’s trajectory, predict where a player might run next and be ready to pan the camera smoothly as the action shifts from one end of the field to the other.
Depending on your team’s goals, you’ll want to discuss the nuances of what your team values with sports video. Over time, your team will develop an intuitive feel for when to start your movements so that the action flows naturally through your frame.
If your team is using PTZ cameras, I highly recommend having them read the PTZ Camera Operators Handbook.
Basic Camera Settings
While composition involves “where” and “what” you point at, camera settings influence “how” the scene looks. The right frame rate can mean the difference between crisp, fluid action and choppy, hard-to-follow video. Many videographers choose higher frame rates (like 60 frames per second) for sports because it better captures fast motion.
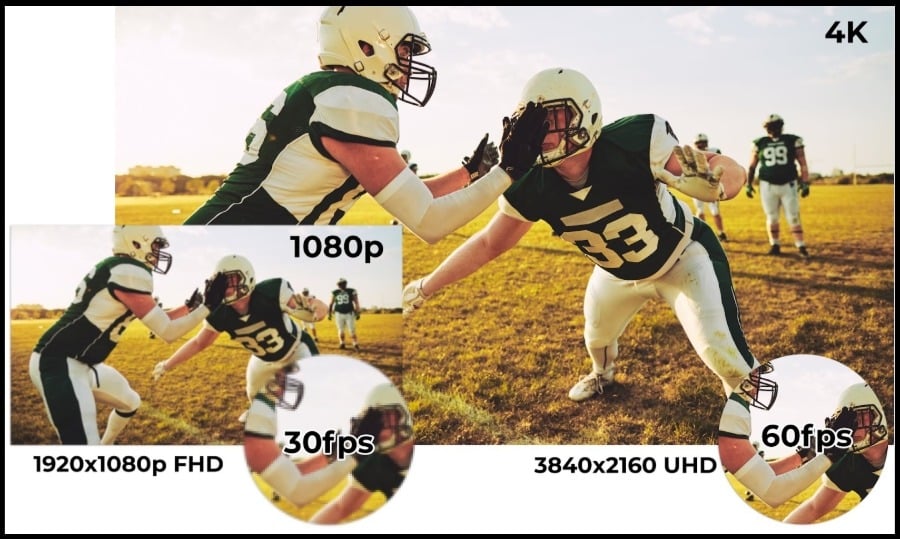
Sports look clearer with high resolutions and frame rates. This is especially true if you plan to use slow motion in your videos.
Consider exposure settings carefully: a fast shutter speed can reduce motion blur, making it easier to see a baseball’s spin or a basketball player’s footwork. However, if you’re filming at dusk or under poor lighting conditions, you may need to adjust ISO, gain or aperture (aka “iris”) to ensure a bright, clear image. Be careful though, the more you open the aperture (the numbers get smaller), the shallower your depth-of-field will be. That’s the area in focus in front of and behind your selected focus point. So, while a shallow depth of field is great for blurring backgrounds in portraits, it leaves no room-for-error in focus point selection. Conversely, a wider depth of field will tend to keep more in focus. White balance is another key factor—lighting can vary dramatically between indoor arenas and sunny outdoor fields and proper color calibration ensures that uniforms, equipment and the playing surface all look as intended.Matching camera settings across all cameras ( in order to match cameras) is equally important in order to avoid distraction and provide a professional looking product. This works best if all of the cameras are the same make and model. You often get pretty close to matching different cameras by spending some time “tweaking” the settings.
Taken together, thoughtful composition and well-chosen settings bring your footage to life. By starting with a strategic vantage point, following the flow of the game and fine-tuning your camera’s parameters, you ensure that the end result is both beautiful and functional. Viewers, coaches and players alike will benefit from footage that’s easy to follow, accurately exposed and color matched and framed to reveal exactly what’s happening in every crucial moment.
Pre-Game Preparation and Planning
Great sports video production doesn’t happen by chance. Before the whistle blows, the lights come on or the athletes take the field, careful planning sets the stage for successful recording. From scouting the venue to ensuring everyone on your team understands their role, preparation is the key to capturing crisp, meaningful footage without scrambling at the last minute.
Scouting the Venue
Before any camera is set up or tripod extended, take a walk around the field, court or gymnasium. Assess the layout, take pictures and identify potential vantage points. Is there a press box or elevated platform you can use to get a wide-angle view of the field? If you’re recording outdoors, note the position of the sun (at the time-of-day you’ll be shooting)—filming directly into harsh sunlight can wash out details, so you may want to set up on the opposite side. Indoors, look for the best lighting conditions and avoid obstructed views caused by pillars, bleachers or support beams. Is there a power outlet nearby? Where are the ideal cable pathways?
Also consider the practicality of your position. Ensure that there’s enough space for your equipment, that you won’t be blocking spectators’ views and that you can easily pivot to follow the action. In some cases, establishing a primary camera location near midfield and a secondary angle at one end zone or baseline can give you flexibility. By thinking ahead and scouting thoroughly, you’ll save yourself from scrambling to adjust once the game has already begun.
Communication and Coordination
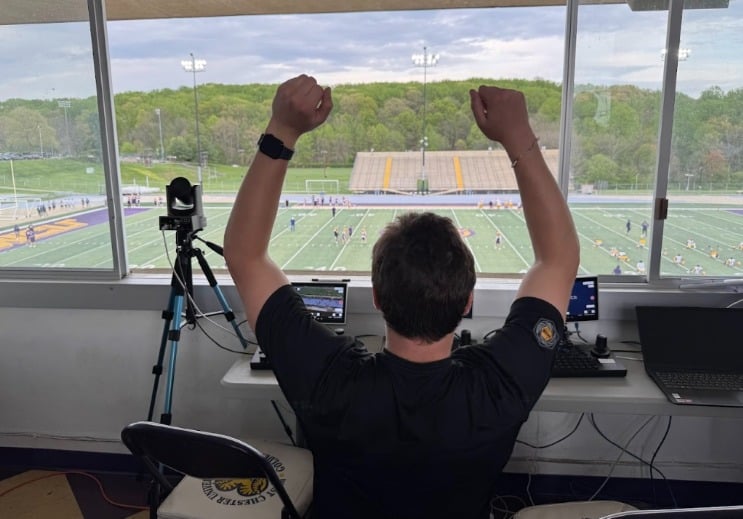
Even if you’re working solo, chances are you’ll need to coordinate with someone—be it a coach, event staff or a colleague helping with commentary or analytics. If you have a production team, outline each person’s responsibilities before the event. The camera operator might focus exclusively on tracking the action, while another team member handles switching angles or updating score graphics. When available, I like to have one camera operator dedicated to the wide 2/3rds shot and another dedicated to a closer up 1/3rds shot who also gets closeups when available. Salesianum High School’s broadcast program likes to have one dedicated PTZ camera operator “hunting” for the best close up moments during the game. They might not have the perfect shot all the time, but when they get the perfect shot of a kick off or a touchdown the video switcher can take advantage of that viewpoint.
Clear communication also extends to understanding the event’s schedule. Know when warm-ups begin, when player introductions occur and when the game officially starts. This knowledge helps you capture important pre-game moments, such as coaches’ pep talks or player warm-ups, which can be valuable in highlight reels and analysis sessions later.
Choosing the Right Camera and Recording Tools
Selecting the right camera setup is a critical step in your sports videography journey. Your choice will depend on your goals, budget and the level of production quality you hope to achieve. Whether you’re a parent filming your child’s weekend game, a coach wanting to improve team strategy or a professional broadcaster delivering content to thousands of fans, there’s a camera solution suited to your needs.
Entry Level (Parents & Coaches): Smartphones and Affordable Apps
For many people, the most accessible camera is the one already in their pocket. Modern smartphones offer surprisingly good video quality and, with the help of dedicated sports-recording apps, such as SportsCam (available for iOS and Android) you can provide on-screen score overlays on all your video. This low barrier to entry makes them ideal for parents and volunteer coaches who need a quick, convenient way to capture key moments.
The trade-offs at this level are limited zoom, potentially shakier footage and challenges in low-light conditions. Many parents who start to consistently film sports, decide to buy a dedicated camera such as a GoPro or Mevo so they can keep their smartphone and stop worrying about battery life during games. Still, with a simple tripod or a small smartphone gimbal, you can stabilize the shot enough to produce watchable video. For those just starting out, this is a practical and cost-effective way to begin recording and analyzing gameplay.
Prosumer Level (Clubs & Amateur): AI All-In-One Cameras and Gimbals
As you move beyond the basics, consider all-in-one cameras that leverage artificial intelligence to track the action automatically. These devices are designed with sports in mind: once positioned, they can follow the ball or key players without requiring constant manual adjustments. This is especially beneficial for clubs and amateur teams looking to elevate their production quality without hiring a dedicated camera operator. Many of these AI-driven cameras come integrated with AI analytics tools, easy cloud storage options and electronic pan-tilt-zoom (EPTZ) capabilities.
Education Level (High School / College): Panoramic Cameras and Cloud-Connected PTZ/IP Cameras
High schools, colleges and other institutions often seek solutions that combine convenience with higher-quality production values. All-in-one panoramic cameras can capture the entire playing field at once, enabling coaches and analysts to zoom in on any segment of the action after the fact. This top-down view of the game lends itself to strategic analysis—coaches can easily review player formations, spacing and tactical decisions from a single wide-angle recording.
Cloud-connected PTZ (Pan-Tilt-Zoom) like PTZOptics Move SE and Move 4K cameras offer even greater control. Managed remotely, these cameras can be adjusted in real-time for close-ups, follow individual players or seamlessly switch between different parts of the field. This flexibility comes closer to broadcast quality, but it also demands a bit more technical know-how. A small team or a dedicated staff member might be needed to operate and maintain these systems. Still, for those who want a truly professional feel and comprehensive tactical insight, this level of investment is a game-changer.
Pro Level (National): Broadcast Cameras
At the highest level of sports production—think major college athletics or national broadcast networks—professional broadcast cameras set the standard for quality and versatility. These cameras feature top-tier lenses, large sensors for low-light performance and customizable settings to achieve perfect exposure, color balance and focus under any conditions.
Using broadcast cameras typically involves a full crew: camera operators who know how to anticipate and frame the action, directors calling the shots from a production truck and technicians ensuring the image is pristine. The cost and complexity are significantly higher, but so is the production value. This level of equipment transforms a simple recording into a polished, television-quality broadcast that can be distributed to large audiences, either via traditional TV networks or professional streaming platforms.
By understanding your production goals and constraints, you can choose the camera solution that fits best. Entry-level options enable individuals to start recording right away with minimal setup, while prosumer and education-level systems offer more sophisticated features without breaking the bank. At the pro level, you’re stepping into a world that rivals the best broadcasts on air, complete with dedicated crews and cutting-edge gear. Whether you’re filming for player development, coaching strategy, fan engagement or major league television, the right camera choice empowers you to tell the story of the game with clarity, insight and excitement.
Matching Your Goals and Budget with the Right Tools
Once you understand the broad spectrum of camera and recording options—ranging from smartphone setups to professional broadcast rigs—it’s time to decide which level best suits your specific situation. This decision often hinges on two key factors: what you want to achieve and how much you’re willing or able to invest.
Sports Video Recording Workflow
Determining Your Purpose
Begin by clarifying your main reason for recording. Are you a coach looking to give players more concrete feedback, reviewing footage to highlight mistakes and successes? Or is your priority building engagement with fans, streaming matches live to viewers who can’t attend in person? Perhaps you’re creating highlight reels for recruitment purposes or aiming to produce content that can be monetized through sponsorships or ticketed streams.
Your goals will guide you toward the appropriate technology. For basic player review and tactical breakdowns, an entry-level or prosumer solution might meet all your needs. However, if you’re looking to produce polished, near-broadcast-quality content, you’ll need to consider more advanced options.
Budget Considerations
Budget plays a significant role in shaping your choices. For many amateur clubs, youth teams or volunteer-run organizations, starting simple might be best. Investing in a few key accessories for a smartphone or a consumer camcorder can stretch your dollar and still produce watchable footage. These lower-cost solutions can be surprisingly effective, helping you gain experience, refine your technique and learn what features matter most before investing more heavily.
If you’re working within a school system or club with access to modest funds, you might look into a mid-tier PTZ setup that offers better control, cloud integration and improved quality. For those at the top of the sports pyramid, where viewership and commercial stakes are high, professional broadcast equipment will likely be a necessity—justified by the potential revenue and credibility it brings.
Choosing the Right Recording Solution
Selecting the appropriate recording solution depends on several factors, including your team’s budget, the level of production quality desired, available technical expertise and the specific needs of your sports video program. Here’s a quick comparison to help guide your decision:
- AI All-In-One (Panoramic) Cameras
- Pros: Easy to use, automated tracking, integrates with analytics.
- Cons: Limited to one angle, hardware and subscription costs, dependent on AI accuracy.
- Camcorders and GoPros
- Pros: Flexible angles, no ongoing costs, high portability.
- Cons: Requires manual operation, potential for shaky footage, less automation. GoPros only provide wide-angle coverage rather than close-ups (from a distance).
- Recording Systems (Magewell Director Mini, YoloBox)
- Pros: Multi-camera support, professional production features, live streaming.
- Cons: More cables, higher initial cost, space and power needs.
- IP Cameras
- Pros: Ideal for permanent installations, scalable, remote control. They can live stream and record in the cloud. They can be remotely controlled in the cloud.
- Cons: Requires network setup, dependence on network stability, higher cost for quality.
- PTZ Cameras
- Pros: Dynamic and versatile coverage, high zoom capability, remote operation. They can live stream and record in the cloud. They can be remotely controlled in the cloud.
- Cons: Can be expensive, requires trained operators, may or may not have on-board recording.
By understanding the various practical recording solutions available, you can tailor your sports video program to meet your specific needs and resources. Whether you opt for the simplicity of AI all-in-one cameras, the flexibility of camcorders and GoPros, the advanced capabilities of recording systems, the strategic placement of IP cameras or the dynamic coverage of PTZ cameras, each option offers unique benefits and challenges. Evaluate your team’s goals, budget and technical capacity to choose the best combination of tools that will help you capture, analyze and share compelling sports footage.
Balancing Quality and Complexity
Another crucial aspect is the complexity you’re ready to handle. A single parent or volunteer coach may not have time to operate multiple camera angles, manage advanced analytics software or troubleshoot complex network connections. Simplicity can be a virtue, ensuring you actually get the shots you need rather than getting bogged down in technical details.
On the other hand, if you’re building a small production team—perhaps tech-savvy students, an assistant coach with an eye for detail or a dedicated media volunteer—you can afford more complexity. With extra hands, you can manage higher-end cameras, integrate performance analysis tools or experiment with live streaming for fans and family at home.
Choosing the right camera and gear setup is about finding the balance that lets you achieve your goals without overburdening your resources. Start where you are comfortable, both financially and technically and scale up as your needs grow. Over time, you may discover that adding a single PTZ camera or upgrading from a smartphone setup to an AI-driven camera system is all it takes to elevate the quality and usefulness of your footage. Ultimately, your best path forward is the one that helps you improve the way you capture, analyze and share the game—making the most of every minute of recorded action.
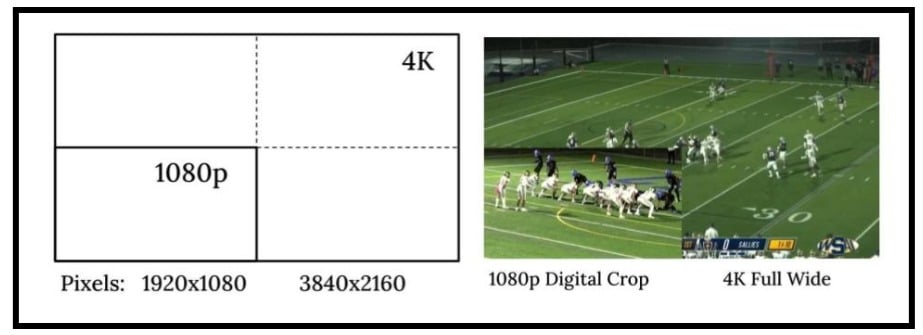
4K video has four times more pixels than 1080p video allowing for lossless digital cropping (to a 1080p image) ideal for highlight reels.
1080p vs. 4K: Pros and Cons for Recording Sports Video
At some point, you may need to make a decision about whether to record your sports video in 1080p (Full HD) or 4K (Ultra HD). 1080p video offers a more affordable and manageable option with smaller file sizes, making it easier to store, share and upload content. For this reason 1080p video is beneficial for live broadcasts and instant replays, where high frame rates like 60fps are crucial and budget constraints are a consideration. 720p and 1080p video workflows tend to be more accessible and popular in youth and K12 sports.
On the other hand, 4K video provides superior image quality with greater detail and clarity, enhancing the overall viewing experience. 4K cameras have larger sensors and offer better color accuracy and performance which make a clear difference when viewed on a 4K television or LCD monitor. However, the higher resolution comes with significantly larger file sizes and increased bandwidth for streaming. Also, the initial investment for 4K cameras and compatible recording and streaming equipment is considerably higher. Despite these challenges, 4K future-proofs your content and most 4K video equipment can be set up to be used in 1080p mode while you transition your video workflow over time. For sports, the 4K quality difference is real and it offers greater flexibility in post-production, allowing for detailed edits and “punch in” crops without compromising image quality. When recording or live streaming 1080p, YoloBox, Vmix and other live switching systems allow you to crop-in on a 4K image which effectively gives you a longer focal length lens that’s double the length of the one you’re using – with no loss of image quality.
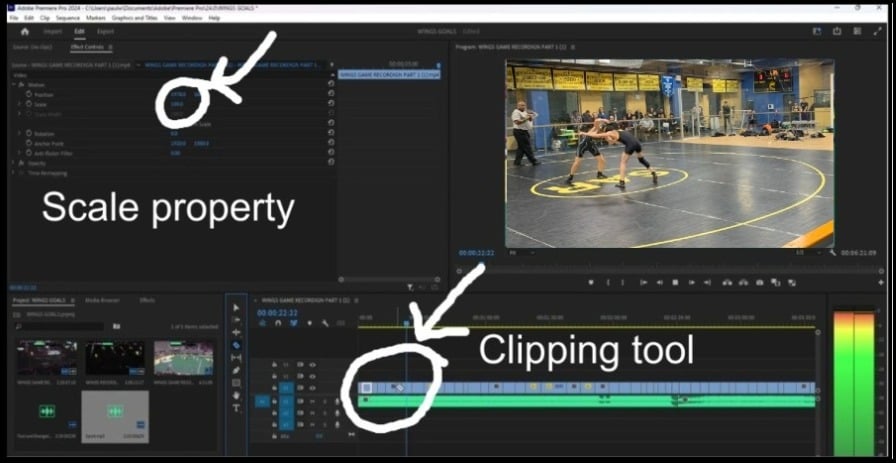
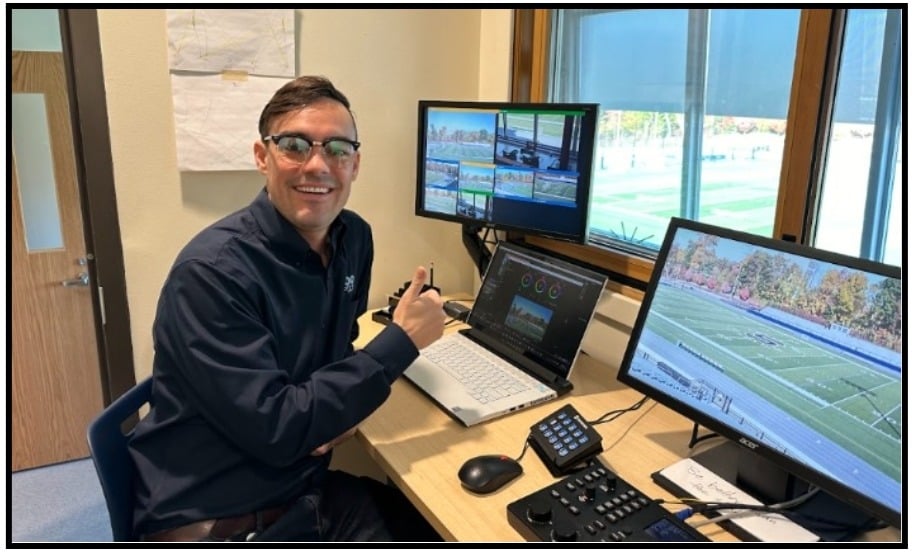
Adobe Premier, pictured above, is a video editing software. Using 4K video footage in a 1080p composition workspace allows for 200% digital cropping without pixelation.
“As the demand for 4K video in sports analysis continues to grow, there’s an increasing need to capture the full, wide-angle view of the game for team formation insights, while also zooming in on specific players or areas of the pitch. Thanks to its high resolution, 4K video makes it possible to do both.” – Ruben Saavedra, Metrica Co-Founder and CEO
Getting Started with Basic Techniques
Once you’ve chosen your gear and established a solid plan, the next step is to put your equipment to good use. Recording sports video effectively takes practice—just like playing the game itself. By focusing on a few fundamental techniques and skills, you’ll set yourself up for success, ensuring that your footage is not only clear and stable but also genuinely helpful when it comes time to review, analyze or share.
Recording Practices and Matches for Improvement
Don’t limit your filming to official games. Recording practices can offer valuable insights into a team’s progress. Consistency is key—try to capture the same drill or exercise from the same angle each week. By reviewing these clips over time, coaches and players can spot improvements in technique, identify recurring mistakes and evaluate whether certain training methods are effective.
Matches themselves often provide the ultimate test. Recording full games ensures that you don’t miss any important plays and having complete footage allows you to select the best moments for highlight reels or in-depth analysis. These recordings become a database of performance, a visual history of how a team evolves over the course of a season.
The Crucial Role of Video Editing in Team Improvement
While recording practices and matches provide a wealth of raw footage, the true value lies in how you edit and utilize that content. Effective video editing transforms lengthy recordings into concise, impactful clips that highlight key moments and areas for improvement. This process not only makes the footage more manageable but also enhances its utility for both coaches and players.
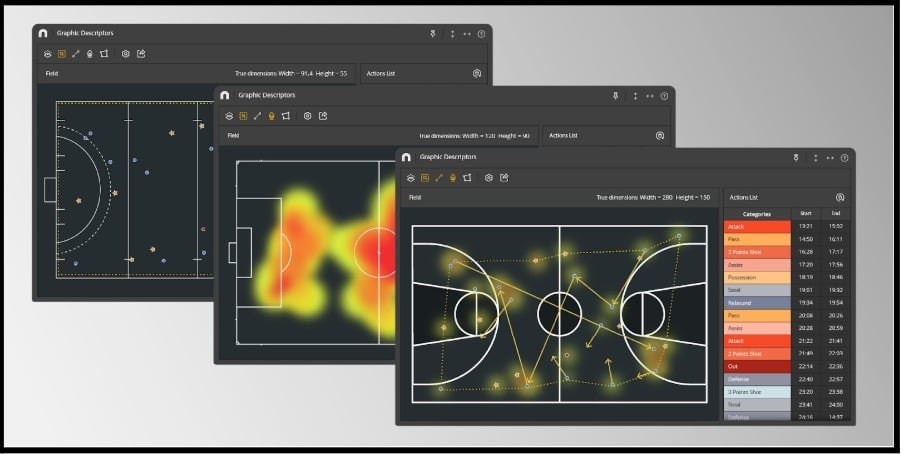
Nacsport heatmaps are generated from manually tagged data.
For this reason, many sports teams decide to use sports analytics software to “tag” games live, which eliminates the need for editing video. Sports analytics software such as Nacsport allows you to tag the game live or after the event. This allows you to create useful statistics and capture highlight clips at the same time.
Streamlining Long Video Files
Practices and games can result in extensive video files—imagine sifting through an hour-long practice session or a 1.5-hour game that includes numerous timeouts and halftime breaks. Editing these long recordings into shorter, more focused clips is essential for several reasons:
- Enhanced Focus: Shorter clips allow coaches and players to concentrate on specific drills, plays or moments that are connected such as all goals, blocks or rebounds.
- Time Efficiency: Reviewing concise clips saves time, enabling quicker feedback and more efficient use of practice or review sessions.
- Targeted Analysis: By isolating particular segments, you can perform a more detailed analysis of techniques, strategies and player performances.
Pro Tip: You can save a lot of time reviewing footage if you have timestamps or a scoreboard. Consider keeping track of time during practices and games if you are not yet using sports analytics tagging or using a graphics scoreboard.
Organize Edited Clips for Maximum Benefit
Once you’ve trimmed your videos into meaningful segments organizing them systematically is vital for easy access and comparative analysis throughout the season. Here are some strategies to consider:
- Categorize by Team Areas:
- Offense: Store clips that showcase offensive plays, strategies and player movements. This can include successful scoring attempts, passing drills and formations.
- Defense: Organize defensive maneuvers, tackles, interceptions and positioning strategies.
- Special Teams: If applicable, separate footage related to special teams play, such as kick-offs, punts and returns.
- Segment by Drill or Exercise:
- Create folders for specific drills or exercises performed during practices. This allows for tracking progress and identifying improvements or persistent issues in particular areas.
- Game Phases:
- First Half / Second Half: Breaking down game footage by halves can help analyze performance trends and adjustments made as the game progresses.
- Specific Quarters or Time Periods: For more granular analysis, especially in closely contested games.
- Player-Specific Folders:
- Sports management software allows teams to maintain player specific tagging of video. You can also create player-specific folders in a file sharing solution such as Google Drive or Dropbox.
Making Clips Accessible for Player Development
Ensuring that players have access to relevant video clips is crucial for their individual growth and for creating personalized highlight reels they can send to scouts. Here’s how you can facilitate this:
- Centralized Storage Solutions:
- Utilize cloud-based platforms like Google Drive, Dropbox or specialized sports video analysis tools (e.g., Hudl, Krossover) to store and organize video clips. This ensures that players can access the footage anytime, anywhere.
- Structured Sharing:
- Share organized folders with players, ensuring that each player has access to their specific clips as well as team-wide footage for a comprehensive understanding of team dynamics.
- Highlight Reel Creation:
- Encourage players to create their own highlight reels by selecting clips that best showcase their skills and improvements. This not only boosts their confidence but also aids in personal scouting and recruitment opportunities.
- Interactive Review Sessions:
- Incorporate video review into team meetings and individual sessions. Use edited clips to illustrate points during coaching, allowing players to visualize and understand feedback effectively.
- Consistent Updates:
- Regularly update the video library with new clips from each practice and game. This ongoing process ensures that the video database remains current and continues to reflect the team’s evolution throughout the season.
Best Practices for Effective Video Management
To maximize the benefits of your video editing and organization efforts, consider the following best practices:
- Maintain Consistency: Always capture and edit videos using the same angles and formats to ensure comparability over time.
- Label Clearly: Use clear and descriptive naming conventions for your video files and folders (e.g., “Offense_Drill_Passing_2024-04-15”). This will make searching for your videos much easier.
- Incorporate Metadata: Add tags or notes to clips with relevant information such as date, drill type, player involved and specific observations.
- Encourage Player Engagement: Motivate players to regularly review their clips and provide feedback on the video resources to continually enhance their effectiveness.
By prioritizing video editing and establishing a robust organizational system, you transform raw footage into a powerful tool for continuous improvement. This approach not only aids in tactical and technical development but also fosters a culture of accountability and self-improvement within the team.
Video Tutorial: In the included online course, there is a tutorial showing how to create player spotlights in your videos. You may have seen this type of video annotation on TV. With the free files and tutorial videos, you can do it too!
The Value of a Team Viewing Room in Sports Video Analysis
To fully leverage the power of video analysis, many teams establish a dedicated team viewing room where coaches and players can review footage together. This collaborative space fosters deeper insights by allowing everyone to engage with key moments and analyze performance in a focused environment. A team viewing room equipped with a large screen, annotation tools and playback controls creates an immersive experience that aids in breaking down plays, discussing strategies and addressing areas for improvement. By centralizing video reviews in one location, teams can make analytics-driven adjustments more effectively, ensuring that both coaches and players are aligned in their efforts to improve performance.
Estimating File Sizes in Sports Video Recording
When planning for sports video recording, it’s essential to estimate the length of each game and the quality of the video to determine the necessary SD card or available hard-drive space. Factors such as the number of cameras, whether not you’re ISO recording individual cameras, video resolution, frame rate and bitrate significantly influence the file sizes. By calculating the total recording time and understanding your video settings, you can choose SD cards (or hard drives or SSDs) that ensure you have enough storage with some extra space for unexpected needs.
| Scenario | # of Cameras | Resolution | Frame Rate | Game Duration | Estimated File Size | SD Card |
| Basic Recording | 1 | 1080p | 30fps | 70 minutes | 5.25 GB | 8 GB |
| Dual Camera Setup | 2 | 1080p | 30fps | 70 minutes | 10.5 GB | 16 GB |
| 4K Single Camera | 1 | 4K | 30fps | 70 minutes | 13.1 GB | 16 GB or 32 GB |
| Dual 4K Cameras | 2 | 4K | 30fps | 70 minutes | 26.3 GB | 32 GB or 64 GB |
| (4) 4K Cameras | 4 | 1080p | 60fps | 70 minutes | 52.5 GB | 128 GB |
These estimates are for each camera you want to record and a “switch” or “mixed” video recording with a scoreboard and other graphics is also important to record. By using this simplified guide and table, your sports video team can efficiently select the right SD card size or computer hard-drive space to ensure seamless recording of all your games. This approach helps in avoiding storage issues and ensures high-quality video capture tailored to your specific recording setup.
With these basics under your belt, you’re ready to take the next step. Chapter 4 introduces the world of sports analytics, showing you how to transform raw footage into insightful data that can drive strategic decision-making. You’ll learn how to integrate video with analytical tools, breaking down plays and player performance metrics to pinpoint strengths and weaknesses. As you refine your production techniques and incorporate analytics, your recordings will transcend simple documentation—they’ll become powerful instruments that inform coaching strategies, enhance player development and deepen fan engagement.
Embrace this journey step by step. By continually honing your camera work, experimenting with new technologies and combining visuals with analytics, you’ll emerge as a more confident and capable sports videographer. The skills you’ve developed in this chapter are just the beginning of a much larger toolkit—one that will serve you well, whether you’re capturing the joys of a local youth tournament or producing top-tier content for an international audience.
Join the StreamGeeks Community and Start Streaming Like a Pro By downloading Sports Video: Recording, Analysis, and Live Streaming, you’ll gain access to:- Proven techniques for live production success.
- The tools to engage and grow your audience.
- Insights that will transform your approach to live video.
Download Sports Video Here
You can purchase the paperback here. <>Sports Video Chapters
- Download Sports Video here
- Chapter 1: Intro to Sports Video here
- Chapter 2: The Power of Sports Video here
- Chapter 3: Recording Sports Video here
- Chapter 4: Sports Video Analytics here
- Chapter 5: Using wide angle tactical cameras for sports video here
- Chapter 6: How to make sports highlight reels here
- Chapter 7: Sports Video Essentials Level 1 here
- Chapter 8: Portable Sports Video Systems here
- Chapter 9: Sports Video Analytics Systems here
- Chapter 10: How to Live Stream Sports Like a Pro here
- Chapter 11: Setting Up Cameras and Sports Equipment for Different Sports here