Setting Up for Different Types of Sports – Chapter 11
Written by Paul Richards on February 19, 2025
Sports of all kinds require different approaches to camera placement, video switching and the overall look and feel of the broadcast. This is largely due to the unique nature of each sport, including the size of the playing field, the pace of the game and the key moments that viewers expect to see. Over decades of televised sports broadcasts, best practices have been established and refined, which we can learn from at all levels of sports production.
These established practices have effectively trained audiences on what to expect when watching a particular sport. For example, viewers of American football are accustomed to seeing a wide shot from high above the 50-yard line, while basketball fans expect to see shots from behind the backboard during free throws.

Capturing video for a tennis match
This standardization is beneficial for several reasons:
- Viewer Satisfaction: By following these guidelines, we can meet viewer expectations and ensure their satisfaction with the broadcast.
- Efficient Production: These best practices provide a proven framework for camera placement and shot selection, streamlining the production process.
- Leveraging Expertise: We can benefit from the collective experience of generations of sports broadcasters who have refined these techniques.
- Consistency: Adhering to these standards ensures a consistent viewing experience across different broadcasts of the same sport.
While it’s important to follow these established practices, there’s also room for innovation. New camera technologies and creative shot compositions can enhance the viewing experience while still meeting the core expectations of the audience.
In the following sections, we’ll explore the specific camera placement strategies for various sports, keeping in mind both the established best practices and opportunities for creative enhancements.
Why Camera Placement Matters
In sports live streaming, where you place your cameras is just as important as the type of cameras you use. Camera placement defines what the audience sees and how they experience the game. A well-placed camera can make your viewers feel like they’re right there, on the sidelines or in the heart of the action. Poor camera placement, however, can result in missed moments, obstructed views or lack of engagement.
This chapter will guide you through the best camera placements for various sports, explain how to frame your shots to capture the energy of the game and show you how to adapt your approach based on the sport and venue.
How to Set Up Wireless Cameras
Camera placement is critical, but what do you do when your ideal camera spot is too far from your production hub for a standard cable connection? This is where a wireless setup becomes essential. Wireless camera systems allow you to position cameras wherever they’re needed—whether that’s high above the field, across the court or on the sidelines—without being tethered by cables.
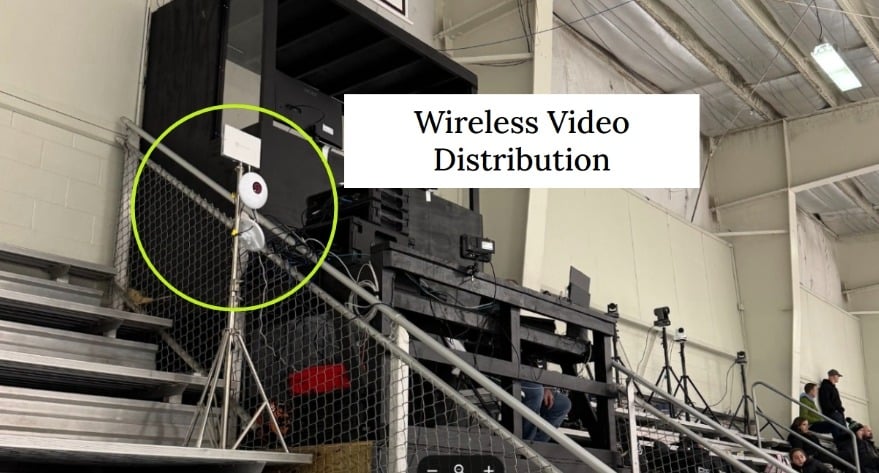
Ubiquiti point to point wireless networking system used to distribute video across an ice rink to the other side.
There are several technologies for transmitting video wirelessly and you may consider HDMI or SDI wireless transmission systems which can connect directly to traditional video equipment. Wireless video systems often lack the flexibility of wireless networking solutions, because they only handle video transmission. Wireless transmission systems such as the Ubiquiti point to point solutions, allow you to create a true wireless bridge that can be used for all kinds of sports video projects such as powering coach iPad, sending video from PTZ cameras and even controlling them with a joystick on the far side. In this section, you’ll learn how to set up a wireless “bridge”, which can be set up to handle wireless video transmissions between two locations just like a long ethernet cable.
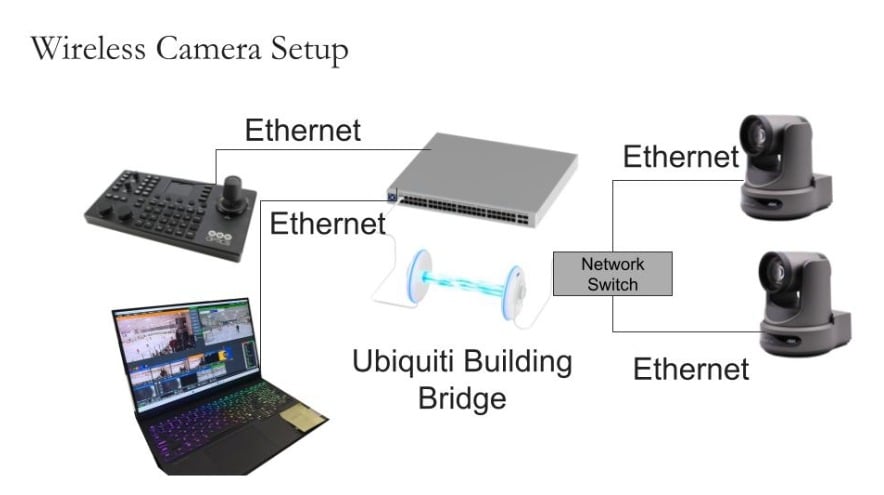
This diagram shows how the Ubiquiti Building Bridge solution is able to link together a network up to 500 meters (1,640 feet) away for remote camera connectivity.
Setting Up a Wireless Video System
To create a wireless link for your cameras, coach iPad and other devices, follow these simple steps:
1. Understand Your Wireless Needs
Start by evaluating your setup:
- Distance: How far is the camera from your main production area? For long distances, use equipment like the Ubiquiti PowerBeam or LiteBeam, capable of handling ranges up to 20 kilometers.
- Bandwidth: NDI|HX cameras require around 10-20 Mbps per stream depending on the bitrate you set. Ensure your wireless equipment can handle the combined bandwidth of all your cameras.
| Product | Range | Max Throughput | Use Case | Approx. Price (USD) |
| UniFi Building-to-Building Bridge (UBB) | Up to 500 meters | 1.7 Gbps | Short-range, high bandwidth | ~$300 |
| LiteBeam 5AC Gen2 | Up to 10 kilometers | ~350 Mbps | Medium-range, cost-effective setup | ~$90 |
| PowerBeam 5AC Gen2 | Up to 20 kilometers | ~450 Mbps | Long-range, robust performance | ~$120 |
| airFiber 24 | Up to 13 kilometers | 1.4 Gbps | Professional-grade, minimal interference | ~$3,000 |
| NanoBeam 5AC Gen2 | Up to 15 kilometers | ~450 Mbps | Compact, mid-range applications | ~$120 |
2. Choose the Right Ubiquiti Gear
Ubiquiti offers various solutions depending on your range and setup:
- Short-range (up to 500 meters): UniFi Building-to-Building Bridge
- Mid-range (up to 10 kilometers): LiteBeam 5AC Gen2
- Long-range (up to 20 kilometers): PowerBeam 5AC Gen2
These devices create a point-to-point wireless connection, effectively replacing long Ethernet cables.
3. Install and Align the Wireless Devices
Wireless devices need a clear line of sight to function properly. Position one device near your camera and the other at your production hub. Use Ubiquiti’s built-in alignment tools to fine-tune the connection for maximum signal strength. Ubiquiti includes flexible pole mounting options which you can use to secure the wireless transmitters to a sturdy tripod or speaker stand. Once secured, it’s recommended to raise the transmitted up and over any obstacles to ensure a solid line of sight connection.
4. Connect Your Camera
Plug your camera into the Ubiquiti transmitter using an Ethernet cable. On the receiving end, connect the Ubiquiti device to your production computer or network.
5. Test Your Setup
Always test the connection. Check for latency, signal stability and video quality. You can log in to your cameras and other devices to make adjustments to the video bitrate if necessary. You usually want to use a lower bitrate for wireless cameras than you would with hardwired connections.
Why Go Wireless?
A wireless camera system gives you the flexibility to place cameras in optimal positions, even in challenging venues. With Ubiquiti’s high-performance gear, you can ensure a stable connection, giving your audience the best possible view of the action—no matter where it happens on the field or court.
In the next section, we’ll explore specific camera angles for popular sports and how to frame your shots for maximum impact. Whether you’re live streaming basketball, soccer or baseball, the right combination of camera placement and reliable wireless setup will take your production to the next level.
Understanding the Flow of Sports
Each sport has its own unique rhythm and flow and your camera placements should reflect that. Understanding how the game moves, where key moments happen and how to cover those moments will guide you in setting up the right shots. Here’s a quick breakdown:
- Field Sports (Soccer, Football, Rugby): These sports involve large playing fields with constant movement across a wide area. You’ll need wide, sweeping shots that can capture the flow of the game, along with occasional zoom-ins for key moments.
- Court Sports (Basketball, Volleyball, Tennis): These sports are faster-paced and confined to smaller areas. You’ll need a mix of wide shots to show team dynamics and close-ups to capture the intensity of one-on-one moments.
- Individual Sports (Swimming, Track & Field, Martial Arts): Here, the focus is often on one or two athletes at a time. You’ll want to focus on tight framing and dynamic angles that emphasize the athlete’s effort and skill.
- Extreme and Action Sports: These sports (such as skateboarding or snowboarding) often require a combination of stationary and action cameras that follow the athlete through fast-paced, unpredictable environments.
General Guidelines for Camera Placement
While each sport will have its own specific camera requirements, there are a few general rules to follow when determining camera placement for any live sports stream:
- Cover the Entire Field of Play: Ensure that no matter where the action happens, your cameras can capture it. For field sports, that might mean using wide-angle shots from a high vantage point, while for smaller courts, a central position may suffice.
- Anticipate Key Moments: Different sports have moments that fans always expect to see (e.g., goals, touchdowns, slam dunks). Make sure your cameras are positioned to capture these critical moments with a clear and unobstructed view.
- Multiple Camera Angles: Using multiple cameras allows you to capture different perspectives. A main camera for wide shots, secondary cameras for close-ups and mobile cameras for sideline or action shots are key to delivering a dynamic experience.
- Avoid Obstructions: Pay attention to potential obstructions like poles, scoreboards or referees that could block the view at key moments. Ensure that your cameras are placed where they can track the action smoothly without interruption.
- Respect the 180 Degree Rule: For sports that move primarily back and forth between two goals on the field (like soccer, football or hockey), it’s crucial to follow the 180 degree rule. This means placing all cameras on the same side of the field, typically along one sideline. By adhering to this rule, you ensure that the direction of play remains consistent from all camera angles, making it easier for viewers to follow the action and understand which way the game is progressing.
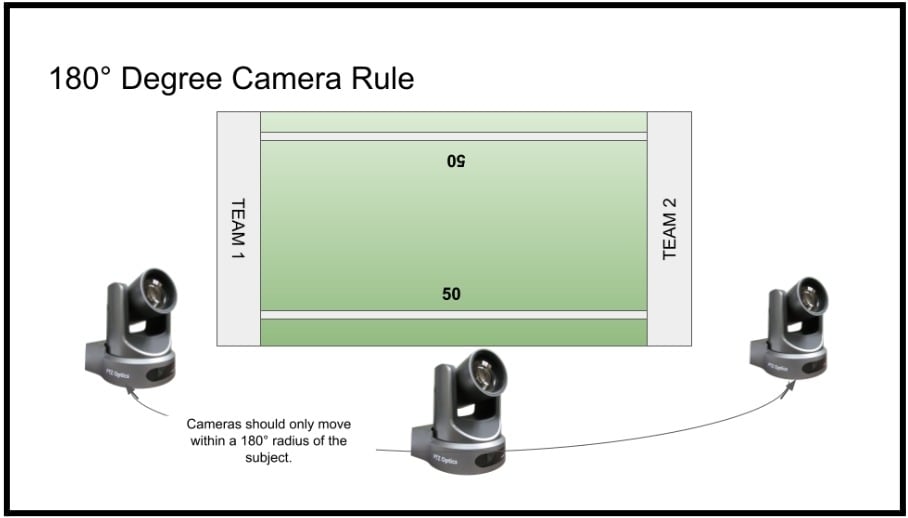
The 180 degree camera rule
The 180 degree rule helps maintain spatial continuity for the audience. When all cameras are on the same side, a team moving left to right on one camera will always be moving left to right on all cameras. This consistency prevents disorientation and confusion that could occur if cameras were placed on opposite sides of the field.
While there may be exceptions for specific shots or replay angles, the main game action should generally be captured from cameras positioned within this 180 degree arc. This approach has become a standard practice in sports broadcasting, creating a more coherent and enjoyable viewing experience.
Rule of Thirds
This timeless compositional guideline divides the frame into nine equal parts using two equally spaced horizontal lines and two equally spaced vertical lines. Placing important elements along these lines or their intersections creates balanced and aesthetically pleasing shots. This simple technique can significantly enhance the visual appeal of your videos.
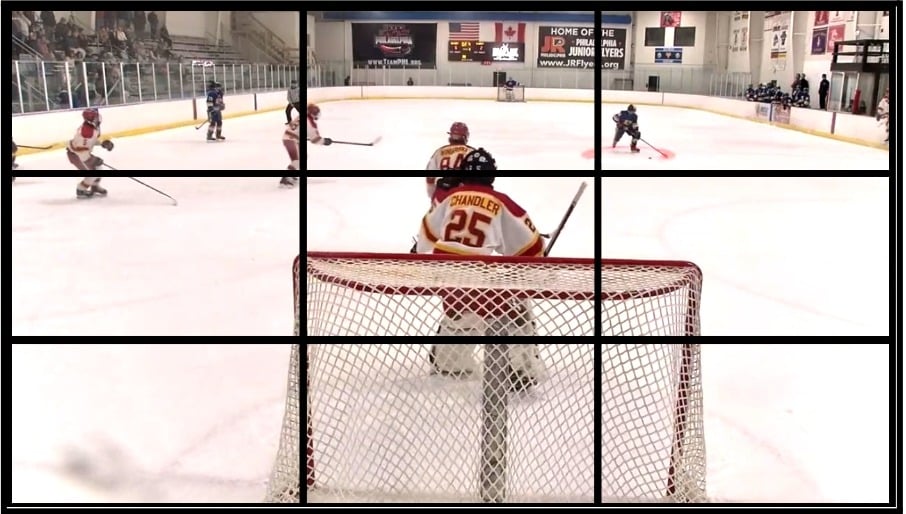
The rule of thirds will help to guide your shot compositions
Soccer/Hockey

Multi-Camera Sports Streaming for Soccer
Camera Roles and Framing in Soccer Game Live Stream
This four-camera setup enables dynamic coverage of the soccer game, each camera strategically positioned for specific purposes to capture every critical angle and aspect of the gameplay.
- Center-Field Cameras
- Cam 1 (Wide Shot):
- Positioned to capture a broad view of the field, this camera keeps between 25% and 50% of the field in frame.
- Primarily used for general gameplay coverage, ensuring the main movements and flow of the game are visible.
- This wide shot helps to establish the game’s overall context, allowing viewers to follow the ball and the teams’ positioning as they move across the field.
- Cam 2 (Tight Follow):
- This camera focuses on a head-to-toe shot of the player with the ball along with 1–2 nearby defenders.
- Used to capture intense, close-up shots following the player at fault after a penalty or to track the scoring player after a goal and the goalie after a save.
- It provides an up-close perspective on individual player actions, highlighting key moments and celebrations and offering a more intimate view of player expressions and reactions.
- Cam 1 (Wide Shot):
- End-Field Cameras
- These cameras typically switch between wide field views and tight follow shots, depending on the situation:
- Wide Field View:
- Generally framed to show the entire width of the field (from sideline to sideline).
- Ideal for tracking players who are offside on the near side, capturing crowd reactions and framing substitutions and throw-ins.
- Tight Follow for Specific Scenarios:
- Primarily used for corner kicks, focusing on the players assembled near the goal and tracking the ball as it enters the frame and action unfolds.
- Follows the goalie for goal kicks, staying wide enough to capture the play’s development and the movement of players across the field.
- Used for hero shots (low-angle shots that capture players as they prepare for or celebrate key moments) and capturing coaches and benches during key moments, as this setup often provides one of the only angles able to capture the sideline areas.
- Wide Field View:
- These cameras typically switch between wide field views and tight follow shots, depending on the situation:
Together, this layout provides full coverage of the soccer game, balancing wide shots to track general play and tighter shots to emphasize individual players, goals and celebrations. This arrangement ensures an engaging viewer experience, allowing audiences to follow both the game’s progress and its more personal, emotional moments.

This layout shows four cameras from the “Broadcast” side of the field.
Example Equipment List
Cameras & Accessories
- Camera 1 (Center-Field – PTZ 20X)
- Purpose: Wide shot covering 25-50% of the field.
- Location: Center of the field near the streaming equipment.
- Ethernet Cable: 30 feet (for data and power through PoE).
- Tripod: 15-foot tripod.
- Camera 2 (Center-Field – PTZ 20X)
- Purpose: Tight shot of players with the ball.
- Location: Center of the field near the streaming equipment.
- Ethernet Cable: 30 feet (for data and power through PoE).
- Tripod: 15-foot tripod.
- Camera 3 (End-Field – PTZ 30X)
- Purpose: Goal-focused close-up from the opposite end.
- Location: One end of the field.
- Ethernet Cable: 300 feet (for data and power through PoE).
- Tripod: 15-foot tripod.
- Camera 4 (End-Field – PTZ 30X)
- Purpose: Goal-focused close-up from the opposite end.
- Location: Opposite end of the field from Camera 3.
- Ethernet Cable: 300 feet (for data and power through PoE).
- Tripod: 15-foot tripod.
Production Table & Accessories
- Foldable Table: Sturdy folding table to house production equipment.
- Two Power Strips: Multi-outlet power strip to supply power to multiple devices.
- Cart: If you are setting up for an away game or simply bringing gear in and out of any space, a cart with wheels is a great accessory.
Network & Power
- PoE Network Switch
- Purpose: Supplies power and data to all cameras.
- Ethernet Cable to Router: 5 feet.
- WiFi Router
- Purpose: Connects the WiFi tablet to vMix for instant replay access.
- Ethernet Cable to Network Switch: 5 feet.
- Streaming Computer (Running vMix)
- Purpose: Central production system for receiving NDI feeds, streaming and controlling instant replays.
- Ethernet Cable to Network Switch: 5 feet.
Control & Monitoring
- PTZ Controller
- Purpose: Controls PTZ cameras for manual adjustments and auto-tracking.
- Ethernet Cable: 5 feet (if connected via Ethernet to the network).
- LCD Monitor
- Purpose: For viewing live feeds and monitoring production.
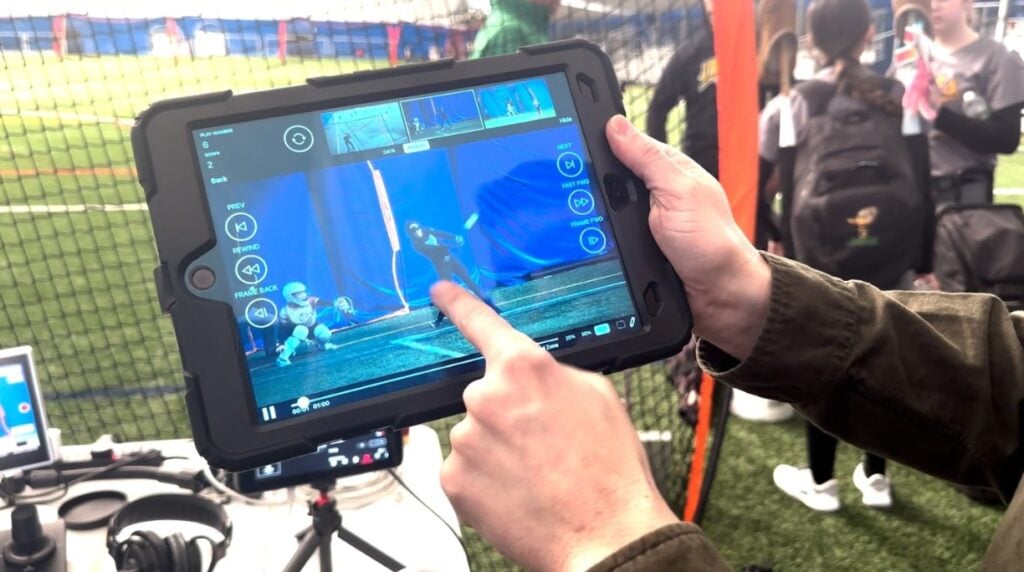
- Tablet (Touchscreen)
- Purpose: Displays instant replays for coaches and referees via LiveLAN from vMix. Touchscreens are great for fast paced sports. They can be used for quick video switching, camera controls or annotations.
- Connection: Wireless, connected through the WiFi router.
Audio Equipment
- Audio Mixer
- Purpose: Manages audio input from microphones and adjusts audio levels for the live stream.
- Shotgun Microphone
- Purpose: Captures ambient sound from the field.
- Microphone Stand: For stable placement of the shotgun microphone near the field.
Replay & Streaming Systems
-
- Roland 20P-HD Instant Replay System
- Purpose: Provides instant replays through HDMI output to vMix or the LCD monitor.
- HDMI Cables: Required for connecting the Roland 20P-HD to vMix and monitor.
- Roland 20P-HD Instant Replay System
- SkyCoach
-
- Purpose: Provides sideline instant replays to wireless tablets for coaching.
- Setup: Requires wireless transmission system for each camera.
- Optional Cellular Bonding System
- Purpose: For stable, high-quality streaming when a wired network connection is unavailable, ideal for remote locations.
Summary of Cable Lengths
| Item | Cable Length |
| Camera 1 (Center-Field 20X) | 30 feet |
| Camera 2 (Center-Field 20X) | 30 feet |
| Camera 3 (End-Field 30X) | 300 feet |
| Camera 4 (End-Field 30X) | 300 feet |
| PoE Switch | 5 feet |
| WiFi Router | 5 feet |
| Computer | 5 feet |
| SuperJoy Controller | 5 feet |
| HDMI Cables | Various, as needed for connections |
Basketball live streaming system set up

Basketball live streaming system set up
Basketball
Suggested Camera Layout:
- Main Camera: High center court, capturing the entire court action from sideline to sideline.
- Baseline Cameras: One camera behind each hoop for capturing fast breaks, dunks and close-range shots. This is also great for foul shots.
- Sideline Camera: At ground level for sideline shots of coaches, players on the bench and court-level action.
This four-camera setup provides complete coverage of a basketball game, with each camera serving specific purposes to capture the fast-paced action, critical plays and close-up details of the gameplay.
- Camera 1 – Game Follow (Wide Shot):
- Positioned to deliver general coverage of gameplay from a wide perspective, this camera is the primary on-air angle and remains active for most of the broadcast.
- Smooth pans from left to right are used to follow the game’s flow, with slow zooms in and out to reduce empty space, keeping the action centered and dynamic.
- When a team is setting up an offense, the framing should place the basket on one side and the last offensive player on the opposite side for balanced coverage of the court.
- Key Responsibilities: Since this camera is on-air frequently, the operator should always anticipate being on tally, ensuring smooth, consistent movement.
- Example Clip: An isolated recording of the Game Follow camera showcases its ability to track wide movements and capture the full context of plays.
- Camera 2 – Tight Follow (Close-Up):
- This camera focuses on a tight, head-to-toe shot of the player with the ball and the nearest defender, capturing close-ups of intense interactions.
- Used to track the player responsible after a foul and to highlight individual players after a score or defensive stop.
- Additional Uses: Often follows players off the court during substitutions and provides tight shots that enhance what commentators are discussing during the game.
- Key Responsibilities: Ideal for capturing player emotions, this camera must be ready to switch quickly between active players and ensure focus on individual movements for dramatic effect.
- Example Clip: An isolated recording of the Tight Follow camera demonstrates its precision in capturing specific players and moments.
- Cameras 3 & 4 – Handhelds (Close Side and Under-Basket Action):
- These cameras capture head-to-toe shots of the player with the ball, especially effective on the side closest to them, providing high-quality replays from under the basket.
- Primary Role: Though less used in live action, these cameras are essential for replays and close-ups of key moments, such as fouls, baskets or crowd reactions.
- Perfect for capturing action under the basket, framing up shots of players taking free throws (typically waist-up) and gathering crowd shots when needed.
- Additional Uses: During substitutions, these cameras show players entering or exiting the court and capture sideline shots of coaches or announcers as needed.
- Key Responsibilities: Even when the players are on the opposite side of the court, these operators continue recording to provide valuable replay angles. They also maintain awareness of baselines for any out-of-bounds situations important for official replays.
- Example Clip: Isolated recordings of these handheld cameras display their versatility in capturing up-close action, player reactions and providing dynamic shots for production highlights.
This multi-camera setup allows for seamless, engaging basketball coverage, balancing wide gameplay views, intense player close-ups and situational shots for commentary and replays, ensuring every aspect of the game is available to the viewers.
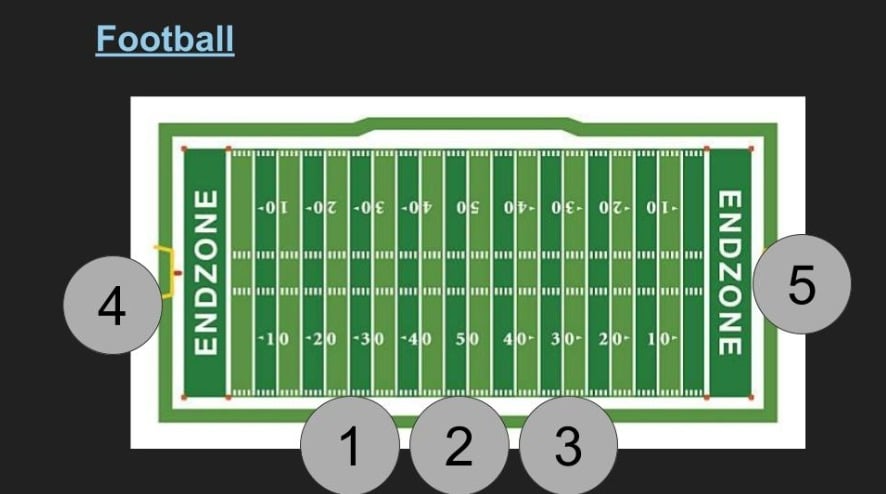
American Football
For covering an American football game, a five-camera setup provides comprehensive field coverage, focusing on essential game dynamics from various angles and distances.
- Main Sideline Cameras: Positioned high in the press box, three cameras span the length of the field. These offer sweeping coverage of plays, transitions and formations, capturing gameplay from a high vantage point that allows viewers to follow field positioning and player movements fluidly.
- End Zone Cameras: Two cameras, each mounted on a 15-foot-high tripod in both end zones, capture goal-line action and close-up views of touchdowns, player celebrations and defensive stands.
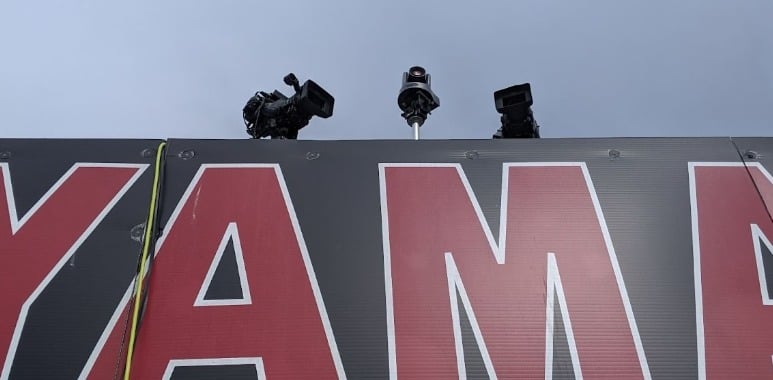
The Palmetto Tigers are a high school football team using two camcorders and a center PTZOptics camera.
Camera 1 – Wide Game Follow (Primary Shot):
- Position: Center sideline, high above the field in the press box area.
- Function: This camera provides a broad view (2/3rds) of the game, capturing the action for live coverage.
- Use: It follows the flow of the game, panning smoothly to track plays as they unfold across the field.
- Key Responsibilities: This camera operator should anticipate play direction, ensuring smooth panning and framing that maintains balanced coverage. Positioning should include both end zones when possible for a full-field perspective.
Camera 2 – Tight Game Follow (Close-Up of Plays):
- Position: Sideline, high in the press box, focusing tightly on players involved in the play. Generally focused on ⅓ of the field.
- Function: This camera captures tighter, head-to-toe shots of key players, particularly focusing on the quarterback, primary receivers or defenders closest to the action.
- Use: This angle is used for close-ups of player interactions, fouls and substitutions, capturing player expressions, reactions and individual achievements.
- Key Responsibilities: The operator must be ready to quickly switch focus, following individual players as needed to enhance the intensity of close plays and individual efforts.
Example Clip: A close-up shot displays the Tight Follow camera’s focus on individual player movements, capturing precise details of tackles, passes and runs.
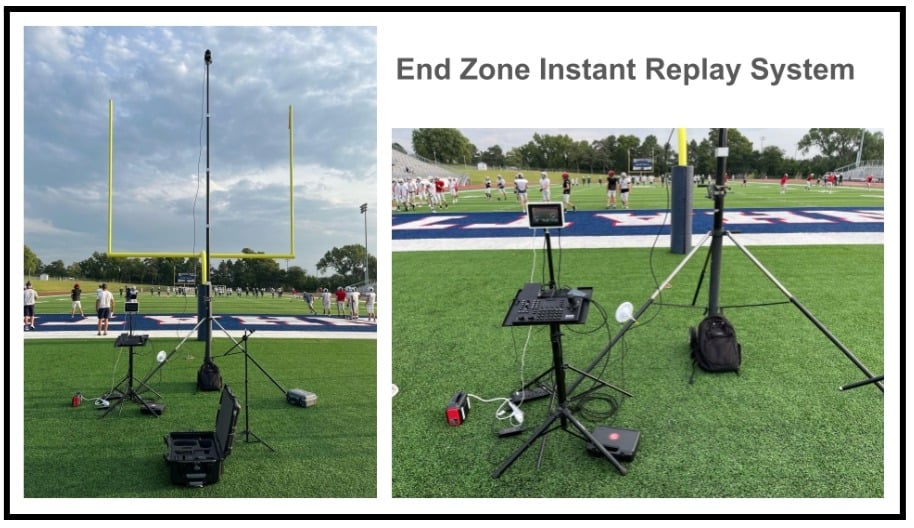
End Zone Streaming camera
Camera 3 – Secondary Sideline (Player Interactions and Benches):
- Position: Sideline, high press box, on the opposite side of the primary sideline camera.
- Function: This camera captures sideline interactions, player substitutions and coaches’ reactions, providing an alternate angle for detailed analysis.
- Secondary Function: This camera can be used for a “fan cam” or used to capture half-time shows or other fan engagement opportunities.
- Use: This angle is often used to capture players and coaches on the sidelines and it can track out-of-bounds plays or incidents occurring close to the field boundary.
- Key Responsibilities: The operator should maintain a close watch on the sideline for out-of-bounds calls, player substitutions and reactions, capturing emotional or strategic moments off the field.
Cameras 4 & 5 – End Zone Views (Goal-Line Action and Key Replays):
- Position: Each camera is mounted on a 15-foot tripod in both end zones.
- Function: These cameras provide critical goal-line views, capturing touchdowns, defensive stops and end-zone celebrations from a unique, close-up perspective.
- Use: These views are essential for live coverage and replays of scoring moments, tracking the ball as it crosses the goal line and capturing celebrations and critical plays from the end zone perspective.
- Key Responsibilities: Operators should follow the ball’s movement into the end zone and be ready to capture quick, decisive shots of the action near the goal line, which are particularly useful for replay reviews and scoring confirmation.
This five-camera setup provides a dynamic and comprehensive view of the football field, covering all aspects of the game, from full-field formations to goal-line intensity. With coordinated camera angles, each position captures unique perspectives that enrich the viewing experience with live action, close-ups and replay capabilities.
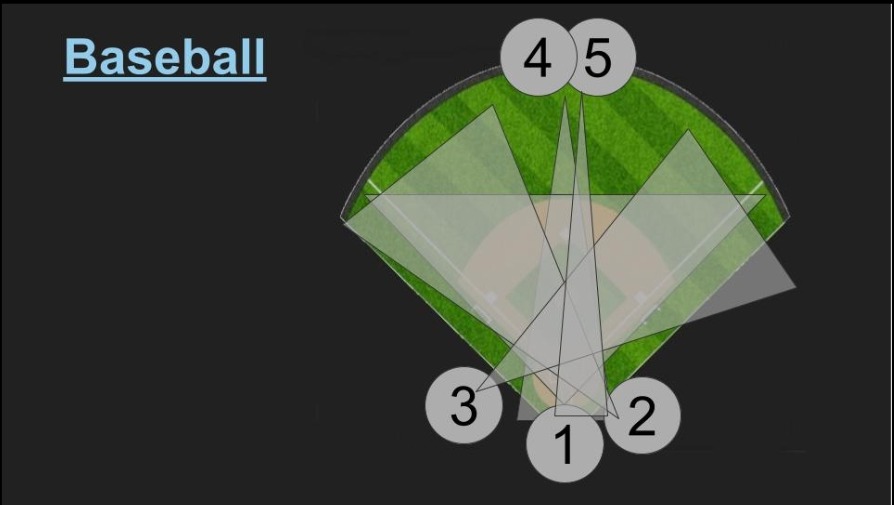
Baseball Suggested Camera Layout:
For baseball, a five to six camera setup provides comprehensive field coverage, highlighting the essential areas of action and maximizing viewer engagement. If you only have one camera the wide shot from a backstop is generally the best place to start.
-
-
Wide Shot from Backstop: Positioned behind home plate, this camera captures the entire field, providing a complete view of the action as it unfolds.
-
First Base Camera: Located near the first-base dugout or above, this camera captures plays at first base, a key area of action for defensive and offensive plays.
-
Pitcher-Batter Close-Up Camera: Positioned directly between the pitcher and batter, this shot focuses on the exchange between the two, capturing pitches, swings and the batter’s response.
-
Outfield Camera 1: Positioned behind the pitcher, over the shoulder, this camera provides an iconic view of the batter and pitcher, often requiring a wireless transmitter and a stable tripod with a 20X or 30X zoom to maintain clear, stable shots.
-
-
Outfield Camera 2: Positioned behind the pitcher, over the shoulder, but zoomed in further to show the batter close-up.
-
-
Third Base Side Camera: Positioned near or above the third-base side, this camera captures plays at third base, the home plate and incoming runs, providing essential coverage for scoring plays.
-
-
Pitcher Camera: Most professional broadcasts will include a camera dedicated to the pitcher.
Camera 1 – Wide Backstop Shot (Full-Field View):
-
Position: Behind home plate, providing a wide-angle view of the entire field.
-
Function: This is the primary camera for live coverage, capturing the whole field and giving viewers the context of each play’s location and movement.
-
Use: Ideal for tracking defensive alignments, player positions and base running, this angle ensures comprehensive coverage.
-
Key Responsibilities: This camera can mainly stay static and is used as a wide angle viewpoint and establishing shot.
Camera 2 – First Base Shot (Close-Up of Key Plays):
-
Position: Near the first-base dugout or above, with a wide angle on first base.
-
Function: This camera captures plays at first base, an area with frequent action as batters reach base or fielders attempt outs.
-
Use: Perfect for replays and close-ups of plays at first base, this angle captures critical defensive actions, pick-offs and runners reaching first.
-
Key Responsibilities: The operator should anticipate plays moving toward first base, framing shots to include the first baseman and runner as they approach, with tight zooms for replays when needed.
Camera 3 – Pitcher-Batter Close-Up (Pitching and Hitting Action):
-
Position: Located between the pitcher and batter.
-
Function: This camera focuses tightly on the interaction between the pitcher and batter, highlighting pitches, swings and the batter’s response.
-
Use: Essential for tracking pitch speed, ball movement and the batter’s swing, this angle is crucial for capturing the intensity of each pitch and hit.
-
Key Responsibilities: The operator should keep the pitcher and batter in frame, with precise focus and framing to capture close-up details of each pitch and hit.
Camera 4 – Outfield Over-the-Shoulder Shot (Long-Range Batter View):
-
Position: Behind the pitcher from the outfield, over the shoulder, with a stable tripod and a 20X or 30X zoom lens.
-
Function: This angle provides a unique perspective of the batter, often used for broadcast quality, capturing the batter and pitcher in line.
-
Use: Used to emphasize batting sequences, this view requires a wireless transmitter for flexibility and a stable mount to handle the zoom level without shake.
-
Key Responsibilities: The operator must maintain focus, accounting for the long zoom and ensure stability throughout the sequence to avoid camera shake.
Camera 5 – Third Base Side Shot (Home Plate Coverage):
-
Position: Near the third-base side, angled toward home plate.
-
Function: This camera captures plays from third base and home plate, offering a view for scoring plays and runners advancing.
-
Use: Often used for shots of the batter’s box, scoring plays and close-ups of players at third base, this angle provides flexibility for both live action and replays.
-
Key Responsibilities: The operator should focus on capturing plays near home plate and third base, adjusting angles as needed to cover both areas of high activity.
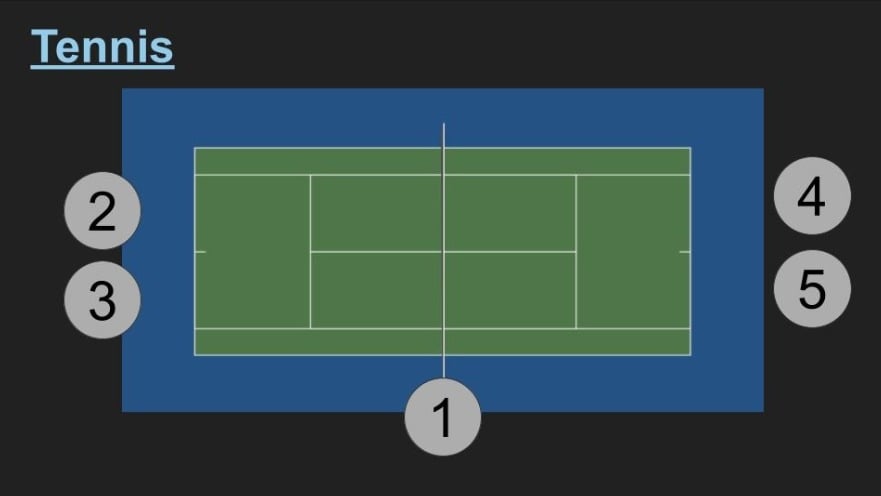
Tennis Suggested Camera Layout:
To capture the full intensity and athleticism of a tennis match, a multi-camera setup is ideal, going beyond the standard overhead view to include both wide and close-up perspectives at court level. This setup leverages PTZ cameras with automated tracking, which can follow players dynamically while maintaining appropriate zoom levels for each shot, giving viewers a detailed and immersive experience.
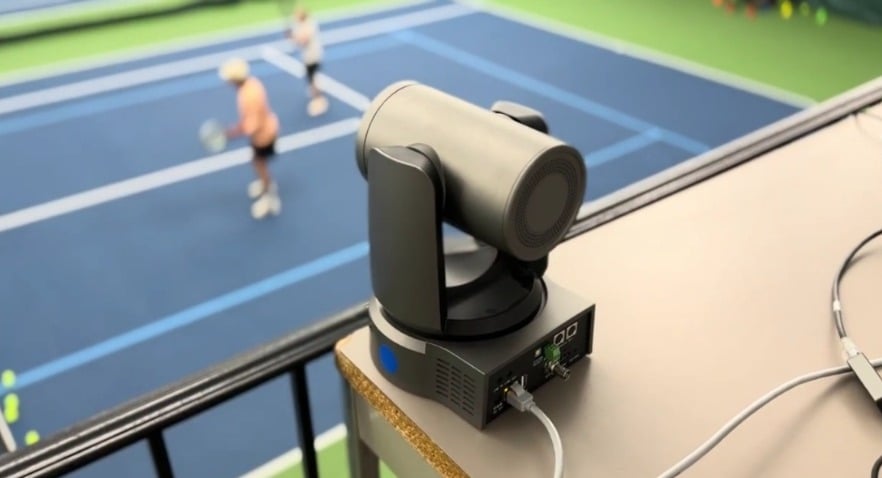
This PTZOptics Move 4K camera is powered over ethernet and is capable of auto-tracking.
Camera 1 – Overhead Wide Angle (Traditional Shot)
- Position: High above the court, positioned centrally to capture the full court.
- Function: This camera provides a traditional broadcast angle, displaying the overall play and player positioning on the court.
- Use: It captures both players and the entire court from above, ensuring a clear view of point progression and positioning.
- Limitations: While effective for showing the court layout, this angle misses the details of player movement, spin and pace, making it ideal for providing overall context but insufficient for highlighting intensity.
Cameras 2 & 3 – Court-Level Wide Angle (Side Shots for Each Half of the Court)
- Position: One camera on each side of the court, positioned at court level.
- Function: These cameras capture the match from each side, emphasizing player movement, the intensity of each shot and the ball’s spin and net clearance.
- Use: Typically, each angle is used on its respective side of the court and only switched between points or during serve changes to avoid viewer confusion.
- Key Responsibilities: Operators should set fixed zoom levels that allow viewers to appreciate player positioning, movements and ball dynamics without needing to adjust during play.
Cameras 4 & 5 – Tight Angles of Opposing Players (Close-Up of Player Movements)
- Position: One camera on each side of the court, positioned for a close-up of the opposing player.
- Function: These cameras capture tight, close-up shots that focus on each player individually, showing the speed, spin and power behind each shot.
- Use: These close-up angles reveal intricate player actions, such as swing intensity, net clearance and footwork, allowing viewers to see the pace and athleticism involved.
- Key Responsibilities: The tight angle cameras should be positioned to avoid rapid switches during active play. Operators (or automated PTZ tracking) should maintain focus on individual players, creating immersive close-ups for replays and breaks.
PTZ Tracking and Automation
- Feature: Using PTZ cameras with automated player tracking can enhance the broadcast by maintaining focus on players dynamically.
- Function: PTZ cameras auto-track player movements based on their fixed position and maintain steady, controlled zoom levels for smooth transitions.
- Use: Automated tracking keeps players in frame, adjusts angles seamlessly based on player positions and reduces the need for rapid manual adjustments, allowing the broadcast to keep up with the fast pace of tennis.
This multi-camera layout balances the traditional overhead view with dynamic, court-level perspectives. Each angle captures unique aspects of the game: the overhead shows the strategic layout, court-level wide angles highlight movement & ball dynamics and close-up shots give insight into the athleticism of each player. With PTZ auto-tracking, this setup provides comprehensive, engaging tennis coverage that captures every detail, speed and effort from each player.
Golf Suggested Camera Layout and Solution:
Covering a golf tournament requires a multi-camera setup that can capture wide, sweeping shots of the course, follow the ball’s trajectory and zoom in on player technique and reactions. A successful layout for golf includes cameras strategically placed at the tee, fairway, green and key vantage points along the course. With PTZ cameras and wireless capabilities, automated tracking and stabilized shots can follow both the ball and players smoothly across varying distances.
Suggested Camera Setup:
- Tee Box Camera – Close-Up of Players and Swing Technique
- Fairway Tracking Camera – Following the Ball’s Flight Path
- Green-Side Camera – Capturing Approach Shots and Putting
- Hole Overview Camera – High-Level Course Perspective
- Roving PTZ Camera – Flexible, Wireless Option for Additional Angles and Player Reactions
Camera 1 – Tee Box Camera (Close-Up for Player Swings)
- Position: Positioned near the tee box on each hole.
- Function: Captures close-up shots of the golfer’s setup, stance and swing mechanics.
- Use: This camera provides viewers with a clear view of the golfer’s technique, swing speed and focus, highlighting the initial ball launch.
- Key Responsibilities: With fixed zoom levels, this camera should follow the player through the swing and into the follow-through, capturing any immediate reactions.
Camera 2 – Fairway Tracking Camera (Ball Flight and Trajectory)
- Position: Positioned at a high vantage point along the fairway, aimed toward the landing area.
- Function: This camera follows the ball’s trajectory after the tee shot, tracking its flight path and approximate landing point.
- Use: Ideal for capturing long shots from the tee to the fairway, helping viewers follow the ball’s path and predict where it will land.
- Key Responsibilities: This camera needs strong zoom and tracking capabilities. PTZ automation is highly effective here, using pre-set tracking functions to follow the ball in flight.
Camera 3 – Green-Side Camera (Close-Up for Approach and Putting)
- Position: Near the green, positioned to capture approach shots and putting.
- Function: This camera zooms in on the player as they approach the green and follows their putts, capturing each putt’s speed, roll and precision.
- Use: Critical for showcasing the skill and strategy of putting, along with the subtle undulations and speed control required to sink a putt.
- Key Responsibilities: With precise zoom and focus, this camera should capture both the ball’s trajectory toward the hole and the player’s reactions, switching smoothly between these perspectives.
Camera 4 – Hole Overview Camera (Wide Shot of Entire Hole)
- Position: Elevated position to capture the entire layout of the hole from tee to green.
- Function: This camera provides a wide, high-level view of each hole, showing the layout, hazards and distance.
- Use: Great for context, this camera offers viewers an understanding of each hole’s unique challenges, showing bunkers, water hazards and elevation changes.
- Key Responsibilities: The operator can switch between static wide shots or slow pans, emphasizing the player’s journey from tee to green.
Camera 5 – Roving PTZ Camera (Player Reactions and Flexibility)
- Position: Mounted on a mobile cart or carried by an operator, with wireless capabilities for flexible movement across the course.
- Function: Captures additional angles, player close-ups and reactions, adding variety to the broadcast.
- Use: Used for player close-ups, crowd shots and spontaneous reactions, this flexible camera is ideal for capturing moments outside the standard play areas.
- Key Responsibilities: Operators can use this PTZ camera to zoom in on players between shots or capture reactions to highlight the emotional aspect of the game.
Archery, Riflery and other specialty sports
Covering archery, riflery, and similar precision sports requires a multi-camera setup designed to capture target accuracy, shooter technique, and the emotional intensity of the competition. These sports often demand high-definition, zoomed-in shots of targets alongside close-ups of participants’ focus, form, and reactions. The right camera setup ensures viewers can follow every moment, from the calm precision before the shot to the triumphant results.

Lancaster Archery Setup
Suggested Camera Setup for Archery, Riflery, and Specialty Sports
- Shooter Technique Camera – Focus on Form and Precision
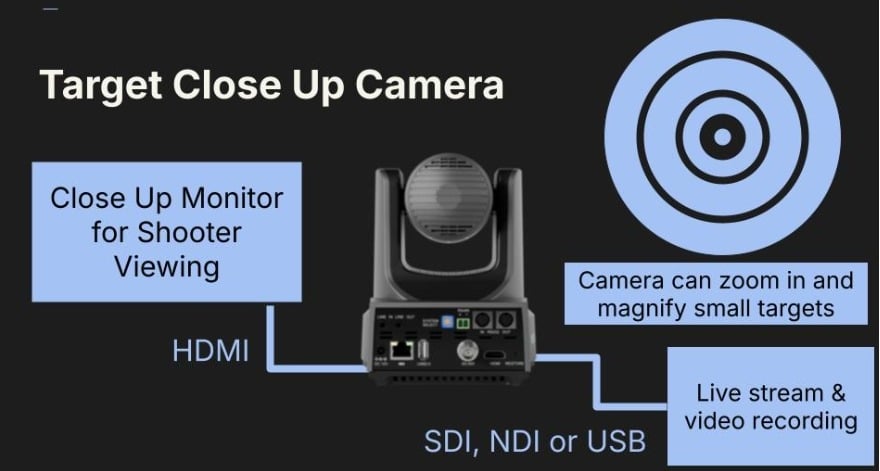
- Target Close-Up Camera – Highlighting Shot Accuracy
- Overhead Context Camera – Wide View of the Range or Competition Layout
- Official Review Camera – Capturing Scoring and Adjudication
- Roving PTZ Camera – Flexible Coverage for Dynamic Angles
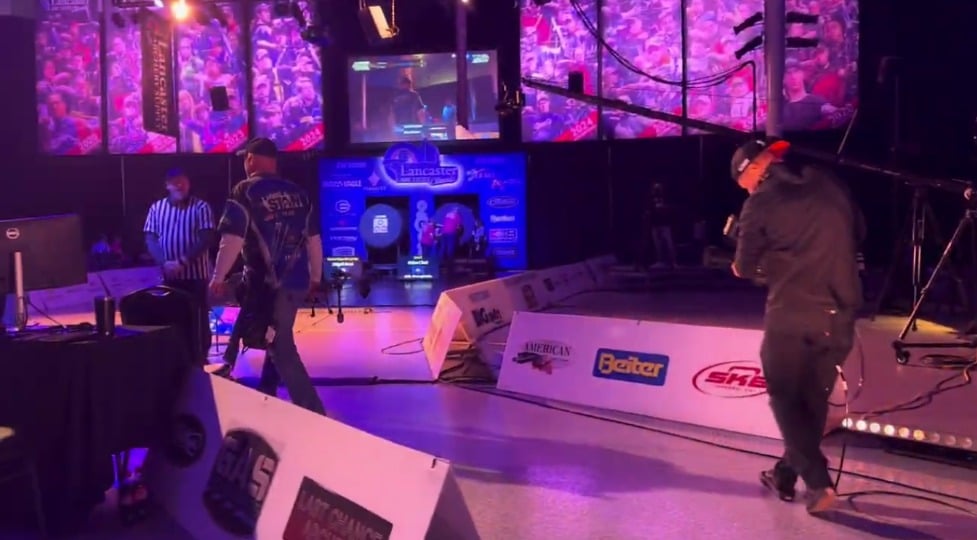
Lancaster Archery Live Streaming setup
Camera 1: Shooter Technique Camera (Close-Up for Form and Focus)
Position: Positioned near the shooter, capturing their stance and actions.
Function: Provides detailed close-ups of the shooter’s technique, focus, and actions during the shot.
Use: Ideal for training, coaching, and broadcasts where viewer engagement with the participant’s skill is essential.
Key Responsibilities:
- Capture the shooter’s setup, alignment, and release with clear focus.
- Zoom in on details like grip, hand position, and body alignment to emphasize skill.
Camera 2: Target Close-Up Camera (Accuracy and Results)
Position: Positioned downrange, with a clear line of sight to the targets.
Function: Focuses on the target, capturing arrows or bullets striking the bullseye in real time.
Use: Essential for slow-motion replays and judging the precision of each shot.
- Utilizes optical zoom to show precise impact points on the target.
- Switch between wide and close-up views of multiple targets as needed.
Camera 3: Wide Angle Context Camera (Range Layout and Events)
Position: Elevated position above the range or field of play.
Function: Provides a wide-angle view of the entire competition area, showing shooter lanes, targets, and audience areas.
Use: Offers context for viewers by showcasing the range layout, the positions of participants, and the overall event setup.
Key Responsibilities:
- Pan across the range to highlight different participants.
- Use zoom sparingly to maintain the broad context of the event.
Camera 4: Official Review Camera (Scoring and Adjudication)
Position: Near the scoring table or review station.
Function: Captures official reviews, scoring updates, and adjudication processes.
Use: Ensures transparency for viewers and provides close-ups of scoring decisions during live broadcasts.
Key Responsibilities:
- Zoom in on scorecards, judges, or reviews of target impacts.
- Maintain stability and clarity during scoring updates.
Camera 5: Roving Camera (Dynamic Angles and Reactions)
Position: Mobile, carried by an operator or mounted on a dolly for flexible movement across the venue.
Function: Captures spontaneous angles, player or team reactions, and crowd responses.
Use: Ideal for adding variety and energy to the broadcast by covering non-static moments and behind-the-scenes activity.
Key Responsibilities:
- Follow participants as they prepare or celebrate.
- Zoom in for emotional close-ups, crowd shots, or interviews.
Framing the Action
Once your cameras are in place, the next step is to frame the action correctly. Here’s how to ensure your viewers stay engaged:
- Wide vs. Tight Shots: Wide shots help viewers see the overall action, while tight shots give focus to individual players or moments. Use a combination of both to keep the stream visually interesting.
- Follow the Ball/Player: Ensure your camera operators (or automation if using PTZ cameras) are trained to follow the ball, puck or key player. This keeps the audience focused on where the action is happening.
- Focus on Key Plays: For certain moments—such as a goal attempt, free throw or sprint finish—tighten your framing on the player or ball. Highlighting these key moments can build excitement.
- Dynamic Angles: If you have multiple cameras, switch between wide, mid and close-up shots for a more dynamic viewing experience. For example, switch to a close-up right before a goal attempt, then return to a wide shot to capture the celebration.
Remote Camera Control and PTZ Cameras
Using PTZ (Pan-Tilt-Zoom) cameras can give you greater flexibility when it comes to framing your shots. These cameras can be remotely controlled, allowing you to pan across the field, tilt up or down to track vertical action and zoom in or out depending on the play.
- Preset Positions: You can program PTZ cameras with preset positions, allowing quick transitions between different angles, such as a wide-field view or a close-up on a specific player.
- Automation: Many PTZ cameras, including those from PTZOptics, offer automatic tracking options, which can follow a player’s movement without manual control, allowing for smoother transitions.
Proper camera placement and framing can elevate your sports live stream from ordinary to professional. Whether you’re streaming a local high school game or a major tournament, understanding the nuances of camera angles, placements and dynamic framing ensures that your audience stays engaged and never misses a moment.
In the next chapter, we’ll dive into best practices for operating cameras in sports production—a crucial step in elevating your broadcasts to a professional level.
Join the StreamGeeks Community and Start Streaming Like a Pro By downloading Sports Video: Recording, Analysis, and Live Streaming, you’ll gain access to:- Proven techniques for live production success.
- The tools to engage and grow your audience.
- Insights that will transform your approach to live video.
Download Sports Video Here
You can purchase the paperback here. <>Sports Video Chapters
- Download Sports Video here
- Chapter 1: Intro to Sports Video here
- Chapter 2: The Power of Sports Video here
- Chapter 3: Recording Sports Video here
- Chapter 4: Sports Video Analytics here
- Chapter 5: Using wide angle tactical cameras for sports video here
- Chapter 6: How to make sports highlight reels here
- Chapter 7: Sports Video Essentials Level 1 here
- Chapter 8: Portable Sports Video Systems here
- Chapter 9: Sports Video Analytics Systems here
- Chapter 10: How to Live Stream Sports Like a Pro here
- Chapter 11: Setting Up Cameras and Sports Equipment for Different Sports here