How to live stream an esports tournament
Written by Paul Richards on January 21, 2020
Why you should host an esports tournament
Esports tournaments provide an amazing opportunity for students interested in video games to get out of their at-home gaming area and into a community environment. While many parents see video gaming as a solo activity, there are a variety of ways that kids can now become involved in local community activities. Scott Novism, the owner of Bavous Youth Esports, has started an esports league called Evolve Youth Esports with the noble mission to, “Transform a love for gaming into a true sporting experience.” Evolve Youth Esports is one of the many video game leagues that are determined to offer, “more than just video games” to students in their area.
Novism is positive that getting kids together to play video games can help develop social skills. In fact, a recent study published in American Psychologist reports that “70% of gamers play with a friend” and “Playing video games, including violent shooter games, may boost children’s learning, health and social skills” (APA, 2014). Many worry that video gaming, as a sport, lacks the team-based community-building aspects of traditional sports. Parents may still reminisce about how baseball teams would meet up in person at a baseball field each week. This concern is quite valid. The lack of in-person community-based “get-togethers” for many video gamers could lead to what Novism calls “Synthetic Autism.” This is a term Novism uses to describe gamers spending too much time in front of screens, which can affect social development skills.
While a common fear among parents is that children who play video games will suffer from social isolation, the studies do prove otherwise. A team of researchers at the Norwegian University of Science and Technology found, “that video games are not the cause of some adolescent issues. Rather, the reason a child spends his or her time playing video games, like social isolation from peers, is more relevant.” The study includes data from interviews with 873 students surveyed every two years for six years. The results did provide insights that confirm video games are being used to “fill a child’s need to belong and desire to master tasks.” The report says “Children who struggle socially are more likely to turn to video games for entertainment” but overall, the study shows video games in a positive light (Science Daily, 2019).
Perhaps using video games as a mechanism to help children meet up in local communities can help build social development skills after all. Many students who play video games at local esports tournaments or gaming centers can build new relationships with friends in their local area. Novism says, “when we bring the students back together… it doesn’t take that long… if you get kids in the right environment where they are playing face to face… It is amazing how given the right opportunity, they will teach each other, learn from each other, and grow together…. That is what is missing online… It’s the non-verbal teaching that you get from peers that share your interests” (Maricopa, 2019).
When you help your local school or community host an esports tournament or gathering, you could be helping to foster more than just video gameplay. If you look at the experience of bringing children together to learn social skills, student participation and cooperation is more like modern education. Given how attracted children are to video games, competitions and events are becoming a popular way to get kids together in new and innovative ways. This brings us to our next chapter, live streaming your first esports tournament, to make it that much more exciting and powerful.
The basics for live streaming esports
If you have never live-streamed video gameplay before, it may seem like a crazy idea. Why would other people want to watch you play video games? It’s possible that nobody wants to watch you play video games, but it’s also possible that people online are interested in what you are doing. The excitement surrounding live-streaming
live streaming an esports tournament at school
esports is incredible. For parents and educators, the live streaming aspect of esports opens the opportunity to bring competitive or casual gaming into a new perspective that can connect your program with the world at large. Live streaming an esports tournament also fosters many non-gaming roles for student volunteers such as video producer, camera operator, on-screen talent, announcers, community organizers and much more.
Today’s top esports stars have advanced streaming systems that include fancy overlays, interactive extensions, and picture-in-picture overlays. Broadcasters in the esports world can often take gaming to the next level by interacting with their live audience and involving thousands, even millions, of viewers with their gameplay. You can capitalize on the excitement of esports in a group setting when you live stream an esports tournament. This can be a great opportunity to position yourself as someone who understands the esports community aspect of video gaming. Esports tournaments are amazing spaces that can create common ground for generations young and old to collaborate and spend time together.
In this chapter, you will learn how to live stream a very simple production of an esports tournament. Through this process, you can involve students in production, camera operation, social media, announcing, journalism, and much more surrounding the event. You can create a video production team just like a school broadcast club or you can simply manage a one-computer streaming system on your own. Whatever you choose to do, you will find that students are excited by live streaming and the idea of competitive gaming.
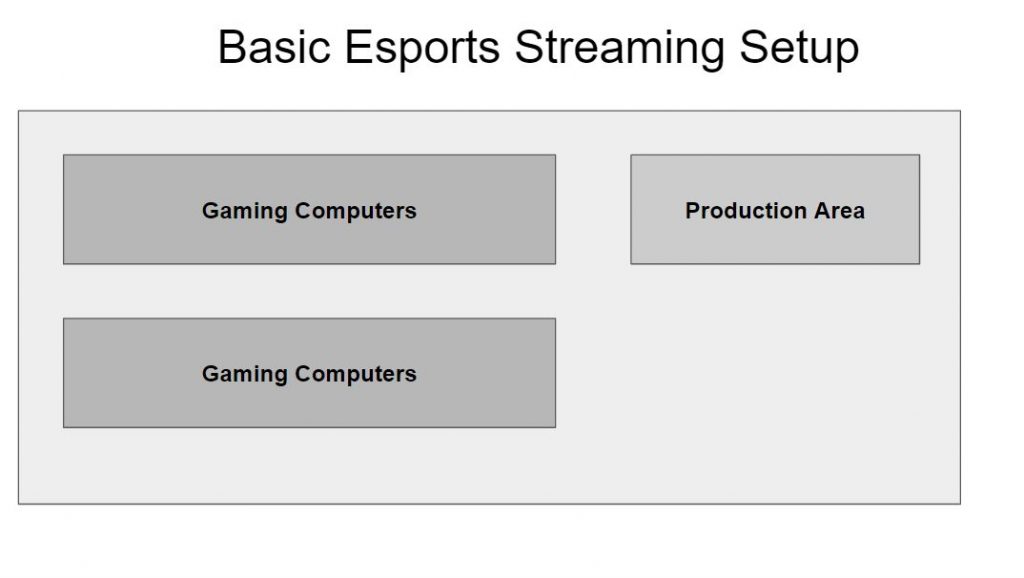
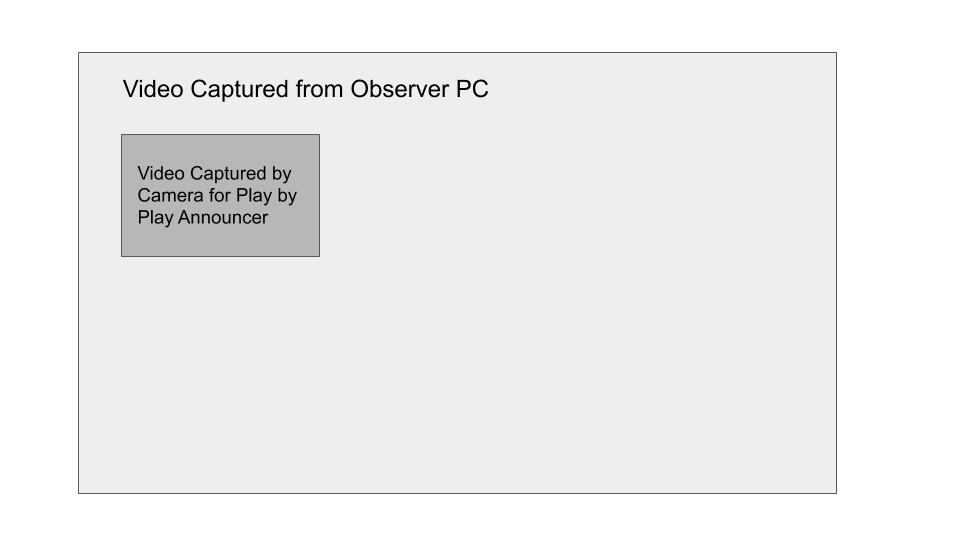
Let’s start with the basic concept of adding a live streaming element to an esports tournament. When esports tournaments are in session, there is generally a computer that is dedicated to the task of being an “Observer” of the game. An “Observer PC” is a computer that is connected to the same network as all the computers that are playing competitively. This computer can view the game being played from any player’s point of view. During a RocketLeauge tournament, for example, this computer will show sweeping camera views of the players who are closest to the action. This Observer PC can be used by your play-by-play announcer to quickly get an idea of what is going on in the game. The video output of this Observer PC can also be used by your production team to capture and stream the essence of most esports tournaments. During most esports tournaments the Observer PC is connected to a large LCD or projection system for spectators to view.
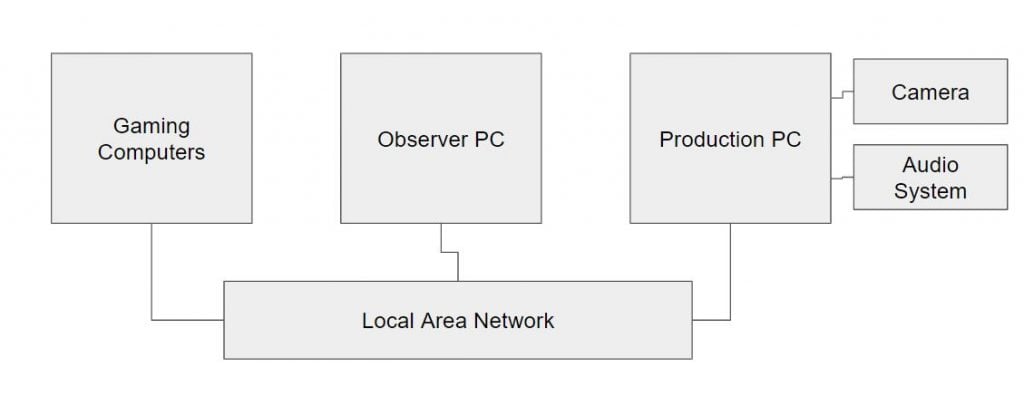
Basic Esports Network
As you can see in the diagram above, the Production PC has a camera and a microphone that is used for capturing a play-by play-announcer (aka the ShoutCaster). While the main screen focus may be the output of the Observer PC, it’s very popular to have a picture-in-picture element of the broadcast that includes a play-by-play announcer or an individual player webcam on top of the gameplay. There are a couple of different ways to capture the video from the Observer PC and bring it into your Production PC. In the next chapter, you will learn how to use free software called OBS (Open Broadcaster Software) with a plugin called NDI™. More advanced tournaments will likely use the free NDI Scan Converter software which accomplishes the same thing using less CPU processing power. But for this chapter, the demonstration will use a professional HDMI to USB capture card with an HDMI loop through.
The HDMI Pro Capture Card from Magewell here is used to capture the HDMI going from the Observer PC computer to the Observer PC monitor. The capture card device is able to pass through the HDMI output and produce a USB 3.0 video output that you can connect to your Production PC. Using one of the many popular live streaming production solutions available today, you can mix the Observer PC video with the video from your camera attached to the Production PC.
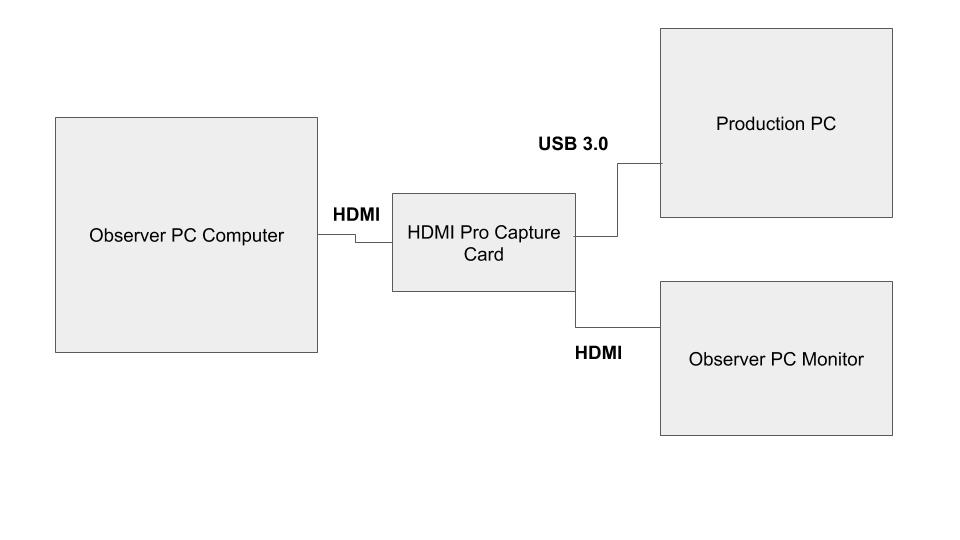
Observer PC Esports Streaming Network
In your video production software, you should have the following inputs.
- A camera input for your play-by-play announcer (connected via a SDI to USB 3.0 capture card).
- A video/audio input from your observer PC (HDMI is used to capture both video and audio) (connected via an HDI to USB capture card).
- An audio input for the announcer (connected via USB 2.0).
You can use a pair of headphones to mix the audio levels between the play-by-play announcer and the gameplay audio. You can also consider adding some compression on the play-by-play announcer’s microphone, but this is something you can learn more about in the included online course.
This is a very high-level look at a simple production for a basic esports tournament. Once your software is set up, you can login to your CDN (Content Delivery Network) and retrieve your streaming credentials. The streaming credentials given to you by a CDN like Twitch allows you to stream from your video production software securely to your chosen streaming site. This type of streaming is called RTMP. RTMP stands for real-time messaging protocol and it used by CDNs such as YouTube, Facebook, and Twitch for streaming your live production over the public internet. It’s important to think about the differences between IP video that is on your LAN (Local Area Network) and video that sent over the WAN (Wide Area Network). The following diagram below helps to illustrate this process.
In the next section, you will learn how to capture unique gameplay from each player, add webcam views for each player, and organize a modern esports tournament with your own LAN. At the 2019 StreamGeeks Summit, one of the goals was to provide students with real-world jobs surrounding the esports tournament and that is exactly what you will learn in the next chapter. A troubleshooting guide for live streaming will be included in the online course. If any of these concepts are new to you, I highly suggest taking the included online course.
Advanced live streaming of esports tournaments
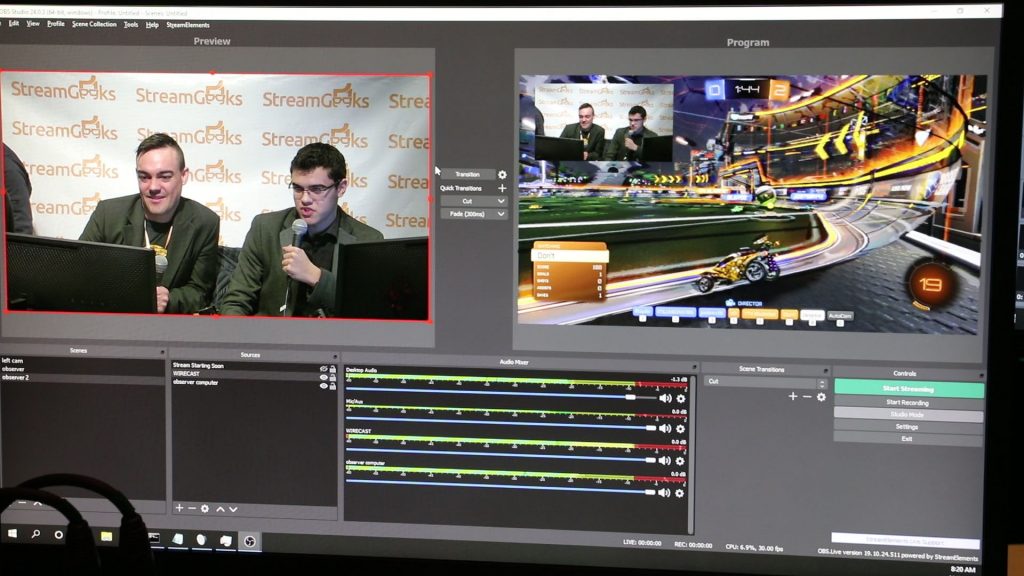
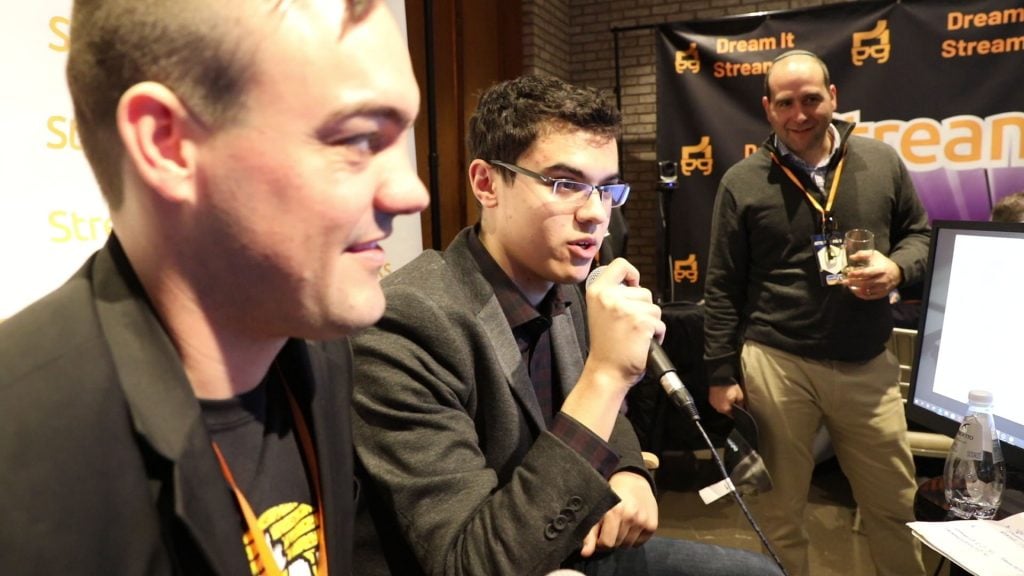
The StreamGeeks Summit happened on November 8th, 2019 in New York City. The tournament featured a 3-on-3 Rocket League setup with seven computers and a production PC all connected on one LAN (Local Area Network). There was a stage area with two student play-by-play announcers on camera holding microphones that were used for audio pickup. The student production crew had multiple PTZOptics NDI cameras available to use in order to zoom into the play-by-play announcers, but also to capture angles that show each of the gaming stations. Students from the S.A.R High School Broadcast Club were able to produce a 100% student-run live stream with the available audio and video sources. The entire student-run production was then live streamed to Twitch.
Get your esports team together
So where do you begin?
Let’s start with capturing the gameplay of each player and include a webcam video feed as well. With six players spread throughout our venue, the USB capture card method mentioned in the basic setup is not possible. Most live streamers do not recommend the use of more than two USB video capture cards with a single computer. This is due to USB bandwidth constraints with most computers. Instead of using expensive capture cards and video extensions, you can use IP video that leverages the ethernet cabling already connecting every computer.
Each of the esports computers should be connected to a local area network as a prerequisite to hosting the tournament. A local area network or LAN is basically an interconnected system that connects each computer for gameplay with ethernet cabling using networking equipment. This same networking infrastructure can also be used to connect each gaming computer to the Production PC.
In the planning stages of your esports tournament, you will want to know exactly how many computers and devices you will have on your LAN (local area network). Most networks can handle 254 connected devices, all communicating with unique IP addresses, without advanced configurations. The brain behind your LAN is generally a piece of networking equipment called a router. A router is used to manage all of the devices connected on your network. All devices on your network will need unique IP addresses in order to communicate properly. Your router can be used to manage your IP address table and give out IP addresses to devices automatically.
This is not something you generally have to worry about, and it will be covered in more detail in the books included online course. For now, just understand that each device can be assigned an IP address manually or automatically using DHCP. Assuming your router is set up to handle DHCP, it will automatically give any device connected to your network an IP address, unless that device has already been assigned an IP address manually.
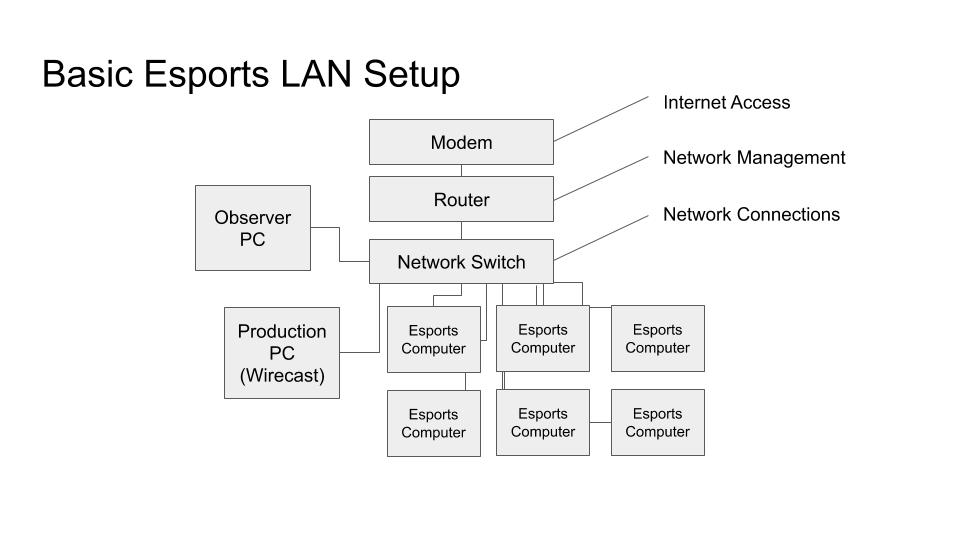
Take the above network for example. The modem providing the internet to your router is optional. If you plug a modem with internet access into your router, it will allow you to give all of the devices on your network internet connectivity. This is generally important for esports tournaments, not just for live streaming, but also for updating game software with the latest builds.
Connected to the router is a network switch. Network switches are used to connect devices together using ethernet cabling. As you can see, there are six “Esports Computers” connected to the network switch. Since they are connected to the network, the router will assign each computer an IP address using DHCP. Once each computer is connected to the same local area network, the RocketLeague software will automatically see each computer running the game on the network and allow the students to play the game together during the tournament. Also connected to the network, you can see the Observer and Production PCs. These computers can be used to send and receive video over the network. The Production PC will be receiving video from all seven computers on the network by the end of this setup.
As you can see noted the video production computer is running software called Wirecast. In fact, the students used a streaming solution called the Wirecast Gear for this production. Wirecast is a great software for video production. The students from the S.A.R High School who were operating the system use Wirecast to produce traditional sports productions like basketball during the school year. On each esports computer, you can install a piece of software called NDI Scan Converter to capture the gameplay and any webcam connected to the computer via USB. NDI Scan Converter is a free tool available from NDI that can be downloaded here: https://ndi.tv/tools/.
Once you are running Scan Converter on each of the esports computers, you can choose to customize your NDI video output. NDI can be used as a low-latency video input or output with almost any video production software including Wirecast, OBS, vMix, xSplit, Livestream Studio, MimoLive and NewTek Tricasters. Because all of these computers are connected over the same local area network, our production PC can automatically discover and use all of the NDI video sources on the network.
Another important part of the production connected to your LAN is the Observer PC. The Observer PC can also run Scan Converter to capture the video gameplay and output the video using NDI. The “Observer” feature of the RocketLeague software is available in almost all other competitive video games as well. Observer PCs have become an important tool for play-by-play announcers and esports coaches alike. The Observer PC should be set up to be viewed easily by your play-by-play announcers who will be using the monitor to do their job. Your production team should consider the Observer PC video input one of the main sources for their production. Just like a regular sports production, you want to give the audience a good overview of the field as the play develops. Transitioning to individual gamer screens should be reserved for special occasions happening during gameplay.
Your play-by-play announcers will have microphones for capturing their performances. Microphones are generally used with XLR connections that can be connected to a USB audio interface. A standard USB audio interface can mix together multiple XLR microphones and connect to your Production PC with a simple USB 2.0 cable. The play-by-play announcers will also be captured via video using a camera connected to your system. In the diagram above, you can see the system has two NDI capable PTZOptics cameras and an audio system for the play-by-play announcer microphones. You can also include microphones to pick up ambiance from the crowd and player’s voices during gameplay. NDI cameras can output video directly to your computer without the need of a capture card. PTZOptics NDI cameras also feature PoE (Power over Ethernet) capabilities making them easy to set up with an ethernet cable. This allows teams to connect a single ethernet cable to power the camera, control the pan, tilt, and zoom for the camera and receive video.
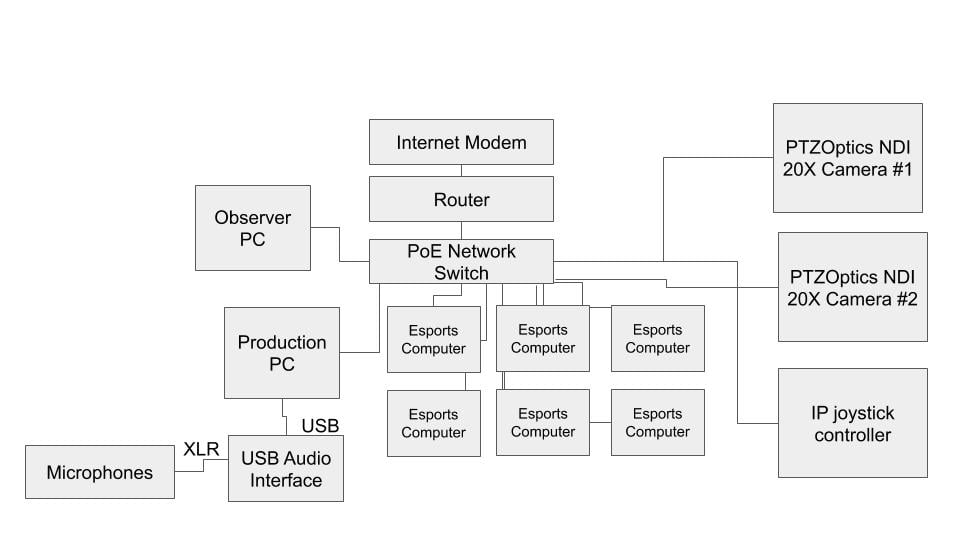
Advanced Esports Streaming Network
Another IP-connected device that gives students an important role in the production is an IP joystick. In this example, there is a PTZOptics IP joystick that is connected to the network. This joystick is able to operate the pan, tilt, and zoom operations of the PTZOptics 20X NDI cameras. Both the joystick and the camera can be powered over ethernet, assuming you are using a power over ethernet capable network switch. The IP joystick uses the PTZOptics camera’s static IP addresses to communicate. Unlike the gaming computers that use DHCP to get their IP addresses, devices like PTZ cameras usually keep static IP addresses. You can, of course, control PTZOptics cameras directly inside software like Wirecast or OBS, but a dedicated joystick controller can make your production easier to manage. This way your student producer can focus on the production with a reaction time similar to an esports player. Teamwork makes the dreamwork for esports tournaments. Plus the joystick gives a student volunteer an important real-world career experience as a live camera operator.
Preparing for a Live Stream
The first thing you will want to do before launching your first esports tournament is to create a table for all of your IP connected devices. In the example table below, you can see each device has a name, a friendly name, an IP address, and notes for your team.
|
Device |
Friendly Name | IP Address | Notes: |
| PTZOptics 20X-SDI | Rear Stage Left | 192.168.1.93 | Controlled by IP Joystick |
| PTZOptics 12X-ZCAM | GAMER ZCAM | 192.168.1.94 | Controlled by IP Wirecast |
| PTZOptics 12X-SDI | Rear Stage Right | 192.168.1.95 | Controlled by IP Joystick |
| IP JOYSTICK | Student Camera Operator | 192.168.1.97 | Student Camera Operator |
| NewTek Tricaster | Mainstream PC | 192.168.1.200 | Main Broadcast Area |
| Wirecast Gear Production PC | Student Broadcast | 192.168.1.202 | Esports Area |
| RocketLeague Observer PC | Shoutcaster | DHCP | 3 monitors + PC |
| RocketLeauge PC #1 | PC NVIDIA 1 | DHCP | 3 monitors + PC |
| RocketLeauge PC #2 | PC NVIDIA 2 | DHCP | 1 monitor + PC |
| RocketLeauge PC #3 | PC NVIDIA 3 | DHCP | 1 monitor + PC |
| RocketLeauge PC #4 | PC NVIDIA 4 | DHCP | 1 monitor + PC |
| RocketLeauge PC #5 | PC NVIDIA 5 | DHCP | 1 monitor + PC |
| RocketLeauge PC #6 | PC NVIDIA 6 | DHCP | 1 monitor + PC |
Friendly names are incredibly important with NDI devices specifically. Most NDI devices can have friendly names, which will populate in your software automatically notifying you of their purpose.
Once you have an IP table ready, it’s time to lay out your space and think about cable runs. If you are setting up a live stream in a space that already has esports computers set up, such as a computer lab or gaming center, you may only need to worry about cabling for your live streaming equipment. There are two popular ways to layout space for cable runs. There is software that uses 2D layouts like the picture above and software that uses 3D layouts like the picture below.
I highly recommend learning how to use Google Sketchup if you have time. Google Sketchup Make 2017 is available for free. You can use the 3D warehouse feature to import all kinds of premade objects to populate your space and plan out an amazing event. If you have a student who likes to learn new software, Google Sketchup will provide real-world skills in 3D design and architecture that they can certainly be added to their resume. The course included with this book will include a brief Google Sketchup tutorial, outlining how we built our StreamGeeks Summit layout from scratch.
Once you have laid out your space, you should consider the distance between your networking equipment and the devices you are connecting to your LAN. You may even want to consider putting a row in your IP address table for cable lengths. Once you have your cable lengths determined, it’s time to make some cables (or buy them). The course will also include tutorials on how to make your own SDI and Ethernet cables. If you don’t feel like making cables, you can always order the cables you need online. Teaching students how to make ethernet cables could be a very valuable lesson for an esports club. It is perhaps the most relevant cable to modern communications and certainly esports.
Once you have assembled all the cables that you need for your event, I highly recommended labeling each end of every cable. This is important for troubleshooting on the fly, as well as for permanent installations where you need to know which cable is going where. If there is an issue with one device, you can always go back to your networking gear and know exactly which cable is plugged into which device.
In fact, while you have your label maker out, go crazy! Label each camera with its NDI-friendly name and IP address. Label every box that equipment will need to be taken out of and eventually be put back in. Label every computer, monitor, power supply, and even the cables designated for each monitor, such as HDMI.
When you start to realize how many cables you will need to connect every computer, camera, and microphone into a complete ecosystem, you may start to feel overwhelmed. Labeling every cable and device helps in a big way. As you build out your checklist, it’s much easier to cross off cables on your list that have labels for the device that they go with, to make sure you have everything accounted for.
Setting Everything Up
- You have spent hours organizing your devices, labeling your cables, and transporting all your gear to the site of your next esports tournament. You remembered to ask about the location of the internet access at the venue and you are ready to get started. You are planning to run an extra-long ethernet cable to the venue’s internet access, but because you are being extra cautious, you are creating a checklist for each section of the tournament.
Before you arrive to set everything up, you should always plan a few meetings. Communication is key when you have multiple people on your team working together. In your meetings, you should be reviewing the layout, the equipment list, and the execution plan. Here is an example of the packing list for the 2019 StreamGeeks Summit:
| Esports Section | TriCaster Section | Wirecast Stream | Esports Production Section | Registration Booth Section | WorkShop Section |
| (X4) PowerStrips | (X2) PowerStrip | (X1) 24-Port Switch #1 | (X1) PowerStrip | (X250) Lanyards | (X1) vmix System |
| (2 each station) | (X3) NDI PTZ Optics | (X1) NETWORK SETUP | (X1) Step and Repeat | (X250) Name Tags | (X1) PowerStrip |
| (X2) Banners | (X3) Speaker Stands | (X1) WIFI SETUP | (X1) Observer PC | (X2) Pens | (X1) Keyboard Mouse |
| (X4) Banner Tripods | (X1) 24-Port Switch #2 | (X1) 12X NDI Zcam | (X1) Keyboard & mouse | (X2) Markers | (X1) 20X-SDI Camera |
| (X6) PTZ WebCams | (X1) Tricaster System | (X1) Wirecast Gear | (X2) MICROPHONES | (X1) Guest List | (X1) PoE Switch |
| (X6) Computers | (X1) Confidence Mon. | (X1) Audio Mixer | (X2) MIC STANDS | (X1) Audio System | |
| (X6) Keyboards | (X1) SDI to HDMI Conv. | (X1) KEYBOARD MOUSE | (X2) XLR CABLES | ||
| (X6) Mices | (X1) Monitor Stand | (X1) NDI ARCADE | (X1) BROADCAST DESK | ||
| (X6) HeadSets | (X1) KEYBOARD MOUSE | (X1) LCD MONITOR | |||
| (X6) Ethernet Cables | (X1) MAGEWELL NDI CAPTURE | (x1) OBS Streaming PC |
A packing list like this can be used to organize your equipment by area and assist in organizing your “day of” preparations. Once your packing list is made up, review it with your team so that you are not the only person who knows where everything is supposed to go. Once you have your packing list in place, it’s time to create your day-of to-do list. This is a list of everything that needs to be done, at what time, and by whom. Take a look at the following list from the 2019 StreamGeeks Summit.
| Time | Activity | Person | Details |
| 4:30 AM | Delivery of equipment from hotel rooms to Gallery | Paul/Melissa | Request Carts from Hotel night before |
| 4:30 AM | Uber Eats Coffee Massive Delivery Order | Michael | |
| 5:00 AM | Stage Build / AV & Lighting | AV Workshop | AV Workshop our vendor to handle |
| 5:00 AM | Running Power (Center Streaming Areas + Esports) | Paul/Melissa/Andy | Run Power Cables and Power Strips to each major streaming area |
| 5:30 AM | Cable Runs & Gaff Tape Down | Melissa, Stuart | Melissa to set up streaming system with help from team |
| 5:30 AM | Workshop Setup | Andy | vMix System, PTZOptics Camera on Tripod, Microphone on Stand, Projector connected |
| 5:30 AM | ESports System Setup | Todd Conley / Helix Esports | Plug in all computer and booth them up. Connect them to network cables |
| 5:30 AM | Speaker Stand Setup / Banner Setup | Sean, Kyle | Speaker Stands are for cameras. Use 1/4-20 screws. Banners are above esports areas and use 3 tripods and center pole |
| 5:30 AM | Broadcast Table Pop Up / 10′ Step and Repeat Banner | Matt / Pat | Instructions in bags. This goes next to esports table. Setup table and LCD on it with Observer PC. |
| 5:30 AM | Press Area Set up | Julia | Posters and Easels. Sponsors (on Columns). Schedules / Media Space |
| 6:00 AM | Table / Chair Arrangements | All Teams | All teams may need to help arrange tables with tech on them. They need to be in place to go further in our setup plans |
| 6:00 AM | Confidence Monitor setup SDI to HDMI | Matt/Pat | Build cart and connect SDI to HDMI converter. Connect power strip to converter and LCD. Put camera on top |
| 6:00 AM | LED Screen Setup | Be Terrific | One LCD in lobby and one next to esports areas |
| 6:00 AM | Network Configuration | Matt Davis | Should be plug and play. Review IP connections for all computers. |
| 6:00 AM | Poster & Easel Set Up | Tess | Posters and Easels. Sponsors (on Columns). Schedules / Media Space |
| 6:00 AM | MP3 Files on USB Stick (Test Laptop) Play Music on House Speakers | Tess | Play music to get team moving this early in the morning |
| 6:30 AM | Wirecast Streaming System Setup (Camera Focus) | Melissa Paul Richards | Make sure Wirecast machine is connected to all cameras and working. |
| 6:30 AM | OBS Streaming System Testing (Esports Focus) | Todd Conley | |
| 6:30 AM | Audio System Testing (Esports Area) | Melissa | |
| 6:30 AM | TriCaster Steaming System Testing | John Mahoney | |
| 7:00 AM | LiveU Stream Setup #1 | Paul | Setup LiveU with Wirecast and make sure it’s streaming properly |
| 7:15 AM | LiveU Stream Setup #2 | Paul | Setup LiveU with TriCaster and make sure it’s streaming properly |
| 7:00 AM | Registration Area Setup | Sean, Kyle | Set out badges and lanyards |
| 7:00 AM | Streaminng System Testing | Paul / Matt / Andy | Check to see if all NDI sources needed are available properly |
| 7:00 AM | PTZOptics Booth Setup (PTZO Backdrop) | Matt / Pat | Partner Team to layout display and brochures |
| 7:00 AM | Book Signing Area | Tess | Books should be out and ready with a small sign |
| 7:00 AM | Placement of signage (Small Signs for each area) | Julia | Final check over everything. |
| 7:30 AM | Empty Box removal | Julia / Tess | Can we move empty boxes and cartons to the Workshop area or press room? |
| 8:00 AM | General Testing | Everybody | |
| 8:00 AM | Microphone Test | Tess | |
| 8:00 AM | Powerpoint / Projector Test | Sean | |
| 8:00 AM | Start Streaming and Test EasyLive | Tess / Paul | Use Wirecast Computer to log into EasyLive… Check streams and start them |
| 8:30 AM | Paul & Tess Get on stage – Test Microphones | Paul / Tess | Review announcement speech |
| 8:45 AM | Paul makes a short speech | Paul | Play short video and presentation #1 |
| 9:00 AM | Facebook Panel Starts | Tess | Take speakers onto stage |
| 9:45 AM | Catchbox used for Q&A | Tess | Throw catch box into the crowd |
| 10:00 AM | Business Panel | Paul | Usher next panel onto the stage |
| 11:00 AM | Esports Tournament | Tess | Prepare for Esports Play-by-Play Announcements |
Staying organized is the key to successful events. Above, you can see each task starts with the time that the task should be executed. Managing this can be a great experience for students who want to learn the importance of planning and organization. It’s important to have someone on your team who is responsible for keeping everyone on pace with the schedule. Students who volunteer can put “Esports Tournament Admin” of “Community Manager” on their resume. This person is usually found with a clipboard, checking off completed tasks and helping along team members who have questions about the next steps. Real-world experiences like this can help open students’ eyes to the possibilities of entrepreneurship and the business of esports. Helping students realize and experience real-world skills is one of the most valuable reasons schools should host esports tournaments.
If you have planned everything out correctly, you should be well on your way to hosting a successful esports tournament live stream.
More Esports in Education Articles
- Download Esports in Education for free
- Introduction to Esports in Education
- History of video games & esports
- The study of video games
- What are the top esports tournaments?
- College Level Esports Programs
- Apply for the StreamGeeks Esports Scholarship
- How to start an esports club at your school
- How to live stream esports tournaments
- Getting the most educational value out of video games

Continue reading