Working with vMix Titles
Written by Paul Richards on October 26, 2020
Working with Titles
In an upcoming chapter, you will learn how to use the vMix GT Title Editor to create custom animated titles. But before you dig into creating custom titles, you should know it is incredibly easy to add lower thirds and graphics into your vMix production by using the included graphics in the Title/XAML input tab.

vMix Titles
To get started simply click Add Input and select Title/XAML. Here you will be presented with a variety of title templates that you can choose from and customize. If the title has a little GT diamond in the top left corner that means the title has been built with the GT Title Editor and includes an animation. Select a title from the menu and click OK.
Pro Tip: You can open these titles with the GT Title Editor and customize if you wish. You can find them located in the vMix folder on your computer inside of the Titles folder.
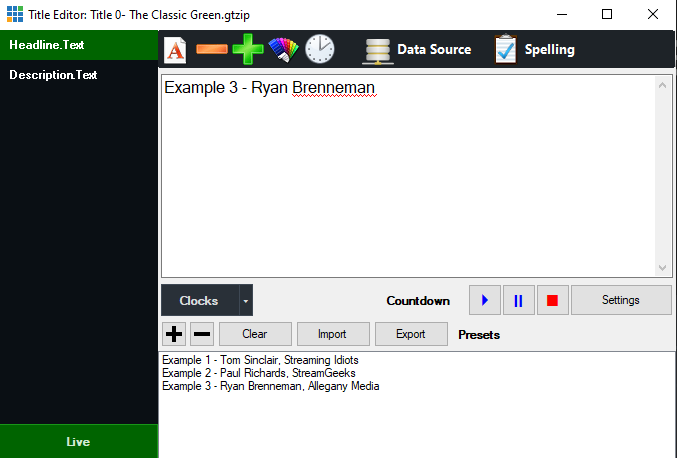
This will create an input inside of your vMix production for your selected title and open the Title Editor. You can reopen this Title Editor at any time by right clicking your title input. At the top of the Title Editor you have options for editing the text. You can alter the font, text size and color. The Data Source button allows you to map custom data from sources around the world directly into your title. Data sources will be covered in an upcoming chapter.

title editor
Many times, during a live production, titles have to be updated. vMix provides a list feature which can be used to build lists of information to quickly populate the titles when clicked on. You can use this feature by entering information into the title fields and clicking the + button. Each time you click the + button a new entry to the list will be added. You can click the – button to remove entries. In this way, you can quickly build a list and click the entry you would like to display inside of your title without having to enter the information in manually during your live broadcast.
Title Plus Buttons
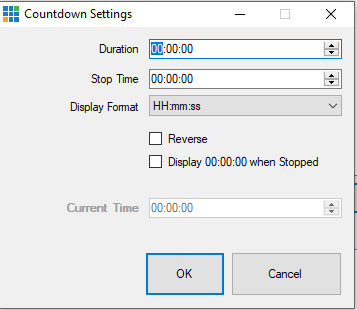
Some titles include countdown timers which can be set up using the Countdown Settings area. You can access Countdown Settings by clicking the Settings button next to the Countdown playback buttons. Many vMix producers connect Countdown timers with shortcut buttons to quickly reset countdowns during sports games for example. You will learn more about triggers and shortcuts for countdown timers in an upcoming chapter.
Title Countdown
Most countdowns start with a specific duration time. For example, you can setup a duration of 30 minutes, click the play button, and your timer will countdown from 30 minutes. You also have a number of formatting options to customize your title. You can choose to show different combinations of hours, minutes, and seconds in your titles. You can choose to reverse your countdown and you can choose to display the current time using the Clocks button.
Countdown Area
Pro Tip: Try setting up a shortcut to start and stop a countdown in your title.
Start Learning vMix
- What is vMix. Learn here
- Getting Started with the vMix interface here
- Learn how to work with vMix inputs here
- Mixing Inputs Together with vMix Multiview here
- Learn about vMix titles here
- Learn how to mix Audio in vMix
- Learn how to use VST3 audio plugins with vMix here
- Learn all about vMix settings here
- Learn about how to use vMix Full Screen and Multiview here
- Learn how to record video with vMix here
- Learn how to live stream with vMix here
- Learn how to use vMix video overlay channels here
- Learn how to make Stinger Transitions in vMix here
- Learn how to use social media comments in your live stream with vMix Social here
- Learn how to use vMix shortcuts here
- Learn how to use GT Title Editor to make custom vMix titles here
- How to use vMix Call to bring guests in your live stream here
- How to control vMix remotely with the web controller here
- How to use vMix color correction tools here
- How to use virtual sets with vMix here
- How to use NDI with vMix here
- How to control PTZ cameras in vMix here
- Learn how to connect vMix with Zoom using the virtual webcam output here
- Learn how to use automated playlists with vMix here
- Learn how to use data sources with vMix here
- Learn how to use vMix triggers here

Continue reading


