How to use vMix Color Correction Tools
Written by Paul Richards on November 10, 2020
vMix Color Correction Tools
A big part of making your live production look great is making sure your colors look realistic and match from camera to camera. vMix includes color correction tools that are advanced enough for color optimization experts yet simple enough that average users can improve their productions’ overall look. Color correction tools are available on every video input, including cameras, videos, and images.
Colour Correction Tools
Basic Color Adjust Tools
Those who just wish to make basic color adjustments may be content to work with the basic Colour Adjust tools. They can be accessed by clicking the gear icon on the selected input and choosing Colour Adjust. From this menu, you can adjust the black level, brightness, transparency, and saturation. You can also independently adjust the level of red, green, and blue. An auto white balance feature is also available.

Basic Color Adjust
Pro Tip: Most cameras can look better with just a bit of Black Stretch applied to their video feed from the “Colour Adjust” area of vMix.
Advanced Color Correction
For more color control, select Colour Correction from the input settings menu to access the professional color correction tools. The interface offers control over the lift, gamma, and gain. The lift adjusts the dark areas of the image, the gamma impacts the colors in between black and white, and the gain adjusts the bright areas of the image.

vMix Color Correction Tools
The most basic function on this menu is the Basic Auto Correct button that attempts to set the lift and gain controls to their optimum setting. Also found on this page are several reset buttons shaped as a circular arrow to undo any settings that you would like reverted to default.
Color Wheels
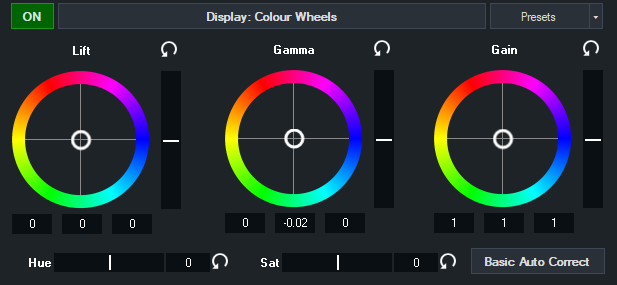
Color Wheels
The color correction tools inside vMix have three (3) wheels which are used commonly in video editing software. The first wheel represents the blacks (shadows) also called lift. The second wheel represents Gamma or mid-tones and the third wheel represents the highlights and overall brightness of the image. Each wheel adjusts a particular part of the image. The first wheel can be used to work with dark areas, the middle wheel works on areas which are usually skin tones and the final wheel is for the highlights. Using the three components of the color correction wheels allows operators the ability to do fine color correction in an intuitive layout. You can use gain control, for example, to adjust the yellows just in the highlight of an image.
An adjustment can be made on the color wheel by dragging the circle to the desired location. Adjustments can be made to all colors equally by using the Luminance/Brightness bar to the wheel’s right. Hue and saturation can be adjusted using the bar below the wheels.
Pro Tip: Try using the ON/OFF buttons to see the color corrections you have applied. Sometimes it’s worth seeing all of the changes you have made by looking back the original.
Color Bars
By clicking on Display Color Bars at the top, the view will be changed to color bars here. The red, green, and blue levels can be adjusted independently for lift, gamma, and gain. Color bars are easier to operate then wheels because wheels are constantly adjusting multiple colors with every change. Bars allow you to adjust a single color independent of others. If you are just learning how to perform color corrections or you are trying to fix a specific color issue, color bars may be easier for you to operate than wheels.
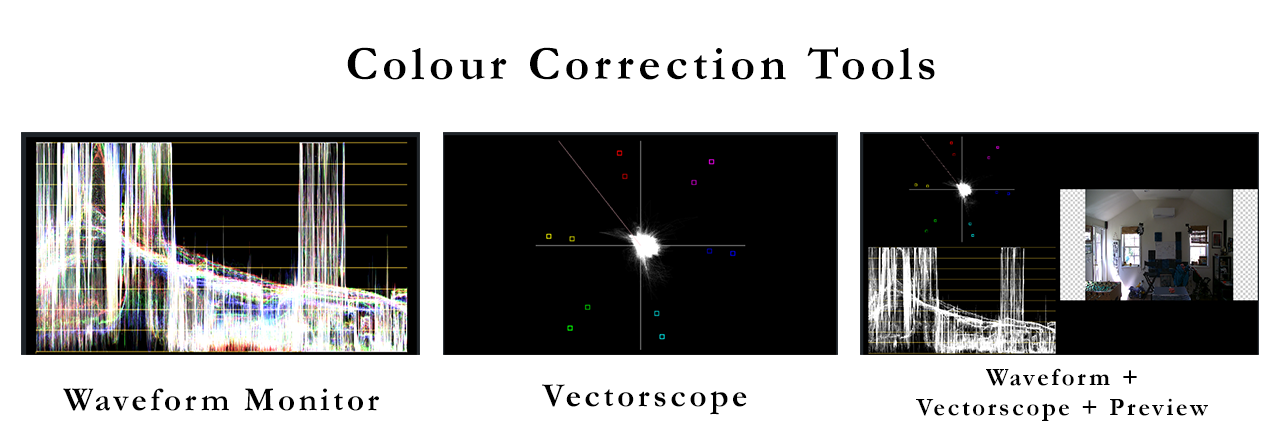
What is a Vectorscope?

Vectorscope
A Vectorscope is a tool that represents the color of your image. It is an x and y graph representation of the color accuracy of your live video feed. At the top of a Vectorscope you have red, toward the bottom you have cyan and there is also a green. The Vectorscope graph allows you to see the balance of the colors coming from your live video. To accurately tune a camera, you can put up a color chart in your space and zoom into it with your camera. The vMix color chart will produce lines that connect your current image with the ideal colors. A Vectorscope is a tool that is ideal for live video color correction without having to rely on your own eyes and potentially inaccurate monitor representations of an image. The Vectorscope is all about color and provides you with tools to accurately adjust your camera settings ideally on the camera side first. Once the camera has been accurately tuned the finishing color corrections can be done in vMix.
What is a Waveform Monitor?
For those with color correction experience or those who want to learn, vMix also includes several types of Waveform Monitors. The Waveform Monitor is the counterpart for the Vectorscope available to handle brightness and exposure. With a Waveform Monitor, you can easily see if your image is clipping at the top or if the blacks are getting crushed. The Waveform Monitor will allow camera operators the ability to adjust the image preferably in the camera first to ensure your image has a good exposure.
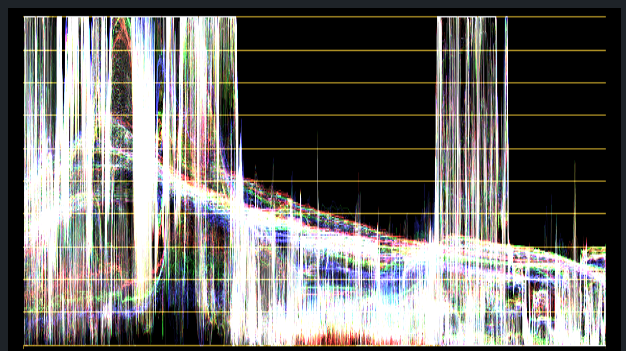
Wave Form Monitor
Ideally, you want your camera’s image to be within the limits of your Waveform Monitor. You can use vMix to make sure your video has perfect whites and blacks using the tools as needed. The tool can be accessed by clicking the small color bar box on the right side of the video preview. Each of the waveform monitor options can be viewed in a split-screen with a preview of the input or in a full screen independently. These are essential for completing precise color correction adjustments. Using the slide on the right, the zoom level of the image can be adjusted. Users can make adjustments to the color setting wheels and bars while seeing the precise impact on the waveform monitors. This can often help even novices detect and correct color issues.
Color Correction Presets
presets
Another tool built into the vMix color correction system allows users to save preset files that can be uploaded to other vMix inputs. This preset information can be useful for color matching cameras from different manufacturers. The preset will save your color correction information which can be applied to any other input in vMix. These presets may not get your image 100% corrected because every camera’s exposure will be slightly different.
Pro Tip: One of the key things with color corrections is starting with exposure and color settings inside the camera. Many times the highlights can be blown out before they even get into your video production software. Using a Vectorscope and waveform monitor you can bring down the range of your camera to make sure that you are not clipping your sensor’s full potential. These tools help you make sure that you are not crushing the blacks or overexposing the whites with the settings in your camera. The waveform monitor specifically allows users to stretch the exposure to the perfect white and black settings.
Input Video Preview Options
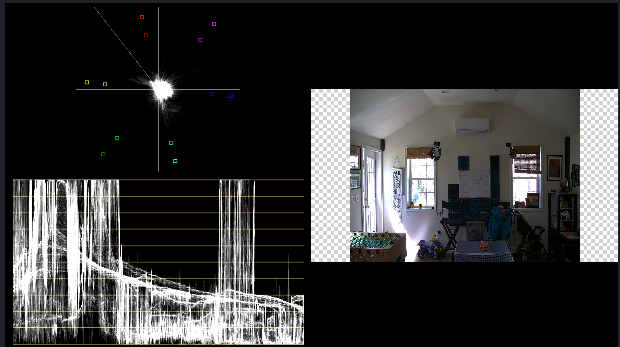
Preview
Underneath the color correction tools you will see the live video preview of your input. On the right side of this interface you will see options for changing this video to see the Waveform Monitor, Vectorscope and various combinations that include a live video preview. You can also apply video standard grids for SMPTE, square and vertical video for monitoring.
Start Learning vMix
- What is vMix. Learn here
- Getting Started with the vMix interface here
- Learn how to work with vMix inputs here
- Mixing Inputs Together with vMix Multiview here
- Learn about vMix titles here
- Learn how to mix Audio in vMix
- Learn how to use VST3 audio plugins with vMix here
- Learn all about vMix settings here
- Learn about how to use vMix Full Screen and Multiview here
- Learn how to record video with vMix here
- Learn how to live stream with vMix here
- Learn how to use vMix video overlay channels here
- Learn how to make Stinger Transitions in vMix here
- Learn how to use social media comments in your live stream with vMix Social here
- Learn how to use vMix shortcuts here
- Learn how to use GT Title Editor to make custom vMix titles here
- How to use vMix Call to bring guests in your live stream here
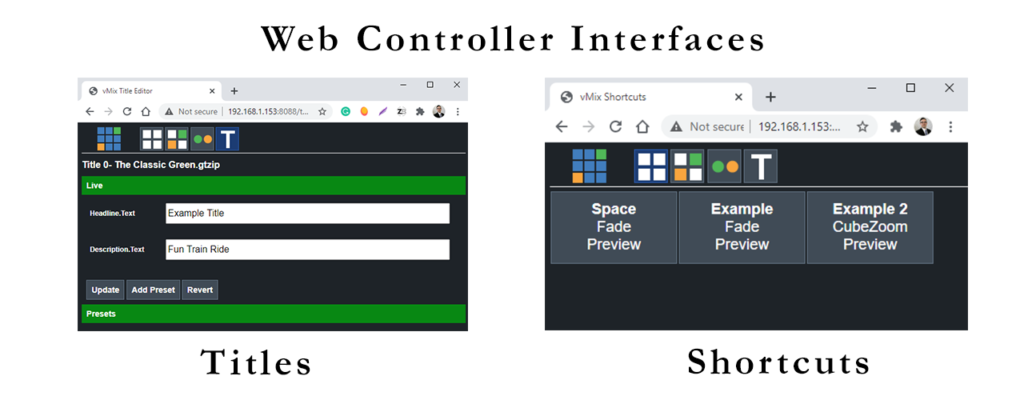
- How to control vMix remotely with the web controller here
- How to use vMix color correction tools here
- How to use virtual sets with vMix here
- How to use NDI with vMix here
- How to control PTZ cameras in vMix here
- Learn how to connect vMix with Zoom using the virtual webcam output here
- Learn how to use automated playlists with vMix here
- Learn how to use data sources with vMix here
- Learn how to use vMix triggers here

Continue reading