Learn vMix Settings
Written by Paul Richards on October 26, 2020
vMix Settings
The Settings menu, accessible in the upper right-hand corner of the vMix, gives you access to advanced features and settings. The most basic users will not likely ever visit many of these settings, but it is helpful to have a basic overview of what is available and where to find it.

Settings of Vmix
On opening the Settings menu, you will see the 14 setting categories down the left-hand side. At the very bottom, look for the Import, Export, and Default buttons. These are you moving or duplicating your setup to another computer. Using Export will create a file with all the configurable settings. Import will load that file into another instance of vMix if it is the same version. Default will return all the vMix settings to how they were when the software was first installed.
Here are the settings options available inside of vMix.
Display
These are the master settings for the vMix output. You can set the master output size, frame rate, and aspect ratio. You can also change the interface’s theme colors and adjust the setting on the Fullscreen output(s). Here you can select the monitor vMix will use for your full screen output.
Outputs/NDI/SRT
This is where you can adjust the multiple vMix outputs, whether via your graphics card or over NDI. The number of outputs is defined by the edition of vMix you are running. You can choose sources for your full-screen outputs here or via the “Fullscreen” button at the center area above the transitions bar.
You can also configure NDI (Network Device Interface) outputs which are IP video streams that are made available over your local area network (LAN). You can choose to turn on up to four unique NDI outputs in addition to enabling all camera sources, vMix calls, and audio inputs/outputs. In this way, you can make almost any source in vMix available to other computers on your network. By clicking the settings cog next to each NDI output you can configure the NDI outputs audio channel, resolution and video settings. You can even enable SRT outputs in this area with quality setting and latency options.
Options
This area includes many of the general preferences for vMix. These include the preferred language, the layout of the interface, and how the software behaves on startup and during a recording or streaming session. One new feature in Options will enable Production Clocks.
Once enabled a Production Clock will appear underneath the transition bar area. You can double click this box to bring up it’s settings options. Production Clocks allow you to quickly reference the time and a custom countdown time based on an event. You can also keep track of the time you have been recording or streaming.
Performance
The Performance settings tab is where you can select the graphics card you will be using with vMix. It is here you can enable Low Latency Capture and High Input Performance Mode. You can also access settings that will alert you when your CPU or GPU is pushing its limits. This is helpful so you can address any issues that may lead to poor performance or dropped frames.
Pro Tip #1: In addition to enabling your graphics card for use with vMix, check to see if your graphics card has been updated. For NVIDIA graphics cards for example, you need to open the NVIDIA Control Panel and add vMix as a selected program in the 3D Settings Area.
Pro Tip #2: If you are using a Windows laptop check out your battery settings. In “Power Options” you can enable “Performance Mode” which will greatly increase the performance of your laptop and its ability to run vMix smoothly.
Decoder
This section is for specifying what decoders will be used to playback certain video file types. In most cases, these can all be left at their default settings.
Recording

Here you can specify the default folder where recordings will be stored and the format for the filename. You can also set the size for the recording memory buffer. This may be useful if you have an older mechanical hard drive and are experiencing dropped frames during recording.
External Output
This is where you can access advanced settings for the available external outputs in vMix. Remember, most editions of vMix offer one external output, whereas 4K and Pro offer a second output. The External output can be used to enable a virtual webcam driver used to send video into additional programs such as Skype or Zoom.
Audio

Audio Mixer 2
This includes several preference settings, including a master setting for the Automatically Mix Audio setting. You can also turn off and on the audio meters for both the master and the individual inputs. There is an option to fade the audio entirely along with the video when Fade to Black in selected. Finally, there is a setting for a default audio delay across all inputs, which can be useful for dealing with syncing issues at a master level.
Audio Output
This controls the routing settings for the master output and headphones. You can also configure the seven auxiliary audio buses. Any of the outputs can be set to various output channels, including mixes for surround sound. Here you can also select the default audio bus for new inputs as they are added. Once you add an audio output it will show up as an audio routing option in the audio mixer.
Web Controller
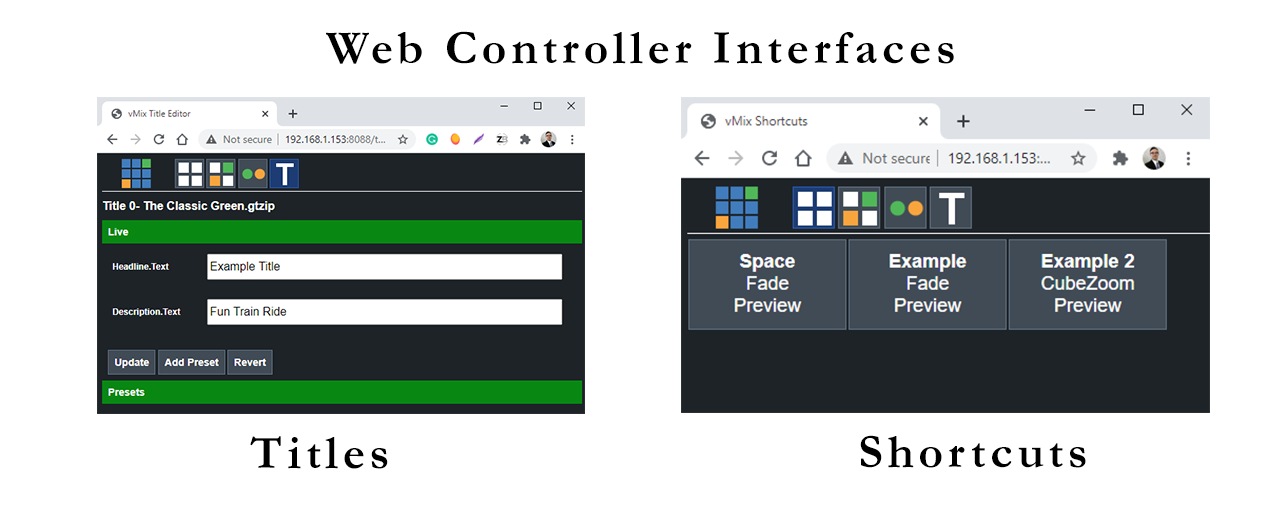
Web Controller Interfaces
This area contains everything you need to set up and use the vMix web controller. This is a web-based controller that you can use to switch vMix inputs, use shortcuts, edit titles, setup tally lights, and interact with the API. You can access this controller from any computer on your LAN using the web site address provided. You can optionally set up a username and password to restrict access to this controller. The Web Controller will be covered in more detail in an upcoming chapter.
Tally Lights
While there are other options for using tally lights, this section includes the settings for a tally light system based on Arduino hardware. Unless you are using such a system, you can ignore this settings tab.
Shortcuts
This is where you can set up, store, and edit shortcuts for nearly any function within vMix. Shortcuts can be assigned to the keyboard, MIDI device, and other control devices. Shortcuts will be covered in more detail in an upcoming chapter.
Activators
With activators, you can activate lights, buttons, and even motorized faders based on changes in vMix.
Scripting
For advanced users running 4K or Pro editions, this is where you can add and edit custom scripts.
Start Learning vMix
- What is vMix. Learn here
- Getting Started with the vMix interface here
- Learn how to work with vMix inputs here
- Mixing Inputs Together with vMix Multiview here
- Learn about vMix titles here
- Learn how to mix Audio in vMix
- Learn how to use VST3 audio plugins with vMix here
- Learn all about vMix settings here
- Learn about how to use vMix Full Screen and Multiview here
- Learn how to record video with vMix here
- Learn how to live stream with vMix here
- Learn how to use vMix video overlay channels here
- Learn how to make Stinger Transitions in vMix here
- Learn how to use social media comments in your live stream with vMix Social here
- Learn how to use vMix shortcuts here
- Learn how to use GT Title Editor to make custom vMix titles here
- How to use vMix Call to bring guests in your live stream here
- How to control vMix remotely with the web controller here
- How to use vMix color correction tools here
- How to use virtual sets with vMix here
- How to use NDI with vMix here
- How to control PTZ cameras in vMix here
- Learn how to connect vMix with Zoom using the virtual webcam output here
- Learn how to use automated playlists with vMix here
- Learn how to use data sources with vMix here
- Learn how to use vMix triggers here

Continue reading


