Learn about NDI Studio Monitor
Written by Paul Richards on November 2, 2021
In this chapter, you will learn how to use Studio Monitor with NDI®. Studio Monitor is an essential tool for video production professionals already using NDI® video sources on their local area network (LAN). Studio Monitor is ideal for displaying a video output from NDI®-compatible video production software such as OBS, Wirecast, vMix, Live Streaming Studio, MimoLive and many more. The application is also ideal for camera operators who desire a low-latency video preview of their cameras located throughout the event facility, while also controlling PTZ functionality.
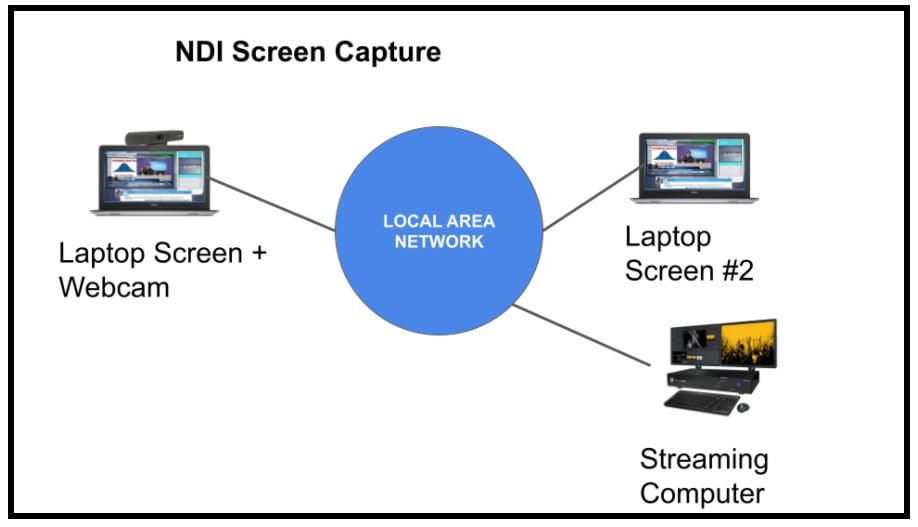
The most popular way to use Studio Monitor is to discover and view NDI® video sources on the network. Studio Monitor can be used to display NDI® sources on multiple screens connected to your computer. These screens could be set up in a lobby, on a building façade, or even on an outdoor billboard display.
NDI Studio Monitor
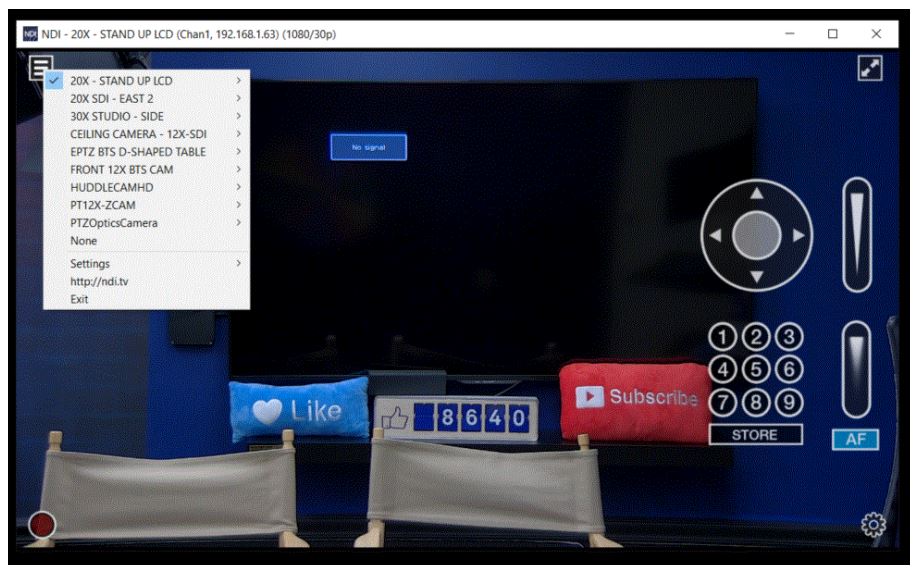
When you first open Studio Monitor you will see a menu at the top left which you can click to automatically discover a list of NDI® sources. As soon as you click one of the available sources on your network, it will fill the application with the video source. If the source is a PTZ camera,you will notice PTZ controls on the screen. These controls will be explained in the next section. Inside the menu you will see a “Settings” area which includes a variety of features that make Studio Monitor very useful.
NDI Studio Monitor Settings
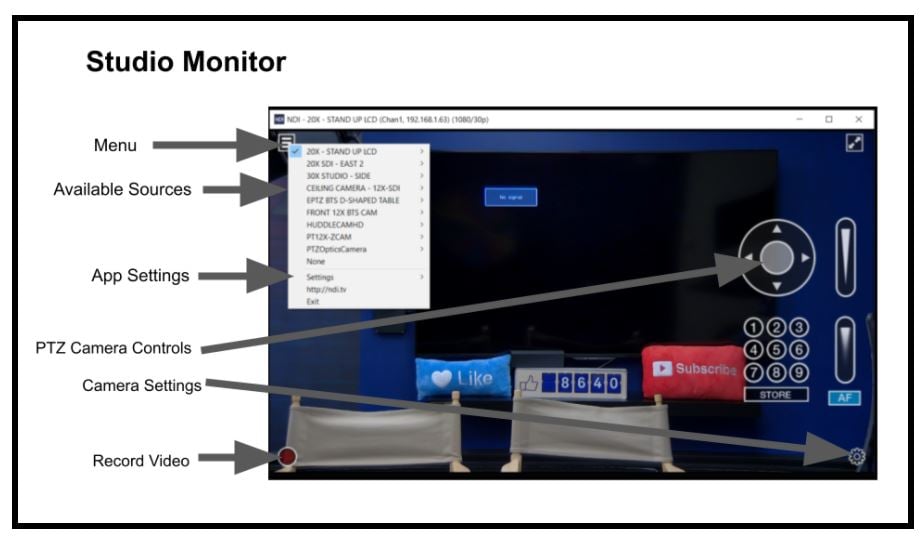
Studio monitor open to show feature set.
For example, there is an option to “Run at Windows Start” which is helpful for setting up a digital signage system. You can also send video to a second monitor by selecting the “New Monitor” option to open a second instance of Studio Monitor. You can, of course, run Studio Monitor in full-screen mode by clicking the arrows in the top right-hand corner. You will also find settings for adjusting the audio and video which may vary by device. Studio Monitor can be used to record video at any time using the red record button on the bottom left corner. There is also an area in the settings menu you can use to determine where you would like the videos to be saved on the computer’s local hard drive. If the computer is running a cloud-based storage system like Dropbox or Google Drive the video files can quickly be transferred to the cloud for easy access.
At startup, Studio Monitor shows a QR code and web address. One useful feature of Studio Monitor that is easy to overlook is the webserver. The web server can be accessed by scanning a QR Code that displays when Studio Monitor first turns on. Scanning this code will take you directly to the management control panel for Studio Monitor. You can also access the management area by typing in the IP address available in the settings area of Studio Monitor. The integrated web server can turn a mobile device or computer into a remote control for Studio Monitor.
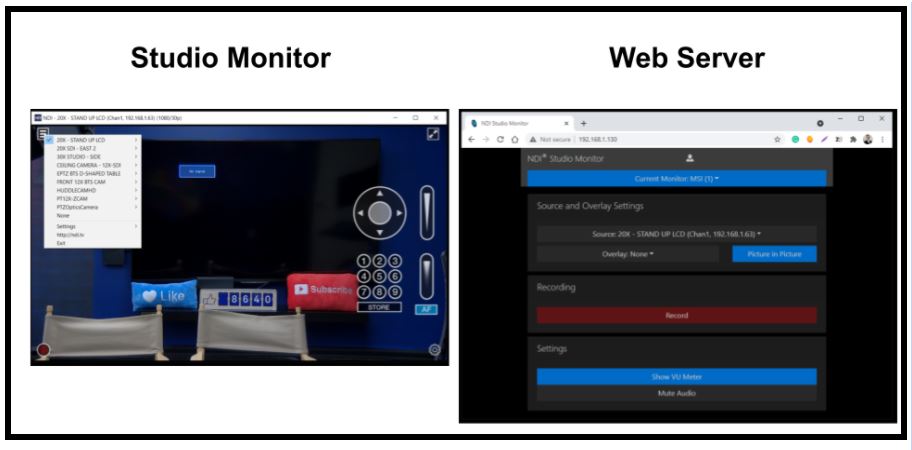
Studio Monitor shown at left; Studio Monitor’s web server appears on the right.
From the NDI® Studio Monitor management page, you will see just how easy it is to update and control any Studio Monitor on your network. You have the ability to switch between NDI® sources with the click of a button. You can also set up picture and picture scenes to create new views on Studio Monitors that may be displayed around your space. Another popular use case for Studio Monitor is for remote camera operation. The picture above shows a camera operator using Studio Monitor to display a camera they are controlling. A picture in picture set-up is ideal for camera operators who may want to view the output of a video production system, but also see the PTZ camera they are controlling
Note: In order to use Studio Monitor’s PTZ camera controls, you must have an NDI®-enabled PTZ camera.
It goes without saying that NDI® PTZ camera operators will control their cameras over the network. Once an NDI® camera is connected to the network, you can connect to the camera using Studio Monitor by right-clicking on the screen and selecting the camera from the dropdown menu. Once connected, Studio Monitor will display PTZ controls for the camera which can be operated by a keyboard and mouse. A USB-connected Xbox controller can also be used to control a PTZ camera with Studio Monitor. To do this you must enable it for use in the settings area under PTZ Controls. You can also use an NDI®-enabled joystick controller like the PTZOptics SuperJoy for camera operation.
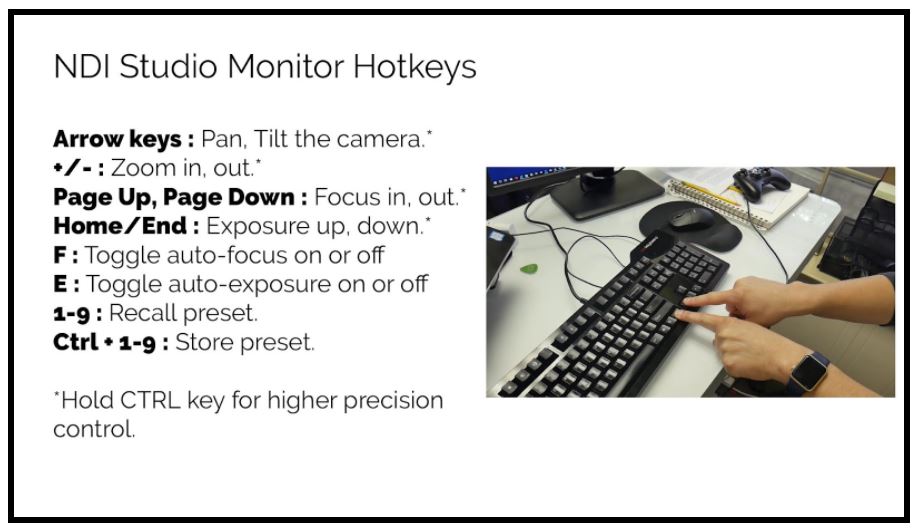
A little-known feature in Studio Monitor is the built-in hotkeys for PTZ camera operation. You can use the following hotkeys as a camera operator to improve your workflow.
NDI Studio Monitor Hotkeys
The most popular keyboard shortcuts for Studio Monitor.
- Arrow keys: Pan, Tilt the camera. Hold CTRL key for higher precision control.
- +/- : Zoom in, out. Hold CTRL key for higher precision control.
- Page Up, Page Down: Focus in, out. Hold CTRL key for higher precision control.
- Home/End: Exposure up, down. Hold CTRL key for higher precision control.
- F: Toggle auto-focus on or off.
- E: Toggle auto-exposure on or off.
- 1-9: Recall preset.
- Ctrl + 1-9: Store preset.
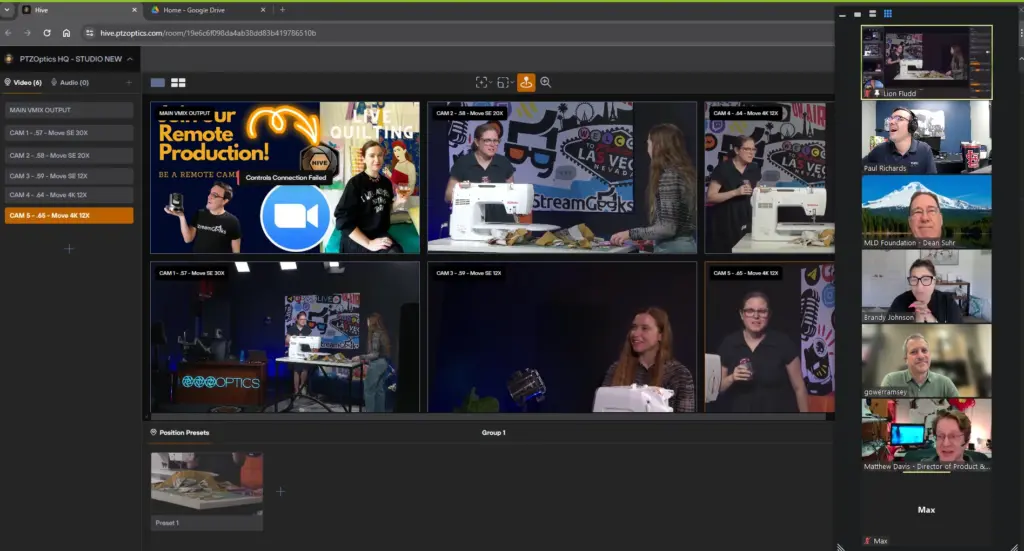
If you would like to access more advanced camera settings, click the cog in the right-hand side of your screen to access the NDI® camera’s management page. You can record video in Studio Monitor remotely by clicking the red “record” button in the web controller. This feature allows remote camera operators to record high-quality videos directly to their local hard-drive. These recordings can then be used in post-production or for video analysis. For example, a sports coach could easily set up a picture in picture using two cameras. One camera captures up-close details, and a wide-angle camera captures the entire field. These recordings can then be used for presentations with coaches and athletes. Coaches can even use an NDI® telestrator with a touchscreen to highlight plays just like you see in professional sports.
Needless to say, Studio Monitor is an important NDI® tool. While the design is minimalistic, the application is far from simple. Studio Monitor is a tool that is meant to provide users with a flexible and efficient NDI® viewing experience. Whether you are using a Mac or a PC computer, Studio Monitor will likely become a go-to application for your NDI® projects.
Key Takeaways:
- Studio Monitor is a free software application available with the NDI® tools.
- Studio Monitor is available for Mac or PC computers.
- Studio Monitor can be remotely controlled via a network-connected computer or device.
- Studio Monitor offers a variety of advanced features available in the menu and web browser interface.
Learn more about NDI:
- What is NDI? - learn more here
- Learn about the history of NDI - here
- What is IP Video - learn more here
- Learn about popular NDI software and hardware here
- Learn about networking for NDI here
- Learn about how much bandwidth NDI requires here
- Learn how to use NDI with OBS here
- Learn how to use NDI with vMix here
- Why you should learn how to use IP video here
- Learn how to use NDI cameras here
- Learn how to use NDI for graphics generation here
- Learn how to use NDI with WiFi here
- Learn how to power displays with NDI here
- Learn about NDI Studio Monitor here
- Learn more about NDI Screen Capture here

Continue reading