VST 2 Plugins for OBS
Written by Paul Richards on January 22, 2019
Audio is perhaps the most important portion of your video production inside Open Broadcaster Software although it often goes overlooked. OBS has always had some decent tools for handling audio, but now it’s time to really take this up to a professional level using free VTS plugins. Here are the plugins used in this video – http://reaper.fm/reaplugs/
Check out the entire OBS Course here on YouTube – https://www.youtube.com/watch?v=pZhLMpPD2EI&list=PLBgMaK-_C5BZD5ECCkOBZvwtHy6ir_5cp
Sound Card Settings
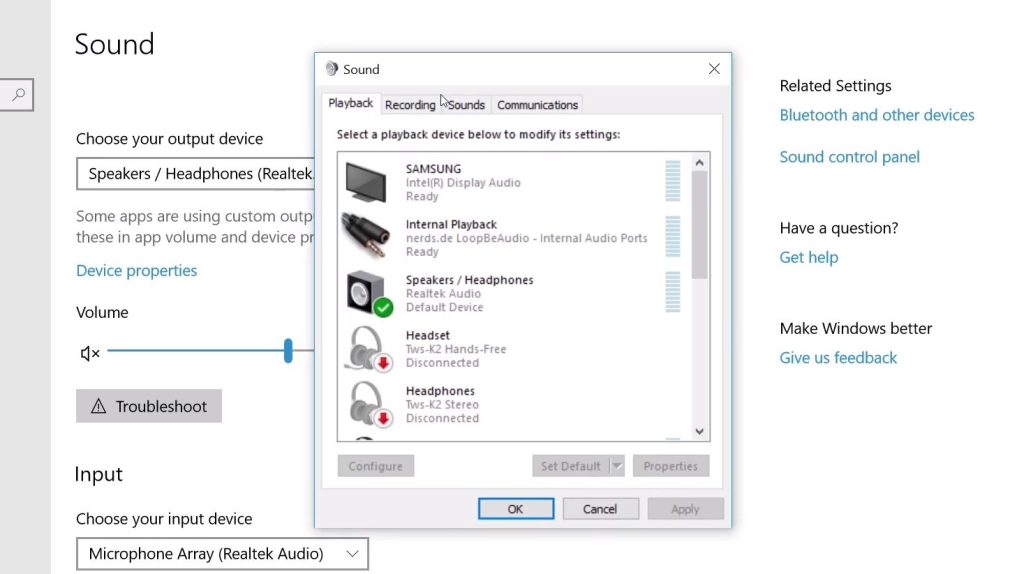
Let’s start by optimizing your default audio settings for your microphone as it comes into Windows. Keep in mind this process could be slightly different for Mac and Linux users. Also, if you have a professional audio mixer, many of these settings can be handled in your hardware audio system. In order to optimize our default audio device in Windows, you need to open up the sound control panel. Go over to the recording section and make sure the microphone you want to use in Open Broadcaster Software is set to “default”. Now you can select that microphone and click properties. This will open up the advanced properties of the microphone and allow you to tweak your microphones boost and levels.
Using VST Plugins in a Chain
As you are building out your audio processing chain it’s important to consider the order you are adding your plugins. You don’t want to compress your signal before you add a noise suppression plugin. Therefore it’s best practice to use the following chain in your VST plugin order:
- Noise Suppression
- Noise Gate
- EQ (Equalization)
- Compression / Limiter
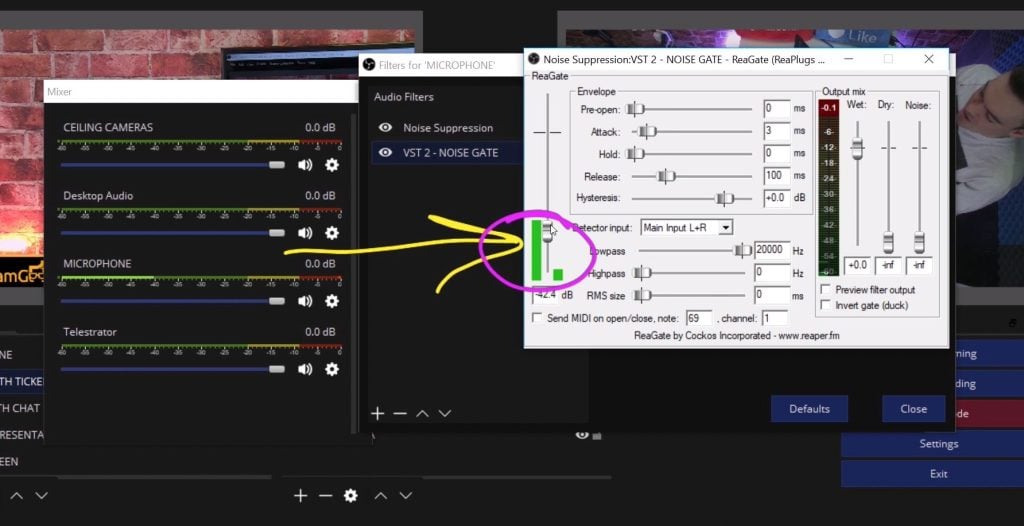
Once we have added our noise suppression, we want to set up our noise gate VST plugin inside our OBS source audio properties. In order to use this, we want to listen to the noise in the room and set up a gate to mute our microphone at a certain level. Most rooms have ambient noise that produces a certain level inside our microphone. We can use our noise gate level monitor to determine the correct level to set our noise gate too. Once this is done you can choose an attack and release that fits your voice and move one.
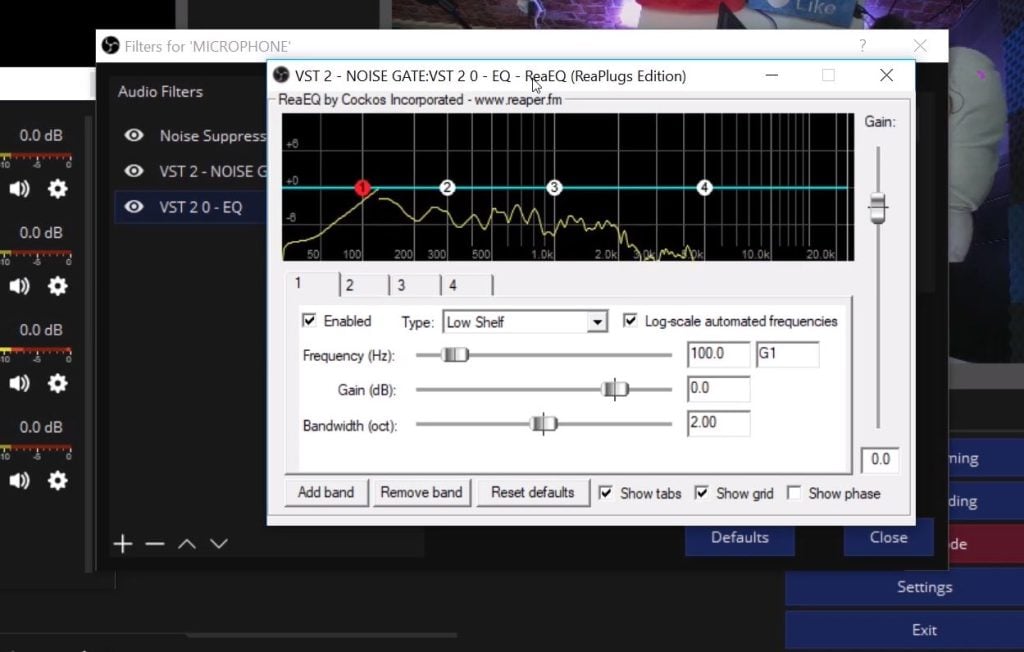
EQ for OBS
Next, we want to EQ for our voice. Equalization can take some time to learn how to do properly. Start with a low cut (aka high pass) to remove any low hums in your room. The human voice generally will not produce volume below 80 Hz on the EQ so we can cut these bands out to remove the sounds of low humming volume. Next we can apply a high cut (aka low pass) which will cut out any high-pitched noises that we do not need inside our microphone pickup range. This in itself will make your production sound a lot better. Finally, you can decide to enhance your voice in the low, middle or high-end ranges of the EQ.
Finally, we want to add our compressor at the end of our audio processing chain. The compressor may have the most noticeable audio effect (depending on how your EQ turned out). The compressor can smooth out your entire performance and help stop your audio from peaking. If you use too much compression your voice will sound like it’s coming out of an announcer bull horn. If you use just enough, your voice will clearly cut through any other audio or background music. The compressor also includes a limiter which will limit the portions of your audio that are compressed and help your audio from peaking overall.
Don’t forget to get our course files at https://streamgeeks.us/OBS
Check out our other articles about Open Broadcaster Software below:
- Updated - How to connect OBS and Zoom with VoiceMeeter and Headphone Monitoring - here.
- Learn how to use OBS for remote production here.
- How to connect OBS with Zoom, here
- OBS vs vMix a complete review here.
- How to use Zoom for Church Meetings and Worship here.
- Here are the top 10 OBS features you need to know about
- Getting dropped frames in OBS. Here are some new feature to help with that.
- Take a look at OBS 24 and all the new feature here.
- Increase your productivity with OBS and learn how to use hotkeys here
- Learn how to setup animated stinger transitions in OBS here
- Learn how to install the NDI plugin for OBS (and why you should) here
- Learn more about the latest OBS user interface (UPDATED for 2019) here
- Make your audio in OBS sound great with these VST 2 plugins here
- Learn how to fix the most common OBS issues! Audio and Video Sync! here
- Learn how to use OBS 20+ here
- Learn how to use NDI Cameras with OBS here
- Learn how to use the OBS Multiview here
- Learn OBS quickly with our ZERO to SIXTY tutorial video here
- Learn more about OBS settings and optimizing your settings for live streaming here
- Learn how to record videos using OBS here
- New OBS 24 feature allows broadcasters the ability to pause and restart video recordings. Learn more here.
- Learn how to add live annotations over your OBS productions here
- Learn how to add a webcam and set up a picture in picture scene inside OBS here
- Learn how to crop and rotate inputs inside OBS here
- Learn how to use color correction tools and LUTs here
- Learn the best way to connect OBS and Zoom here
- Learn how to connect OBS and Teams here
- Learn how to use countdown timers in Teams here
- Learn where OBS recordings are saved here
- Learn how to live stream to YouTube and Facebook with OBS for free here
- Learn about OBS 27's new features here

Continue reading


