Remote Production with OBS
Written by Paul Richards on May 19, 2024
OBS (Open Broadcaster Software) is one of the most popular live streaming and video recording tools for content creators and broadcasters. Its broad-support combined with the ability to integrate with NDI and SRT, makes OBS an ideal choice for remote production software. In this article, we will explore the key aspects of using OBS for remote production, including setup, configuration, and best practices.
Introduction to Remote Production with OBS
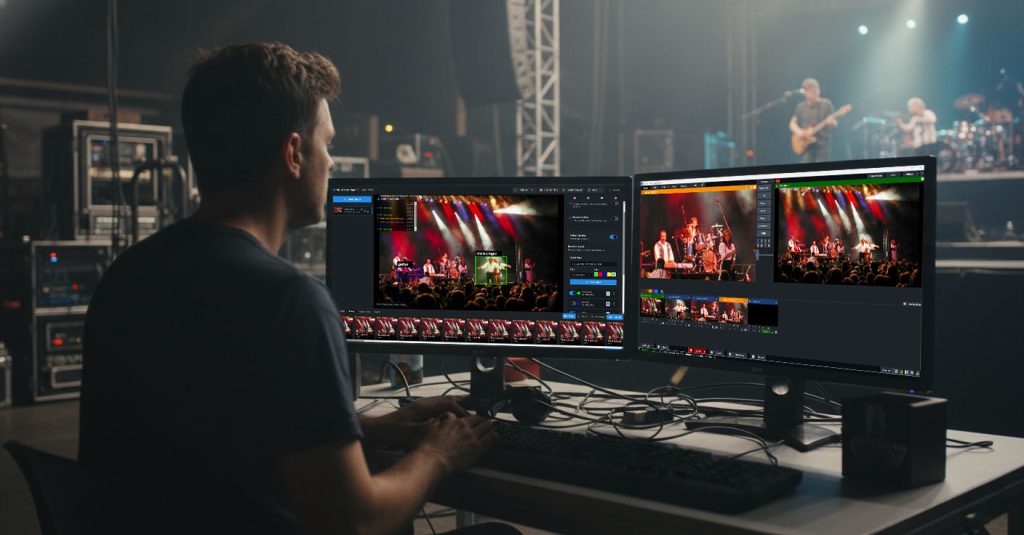
Remote production, also known as REMI (Remote Integration Model), allows broadcasters to produce live events from a distance. This approach reduces the need for on-site production crews, lowering costs and increasing flexibility. OBS, being a free and open-source software, provides a robust platform for remote production, enabling high-quality live streaming from virtually any location.
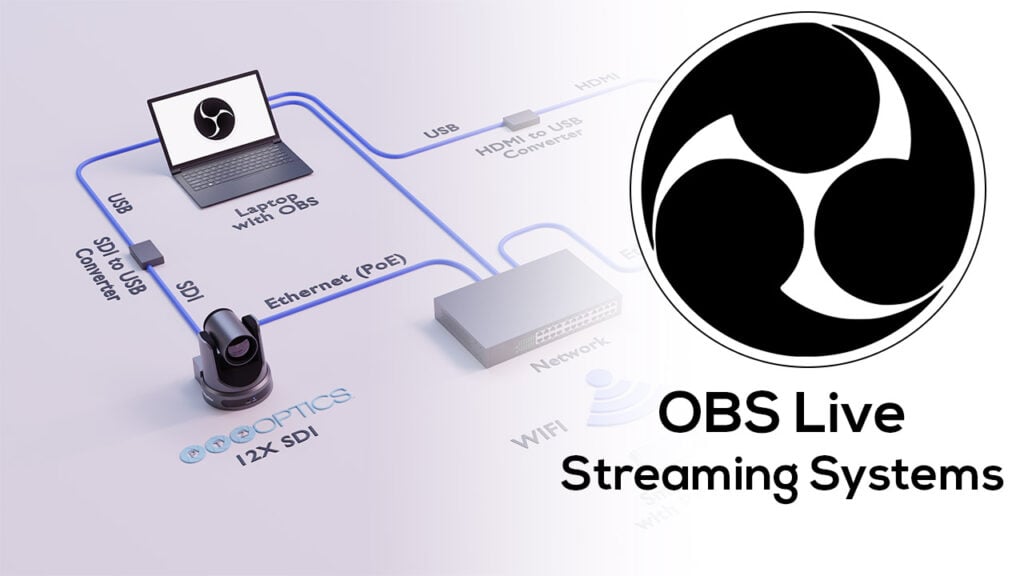
OBS used for remote production
Why Choose OBS for Remote Production?
OBS is an excellent choice for remote production due to its cost-effectiveness, versatility, scalability, and extensibility. As a free tool, it significantly reduces production costs, making high-quality streaming accessible to everyone. Its support for various input sources, including cameras, capture cards, and IP streams, allows for diverse production setups. OBS can be deployed on local machines or in the cloud, catering to productions of any scale. Furthermore, a wide range of plugins and integrations enhances its functionality, making OBS a highly customizable tool for any production need.
Setting Up OBS for Remote Production
To get started with OBS, download and install the software from the official website. The installation process is straightforward, with versions available for Windows, macOS, and Linux. Once installed, connect your video and audio sources to your computer or server. In OBS, you can add these sources by clicking the “+” button in the “Sources” panel and selecting the appropriate source type, such as Video Capture Device or Audio Input Capture. Configuring these sources correctly is essential to ensure they work seamlessly within OBS.
Optimizing OBS settings is crucial for a smooth production. Adjust the video bitrate according to your available bandwidth to avoid buffering or lag. Choose the right encoder based on your system’s capabilities—hardware encoding is preferred if your machine supports it, as it reduces CPU load. Set the output resolution and frame rate to match your streaming platform’s requirements for the best viewer experience.
Integrating OBS with Cloud Platforms
Using OBS in the cloud can significantly enhance your remote production capabilities. Cloud platforms like Amazon Web Services (AWS), Microsoft Azure, and Google Cloud Platform (GCP) offer the necessary infrastructure to run OBS efficiently. Deploying OBS in the cloud involves provisioning a virtual machine (VM) with adequate CPU, memory, and network capabilities. Once your VM is set up, access it via remote desktop (Windows) or SSH (Linux) and install OBS. Configure OBS to set up your video and audio sources, and adjust the settings for optimal performance. Cloud deployment allows for scalable and flexible production environments, making it easier to manage large-scale events.
V2 Cloud has a great cloud configuration tool for OBS. Check it out here.
Leveraging SRT for Secure and Reliable Streaming
Secure Reliable Transport (SRT) is a protocol designed to ensure low-latency, secure, and reliable streaming, even in challenging network conditions. Integrating SRT with OBS enhances the quality of remote production by providing a stable and secure video transmission method. To use SRT with OBS, configure your SRT encoder, such as a camera or external device, to send video via SRT. In OBS, add a new media source and enter the SRT URL provided by your encoder. Optimizing latency and buffer settings is crucial to maintaining a smooth and high-quality stream.
You can learn more about SRT here.
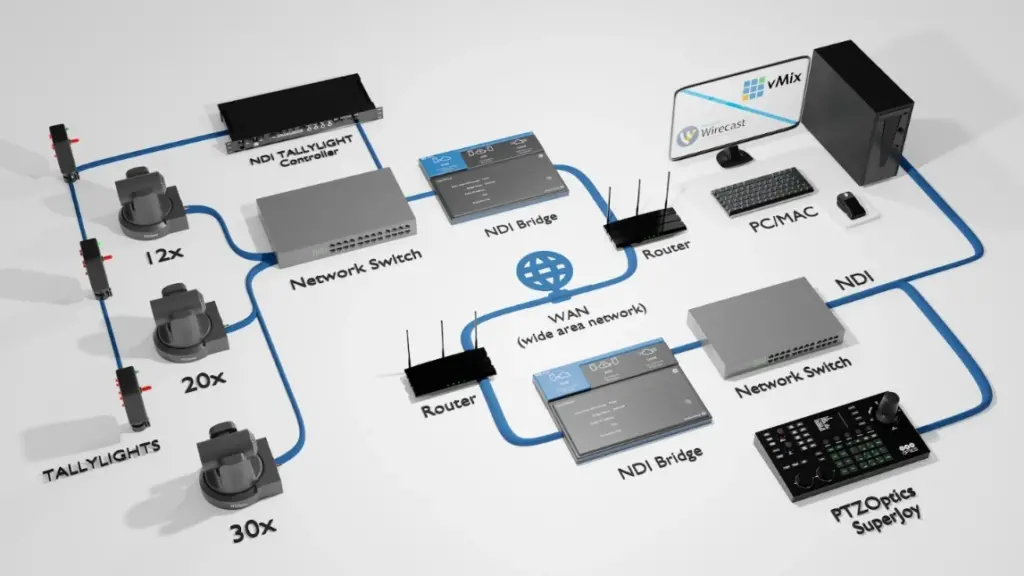
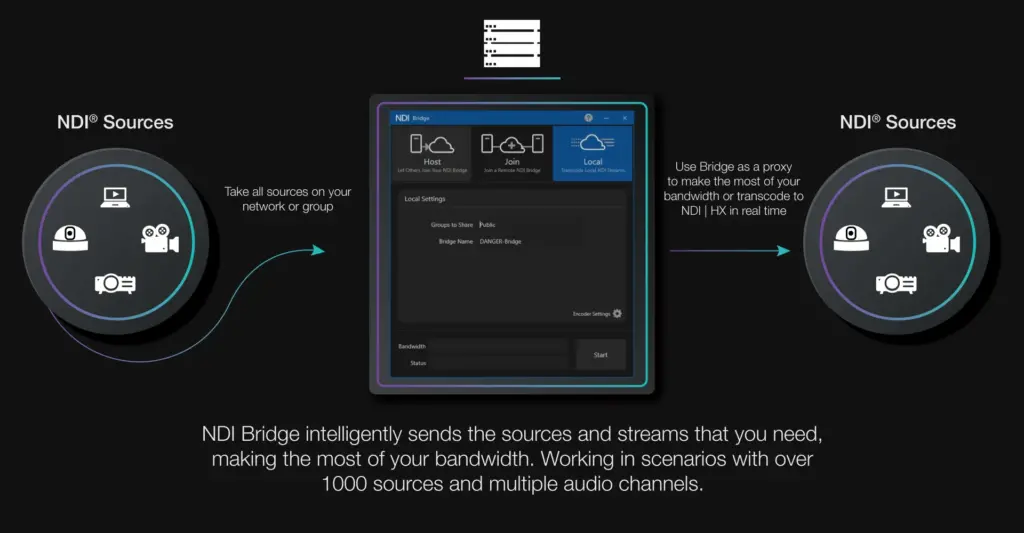
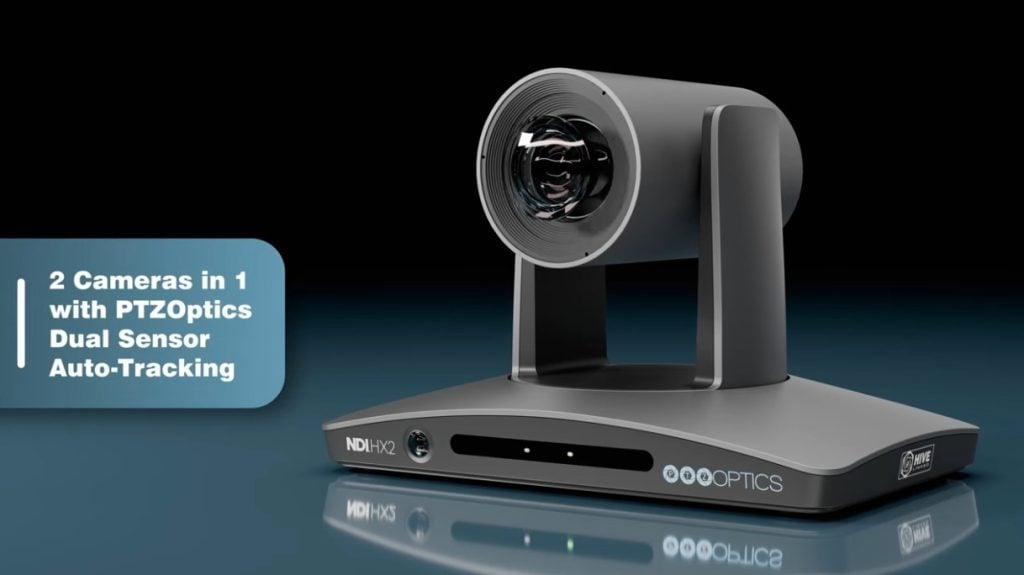
NDI Bridge used with PTZ cameras and Tally Lights
Utilizing NDI for Efficient Network Video Production
Network Device Interface (NDI) allows for high-quality video transmission over local networks. NDI integration with OBS simplifies the setup and management of multiple video sources in a remote production environment. To get started, download and install NDI Tools, which include the necessary software to enable NDI on your devices. In OBS, install the NDI plugin and add your NDI sources. Ensure all NDI devices are on the same local network and configured correctly to achieve seamless video transmission. This setup allows for efficient and flexible video production, making it ideal for multi-camera setups and complex productions.
If you are interested in using NDI video sources from a remote location you can learn more about NDI Bridge here.
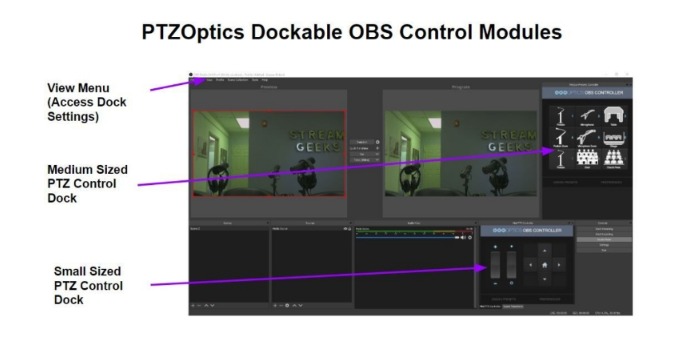
PTZOptics Plugin for OBS
Enhancing Remote Production with PTZ Cameras
PTZ (Pan-Tilt-Zoom) cameras offer dynamic video capabilities that can be controlled remotely, making them ideal for remote production. Using PTZ cameras with OBS allows for seamless camera management and high-quality video output. These cameras can be remotely controlled to adjust angles, zoom, and focus, providing a wide range of perspectives. This is particularly valuable in dynamic environments such as live events, conferences, and worship services. Integrating PTZ cameras with OBS also simplifies the production workflow, as you can manage multiple cameras from a central location, reducing the need for on-site camera operators.
Conclusion
OBS is a versatile and powerful tool that can significantly enhance your remote production capabilities. By leveraging cloud platforms, SRT, NDI, and PTZ cameras, you can create high-quality live streams that meet the demands of today’s audiences. Whether you’re streaming a live sports event, a corporate meeting, or a worship service, OBS provides the flexibility and functionality needed for successful remote production.
Check out our other articles about Open Broadcaster Software below:
- Updated - How to connect OBS and Zoom with VoiceMeeter and Headphone Monitoring - here.
- Learn how to use OBS for remote production here.
- How to connect OBS with Zoom, here
- OBS vs vMix a complete review here.
- How to use Zoom for Church Meetings and Worship here.
- Here are the top 10 OBS features you need to know about
- Getting dropped frames in OBS. Here are some new feature to help with that.
- Take a look at OBS 24 and all the new feature here.
- Increase your productivity with OBS and learn how to use hotkeys here
- Learn how to setup animated stinger transitions in OBS here
- Learn how to install the NDI plugin for OBS (and why you should) here
- Learn more about the latest OBS user interface (UPDATED for 2019) here
- Make your audio in OBS sound great with these VST 2 plugins here
- Learn how to fix the most common OBS issues! Audio and Video Sync! here
- Learn how to use OBS 20+ here
- Learn how to use NDI Cameras with OBS here
- Learn how to use the OBS Multiview here
- Learn OBS quickly with our ZERO to SIXTY tutorial video here
- Learn more about OBS settings and optimizing your settings for live streaming here
- Learn how to record videos using OBS here
- New OBS 24 feature allows broadcasters the ability to pause and restart video recordings. Learn more here.
- Learn how to add live annotations over your OBS productions here
- Learn how to add a webcam and set up a picture in picture scene inside OBS here
- Learn how to crop and rotate inputs inside OBS here
- Learn how to use color correction tools and LUTs here
- Learn the best way to connect OBS and Zoom here
- Learn how to connect OBS and Teams here
- Learn how to use countdown timers in Teams here
- Learn where OBS recordings are saved here
- Learn how to live stream to YouTube and Facebook with OBS for free here
- Learn about OBS 27's new features here

Continue reading