Automatic Scene Switching in OBS
Written by Paul Richards on February 8, 2022
Many OBS users handle all the aspects of video production by themselves. In these cases, there is no dedicated producer or engineer. Instead, the streaming host is also the producer, director, camera operator, and technical director. Thanks to the flexibility and customization possibilities of OBS Studio, the software works great for solo operators who learn how to use Hotkeys and controllers such as the Elgato StreamDeck. However, it still doesn’t hurt to have some help keeping everything running. Advanced Scene Switcher adds switching automation to OBS with a powerful plug-in that features a bunch of options to help producers automate scene switching.
Installing Advanced Scene Switcher
You can install Advanced Scene Switcher in the same manner as most other OBS plug-ins. It is available for download on the OBS website https://obsproject.com/forum/resources/advanced-scene-switcher.395/ For this plug-in, you will download one .zip file. When you extract it, you will see the auto-installers and files for Mac, PC, and Linux. Use of the auto-installer is recommended unless you have experience adding plug-ins manually.
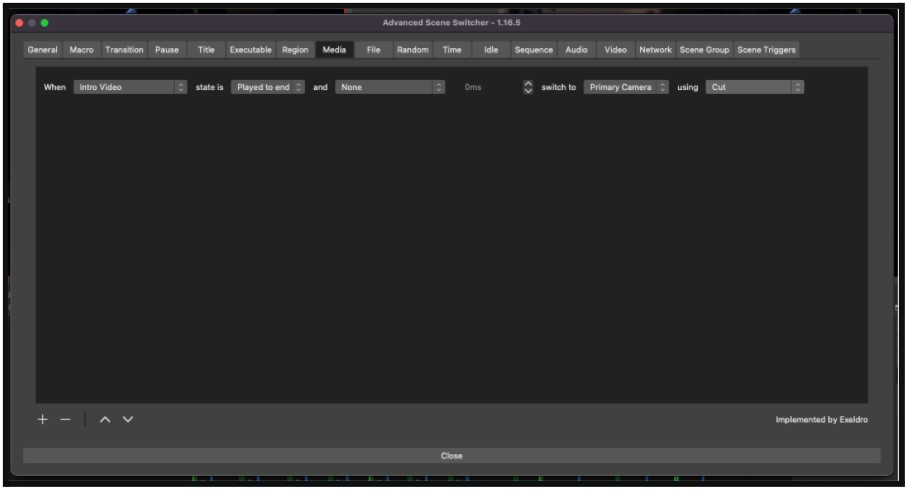
Advanced Scene Switcher opens into a management window.
Using Advanced Scene Switcher
After installation is complete, relaunch OBS. You can access Advanced Scene Switcher in the Tools menu. The Advanced Scene Switcher dialog box can be a bit overwhelming at first. Fortunately, you won’t likely need more than a couple of those tabs. However, a look through them will introduce you to the possibilities of Advanced Scene Switcher. In the General tab, you will find some of the global settings you may need to revisit once you get some automation set up. One thing to note here is the Status section, where you can choose to automatically start the switcher when you start recording, streaming, or both. There is also an option to start the switcher on startup if it was running previously.
The rest of the tabs cover all the possible ways to use Advanced Scene Switcher. As you review the options available on each tab, notice that they all work on the same basic concepts – triggers and actions. Setting up automated scene switching is about assigning the trigger and action each will initiate.
- Scene Triggers – This allows you to trigger actions based on scene changes. For example: When Camera 1 is active, start recording after 2 seconds.
- Video – Video can monitor a video source and trigger an action when the source matches a predetermined video file. That action switches to the scene you pre-select. The trigger can also be set to engage when the source does not match or if it has changed.
- Audio – Monitors any audio source and triggers an action when the levels go above a certain threshold (or below a threshold) for a set amount of time, it will trigger a scene switch the scene you choose. This can be used to switch camera views when specific microphones become active.
- Sequence – Automatically switches to a scene when another scene becomes active.
- Idle – Switches to a preset scene if there are no keyboard or mouse inputs for a set time.
- Time – Can trigger a scene change based on the day and time.
- File – Triggers a scene based on the contents of a file. You can also write the name of the current scene to a file and use the contents of that same file to select the next scene.
- Media – Automatically switches scenes based on the current state of a media source. For example, when a media source ends, switch to a title slide.
- Region – Can automatically trigger a scene based on the cursor’s position.
These are just some of the commonly used available trigger options. Next, you can set up an example trigger and action. For this example, try switching to the scene for your camera immediately after a video finishes playback.
Example Use:
- In OBS, go to Tools, Advanced Scene Switcher.
- Select the Media tab.
- Click the + in the lower-left corner.
- Moving from left to right, choose your media source.
- After “state is,” choose “Played to end” from the dropdown menu.
- Leave the next two boxes as is and then choose Camera 1 as the scene to switch to.
If you would like to try your first automated transition, go to the General tab of Advanced Scene Switcher and check to see that it is active. If not, just click the Start button.
How Advanced Scene Switcher is Being Used
Gaming
Gamers have enough to pay attention to without manually switching scenes. With Advanced Scene Switcher, gamers can automate nearly every transition in their stream while keeping their hands free.
Video Podcasts
Advanced Scene Switcher can keep shows moving along with automation. Producers can have countdown timers trigger intro videos which can then switch to a camera and microphone.
Houses of Worship
The Advanced Scene Switcher is very popular with houses of worship. Since they often rely on volunteers and can sometimes be shorthanded, this type of automation really helps.
Sporting Events
The fast pace of sporting events, plus the use of pre-recorded videos, graphics, and transitions, make Advanced Scene Switcher popular with sporting event streamers. It will be especially beneficial for those covering school and local sports where you don’t have an entire production crew. Automating some of the switching duties can let broadcasters focus on the game.
Pros and Cons
Pros: It’s free. It offers powerful automation.
Cons: The interface can be intimidating at first.
Alternatives to Advanced Scene Switcher
Advanced Scene Switcher appears to be the only plug-in currently available for automating scene switching in OBS.
Key Takeaways
- If you want to automate some of the switching work in OBS, Advanced Scene Switcher is a great option.
- Don’t be overwhelmed by the many options, just choose what you will benefit from.
- You may only need one or two automations to make significant improvements in your workflow.
- You can always add more as you learn the plug-in and consider other places where automation can help.
Additional chapters from the OBS Superuser Guidebook
- Chapter 1 - An Update on the Updates here
- Chapter 2 - How to Customize OBS here
- Chapter 3 - How to Optimize OBS here
- Chapter 4 - How to use the core features of OBS here
- Chapter 5 - How to use video filters in OBS here
- Chapter 6 - How to use audio filters in OBS here
- Chapter 7 - The Top 10 OBS Plugins here
- Chapter 8 - The Multiple RTMP Streaming Plugin here
- Chapter 9 - The Automatic Scene Switching Plugin here
- Chapter 10 - How to record multiple sources in OBS here
- Chapter 11 - How to dock sources with live video in OBS here
- Chapter 13 - How to use NDI in OBS here
- Chapter 14 - How to route Audio in and out of OBS here
- Chapter 15 - How to use Virtual Audio cables with OBS here
- Chapter 16 - How to use VST Audio Plugins for OBS here
- Bonus Chapter - How to fix audio sync issues in OBS here
- Chapter 16 - How to use use hotkeys with filters here
Check out our other articles about Open Broadcaster Software below:
- Updated - How to connect OBS and Zoom with VoiceMeeter and Headphone Monitoring - here.
- Learn how to use OBS for remote production here.
- How to connect OBS with Zoom, here
- OBS vs vMix a complete review here.
- How to use Zoom for Church Meetings and Worship here.
- Here are the top 10 OBS features you need to know about
- Getting dropped frames in OBS. Here are some new feature to help with that.
- Take a look at OBS 24 and all the new feature here.
- Increase your productivity with OBS and learn how to use hotkeys here
- Learn how to setup animated stinger transitions in OBS here
- Learn how to install the NDI plugin for OBS (and why you should) here
- Learn more about the latest OBS user interface (UPDATED for 2019) here
- Make your audio in OBS sound great with these VST 2 plugins here
- Learn how to fix the most common OBS issues! Audio and Video Sync! here
- Learn how to use OBS 20+ here
- Learn how to use NDI Cameras with OBS here
- Learn how to use the OBS Multiview here
- Learn OBS quickly with our ZERO to SIXTY tutorial video here
- Learn more about OBS settings and optimizing your settings for live streaming here
- Learn how to record videos using OBS here
- New OBS 24 feature allows broadcasters the ability to pause and restart video recordings. Learn more here.
- Learn how to add live annotations over your OBS productions here
- Learn how to add a webcam and set up a picture in picture scene inside OBS here
- Learn how to crop and rotate inputs inside OBS here
- Learn how to use color correction tools and LUTs here
- Learn the best way to connect OBS and Zoom here
- Learn how to connect OBS and Teams here
- Learn how to use countdown timers in Teams here
- Learn where OBS recordings are saved here
- Learn how to live stream to YouTube and Facebook with OBS for free here
- Learn about OBS 27's new features here

Continue reading