Dock Individual Sources in OBS
Written by Paul Richards on February 8, 2022
OBS offers a flexible interface that allows users to customize the layout. One thing that couldn’t be added as a dockable panel with the ability to preview sources. The Source Dock plug-in for OBS Studio allows users to create a dockable window inside the interface for any source. In addition, each panel can be customized to provide audio level meters, volume adjustments, and media controls you can access on the fly.
Installing Source Dock
Source Dock can be downloaded from the OBS website. https://obsproject.com/forum/resources/source-dock.1317/. Download the version for your system (PC, Mac, and Linux ). Installation wizards are available for the Mac and Windows versions. This is the best route for most users. Otherwise, extract the .zip file and place the plug-in files in the correct folder on your computer. When you are done, restart OBS.
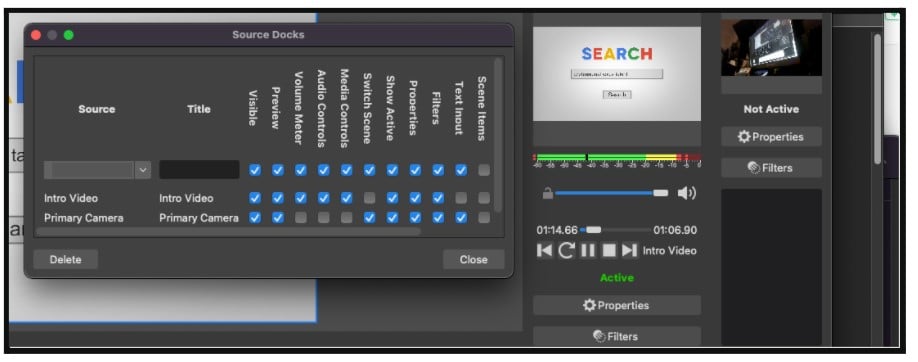
Source dock includes additional controls for the sources you are monitoring.
Using Source Dock
To create a dockable panel from any source in OBS, go to Tools and select Source Dock. In the dialog box, select the source you wish to dock. Be sure the Visible box is checked. Check or uncheck boxes below the various features that you want to appear in the dock. These can be adjusted later.
- Preview – This will show a thumbnail of any video source.
- Volume Meter – This will enable the audio level meters for the source.
- Audio Controls –This will allow you to adjust the levels of the sources from within the Source Dock window.
- Switch Scene –This will enable the source to be sent to the program output when clicked on in the panel.
- Show Active – This will display Active in green when the source is active.
- Properties – This adds a button to access the properties of the source
- Filters – This adds one-button access to filters assigned to the source.
- Text Input – This displays a text area for notes. This could be used to display the Hotkey combination used to display the sources or other information.
- Scene Items – This displays scene layers and enables toggling of each item.
Next, click Add. The panel will appear. Click and drag it like any other panel. From there, you can adjust and rearrange the panel’s location. While Source Dock can be used with any input type, it is especially useful with live web pages and media sources.
Using Source Dock with a Web Page
Add a Browser Source to any scene in OBS. You can use any website you like for the URL. Once the input is created, go to Tools and select Source Dock. Add the browser source and be sure the Visible and Preview boxes are checked. Click Add and then click and drag to drop the panel to your preferred location. Now notice that if you click into the preview window in the panel, you can use your mouse to interact with the live website. You can scroll and click when the source is live or when it is inactive. This is ideal for getting up to date website information ready for display.
Using Source Dock with a Media Source
Add a Media Source to any scene. Be sure that the Local File is checked. Click Browse to locate a video file on your computer. If it is a short video, you may want to check the box next to Loop. Click OK. Now once again, go to Tools, Source Dock. Choose the media source you just created. Be sure the Visible, Preview, Volume Meter, Audio Controls, and Media Controls are checked and click Add. Drag and drop the panel to your preferred location. Now you will see that you have complete control of the media source. You can start, stop, or replay the media. You can also see the audio levels and adjust them via a slider.
Using Source Dock with a Live Video Source
Add a Video Capture Device to any scene. Go to Tools, Source Dock and choose the Video Capture Device you just added as the source. In most cases, you will only need to check the boxes for Visible, Preview, and Switch Scenes. Click Add. Drag it to where you would like it to dock, and you now have a dedicated preview monitor that you can place nearly anywhere in the OBS interface.
How is Source Dock Being Used?
Live Multi-Camera Productions
It is now possible within OBS to have a preview monitor window for every camera and pre-recorded video. There would be no need for the Studio Mode Preview Window as you could see all sources simultaneously. With the Switch Scenes option selected for each input, switching would be as easy as clicking the preview of the source you wish to send to the program output.
Houses of Worship
Many houses of worship use multi-camera setups, and many of them are operated by volunteers. Using Source Docks, someone can configure a layout with each camera or other video source displayed in a preview panel. Then, once the service starts, the volunteer operator would only need to click the next desired input.
Training Videos
Some training videos rely heavily on sharing web content. With Source Dock, any Browser Source can be docked. If it is configured correctly, instructors can interact with the web page from within the Preview window. This makes displaying the web content so much simpler for instructors since the whole thing happens within the OBS interface.
Pros and Cons
Pros: It’s Free. It’s easy to install and to set up.
Cons: It is difficult to find any downsides to this plug-in.
Alternatives to Source Dock
Source Dock appears to be the first and only of its kind. Users looking for more limited docking capabilities may want to look into the Custom Browser Docks feature in OBS.
Key Takeaways
- If you want to be able to preview input sources in dockable panels in OBS, you need to install the Source Dock plugin.
- Whether you want to interact with web content via a preview window or control of pre-recorded videos, Source Dock can do it.
Additional chapters from the OBS Superuser Guidebook
- Chapter 1 - An Update on the Updates here
- Chapter 2 - How to Customize OBS here
- Chapter 3 - How to Optimize OBS here
- Chapter 4 - How to use the core features of OBS here
- Chapter 5 - How to use video filters in OBS here
- Chapter 6 - How to use audio filters in OBS here
- Chapter 7 - The Top 10 OBS Plugins here
- Chapter 8 - The Multiple RTMP Streaming Plugin here
- Chapter 9 - The Automatic Scene Switching Plugin here
- Chapter 10 - How to record multiple sources in OBS here
- Chapter 11 - How to dock sources with live video in OBS here
- Chapter 13 - How to use NDI in OBS here
- Chapter 14 - How to route Audio in and out of OBS here
- Chapter 15 - How to use Virtual Audio cables with OBS here
- Chapter 16 - How to use VST Audio Plugins for OBS here
- Bonus Chapter - How to fix audio sync issues in OBS here
- Chapter 16 - How to use use hotkeys with filters here
Check out our other articles about Open Broadcaster Software below:
- Updated - How to connect OBS and Zoom with VoiceMeeter and Headphone Monitoring - here.
- Learn how to use OBS for remote production here.
- How to connect OBS with Zoom, here
- OBS vs vMix a complete review here.
- How to use Zoom for Church Meetings and Worship here.
- Here are the top 10 OBS features you need to know about
- Getting dropped frames in OBS. Here are some new feature to help with that.
- Take a look at OBS 24 and all the new feature here.
- Increase your productivity with OBS and learn how to use hotkeys here
- Learn how to setup animated stinger transitions in OBS here
- Learn how to install the NDI plugin for OBS (and why you should) here
- Learn more about the latest OBS user interface (UPDATED for 2019) here
- Make your audio in OBS sound great with these VST 2 plugins here
- Learn how to fix the most common OBS issues! Audio and Video Sync! here
- Learn how to use OBS 20+ here
- Learn how to use NDI Cameras with OBS here
- Learn how to use the OBS Multiview here
- Learn OBS quickly with our ZERO to SIXTY tutorial video here
- Learn more about OBS settings and optimizing your settings for live streaming here
- Learn how to record videos using OBS here
- New OBS 24 feature allows broadcasters the ability to pause and restart video recordings. Learn more here.
- Learn how to add live annotations over your OBS productions here
- Learn how to add a webcam and set up a picture in picture scene inside OBS here
- Learn how to crop and rotate inputs inside OBS here
- Learn how to use color correction tools and LUTs here
- Learn the best way to connect OBS and Zoom here
- Learn how to connect OBS and Teams here
- Learn how to use countdown timers in Teams here
- Learn where OBS recordings are saved here
- Learn how to live stream to YouTube and Facebook with OBS for free here
- Learn about OBS 27's new features here

Continue reading