How to Customize OBS
Written by Paul Richards on January 31, 2022
Learn how to customize Open Broadcaster Software
Once you have become comfortable with OBS, you may want to start customizing the OBS software. OBS allows users to customize many settings including the overall theme and positioning of each major user interface element. You will notice the ability to resize areas of OBS with your mouse by hovering over the edge of a particular area. For example, if you hover your mouse under the main video area you will notice you can click and drag the side to resize the element. You can also click and drag the top bar of an element to drag the entire element into a new space to reorganize the OBS interface. You can also click and drag entire interface elements outside of the main OBS application in order to create a dedicated space in a new window. Some core OBS elements such as Scenes and the Audio Mixer offer alternate layout options. For example, the image below shows the default audio mixer moved to the side and put into a vertical mode.

OBS is shown with various customization options.
To further customize the OBS interface you can use a feature called Browser Docks which allows you to add new interface elements to OBS by adding web-browser sources. A popular way to use this feature is to add a panel to display the chatroom from a live stream. To do this you can click View, select Docks, and click Custom Browser. This will open up the custom browser docks area where you can add an unlimited number of web browser sources with names you can reference. Once you create one it will appear in a window you can place anywhere you like in the OBS interface.
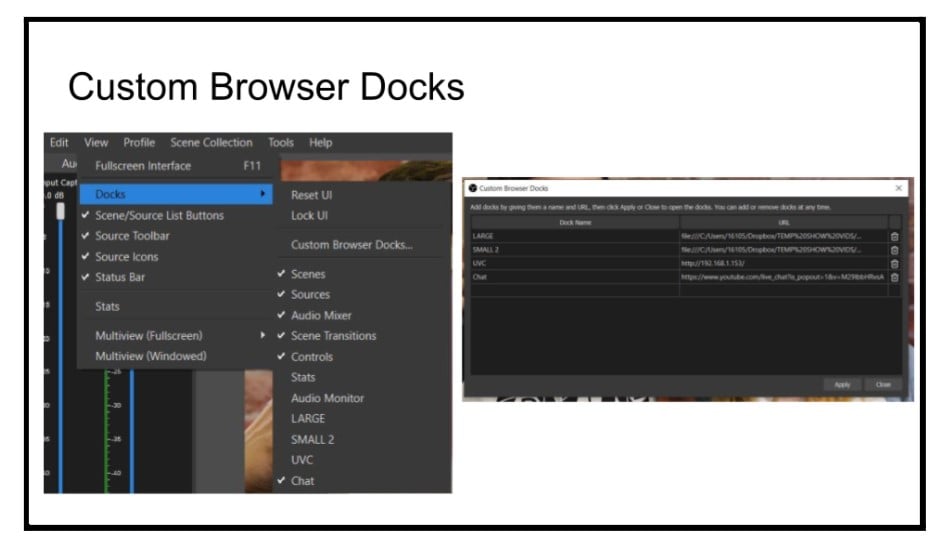
Custom browser docks can be added to OBS from the View menu.
Browser Docks can be used in a variety of creative ways to enhance your OBS experience. For example, if you are using a pan, tilt, and zoom (PTZ) camera, you can dock PTZ camera controls on the side of your OBS interface. For example, PTZOptics offers open-source camera control codes which you can use to control robotic cameras inside of OBS. The control codes are essentially HTML files that you can put on your local computer. Browser Docks can be used for websites on the public internet or HTML files on your local computer.

Docks can be placed in most areas of the OBS interface.
In the example above, you will notice that the OBS instance has multiple PTZ cameras connected to the system via Network Device Interface (NDI). NDI is an advanced video source option that is available via a plugin which will be discussed later in this book. Browser Docks can be placed on top of one another. When you drag and drop a Browser Dock on top of an existing dock, OBS will create a tab for you to switch between them. If you know how to write HTML code you can customize the size, shape, and look of your Browser Docks to fit into the theme you are using.
Editing an OBS Theme
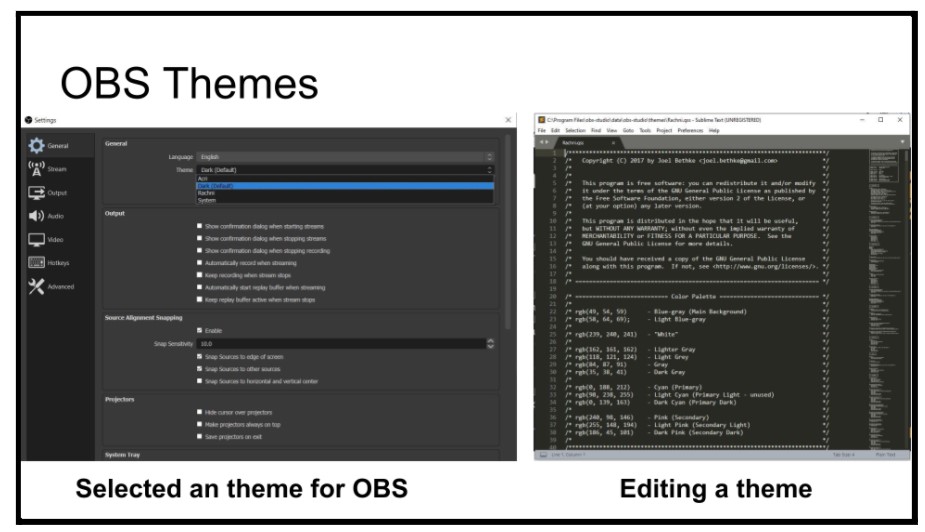
Themes can be selected in the OBS settings and edited from the main OBS themes folder.
As you are customizing your OBS interface, you should be aware of the OBS Themes that are available. Themes will update the entire OBS interface color scheme along with the size and shape of most buttons. The default themes include Arci, Dark, Default, and Ranchi. It is possible to create your own OBS Theme by using QSS which is a subset of CSS2. You can also find custom themes available on the internet. The theme files for OBS can be found in the /data/obs-studio/themes/ folder on your computer. If you would like to customize an OBS theme it is recommended that you start by editing an existing theme. The Ranchi theme which was developed by Joel Bethke in 2017, is open source and includes great documentation. The online course for this book will walk you through some basic customizations that you can do with a standard text editor.
Another helpful customization option many advanced OBS users like is called Stats Dock. The Stats Dock can be enabled in the View tab, under Docks and Stats. Once enabled you can drag this interface element to a space inside your OBS interface. This dock will display live statistics about your computer and the video production. For example, the Stats Dock will let you know the status of your live stream, whether you are recording and if there have been any dropped frames. Other important statistics include the amount of harddrive space available for your recordings and the total CPU usage.
Note: There are two Stats Dock options. One is dockable and the other is not. If you want to dock your stats panel use the Stats option found inside the docks dropdown menu.
Another decision you may decide to make is whether or not to use Studio Mode. When enabled Studio Mode will give you two windows inside your OBS production environment very much like a traditional video production switcher. Studio Mode is designed to allow producers the ability to preview scenes before transitioning them to the output area which is being live-streamed and/or recorded. The main benefit of this is the ability to preview and edit scenes before they go live. You also gain the ability to choose a custom transition type for every scene switch including the T-bar transition type. The T-Bar transition allows producers the ability to cross-fade between the preview and output scenes by dragging the T-Bar from left to right across the screen. The drawback to Studio Mode is that it takes up space inside your interface and requires more clicks to switch between scenes.
Professional productions enjoy studio mode but many experienced live streamers have found useful workarounds. For example, without using studio mode you can still choose custom in and out transitions for each scene. Many productions will then use simple hotkeys or USB-connected controllers like the Elgato StreamDeck to switch between scenes without the need for a preview window. Professional productions that have camera operators use the preview window as a way to notify camera operators that their camera is “up next” by using a Tally Light. Tally-Lights are indicator lights that communicate with on-air talent and camera operators letting them know which source is live and which source is about to be live. Tally-Lights and other professional hardware designed for OBS will be covered in more detail in an upcoming chapter.
Customizing OBS Scene Layouts
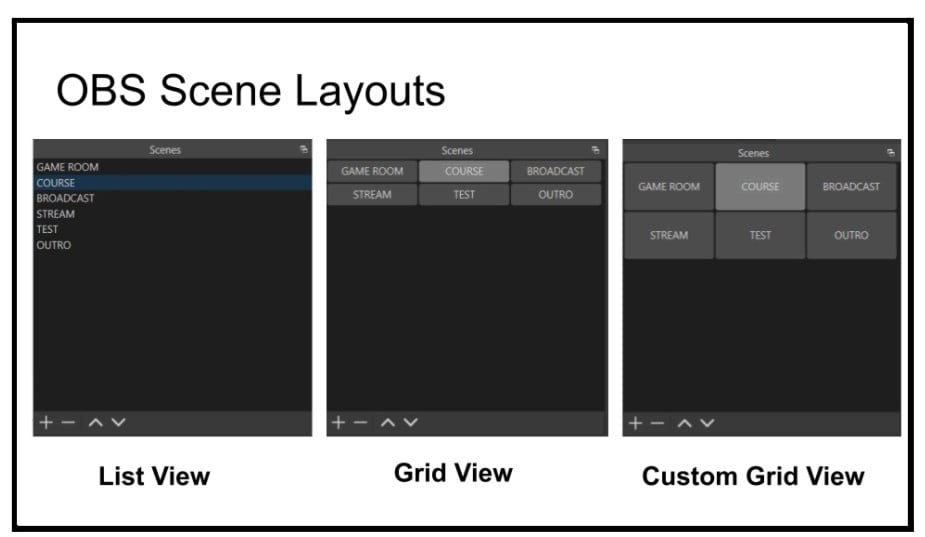
OBS scenes can be displayed in a variety of ways and customized for your application.
You can also customize the way OBS organizes scenes. The default view for Scenes is a simple list. But since OBS 26 a Grid View view has become available which makes each scene available as a button. You can turn Grid View on by right clicking the scenes area and selecting Grid View. Once enabled each scene will show up as a button which for some users is easier to click. You can also customize the size, color and shape of these buttons by editing your OBS theme file. An easy way to do this, is to create a copy of the current theme. Try naming the copy something else such as new-theme.qss. You can then update the code for QListWidget#scenes::item with the code below.
QListWidget#scenes::item {
min-height: 55px;
}
Another simple form of OBS customization is good old-fashioned organization. OBS scenes themselves can be organized into a list and include helpful information for quick reference. This is especially useful if you are designing an OBS production system for volunteer operators. The following list of scenes comes from the Trinity United Church in North Bay, Ontario, Canada. John Roberts, the audio visual technician there has shared a list of tips for organizing OBS scenes and sources to be more productive.
- 10:00 – Live Streaming off – setup and testing– camera & sound ON
- 10:15 – start Live Streaming – “Live streaming will start at 10:20am” – camera & sound OFF
- ~10:20 – prelude – live – Pre-Music: 2 choir pods
- 10:29 – Display copyright notice
- 10:29½ – Today’s Image – William Blake: “Eternity is in love with the productions of time.”
- 10:30am – Welcome (Minister in pulpit)
- hymn 1 – CALL TO WORSHIP (Kids Song): “LIKE A ROCK” – video
- Prayer of Confession: (Minister near table)
- Family Story: “Martin’s Big Words” by Doreen Rappaport and Bryan Collier (Minister P-I-P)
- An Extra Video: Free Film for Martin Luther King Jr. Day (saltproject.org) – video
- Introduction to Scripture: (Minister at table)
- Scripture: 1 Corinthians 6:12-20 – video
- hymn 2 – VU 60 Come all Ye Faithful (vs.1,2,3,5) – video
- Sermon: “In the Flesh” – 3 pictures
- hymn 3 – VU 31 “O Lord How Shall I Meet You” – video
- Offertory Prayer and Prayers of the People (Minister at table)
- lords prayer – VU 959 – video
- Brief Hymn Introduction: (Minister at table)
- hymn 4 – VU 266“AMAZING GRACE” – video
- Gratitudes and Blessing (display the “Dial for Hope” Number?) (Minister at table)
- benediction – VU 422 “God Be with You” – video
- postlude – live
This OBS scene layout allows the volunteer OBS operators to know exactly when each scene should be used because the time is in the title. The tech team then builds all the segments in the worship script into OBS, with each segment being a scene. They do not recreate the OBS session each week. Instead, they just modify the previous week’s setup as needed for the next week.
The kind of things they do change week-to-week.
- The order of the segments, although they don’t change all that much.
- If a segment is “live” or a “video.” One of the key points of the “Hybrid Services” is that any given segment can be delivered live in the Sanctuary, or via video.
- For the live segments they have to know what to do with the camera, so who is it and where will they be?
- And they look for any “special effects” they have to build into OBS. Examples from this are pictures their minister wants displayed during his sermon, and the “Dial for Hope” phone number to be displayed during the Gratitudes and Blessing segment.
On Sunday mornings all they have to do is start streaming. The volunteers can simply click through the OBS scenes in sequence. They get the full script prior to the service, and that allows them to be better prepared for upcoming scene changes. They also work with the minister to determine how he’ll be cuing the special effects.
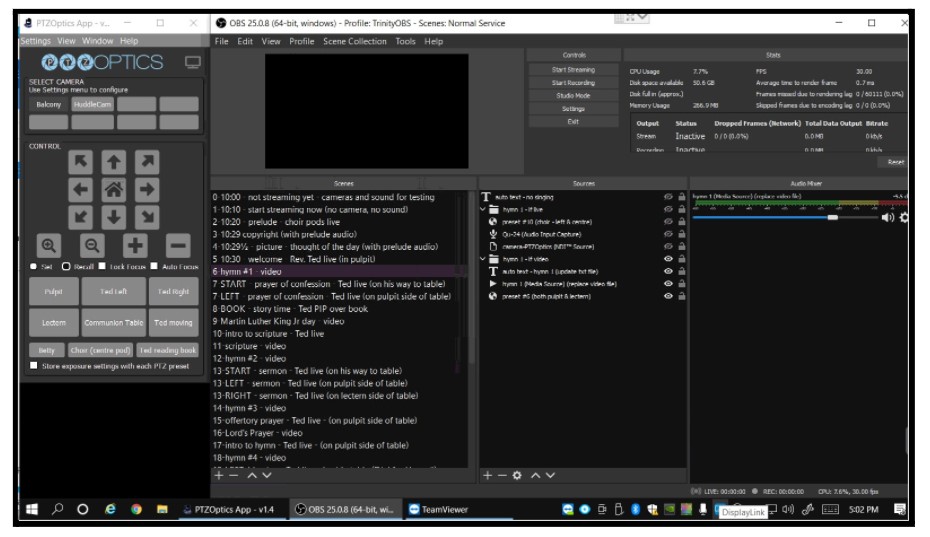
example customization of OBS for a church
John Roberts says, “We don’t use OBS in Studio Mode. This would give us a “Preview” and a “Program” window, and lots of neat transitions. But it doesn’t match the way we build our scenes – it can’t preview the next camera preset since we only have 1 camera and it can’t move until we switch to that scene. I expect we’ll switch to “Studio Mode” for our “Post-COVID Services” when the scene structure will be entirely different.”
John also explained their setup process, “Once we’ve built all the scenes, we run a quick test. We start recording and run each scene long enough to get into some audio and test the microphone for the live scenes. Then we stop recording and play the video to make sure every scene functions as we expect it to. As we get better at all of this there is likely less need to run this test, but we’re still doing it.”
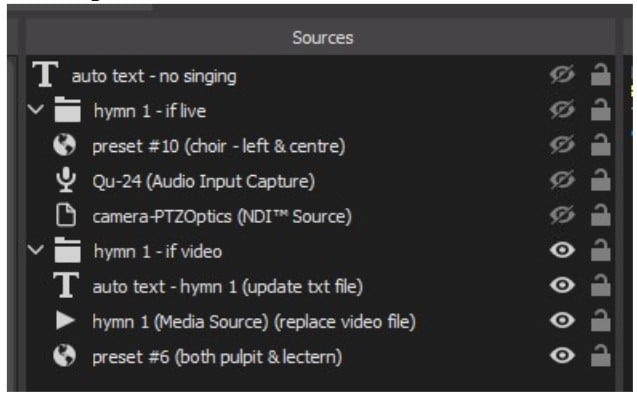
how to organize sources in OBS
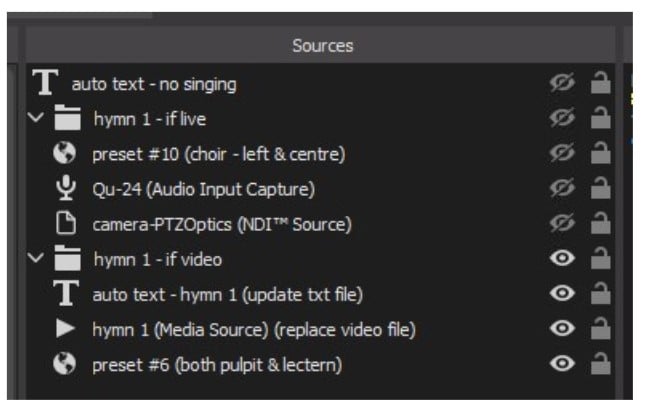
Customizing Sources with Folders
John also explained how he uses folders inside each scene to quickly switch between live and pre-recorded segments. “With some scenes in our Hybrid Services, like hymns and scripture, being live one week and a video the following week, we have built scenes to enable this flexibility. Rather than rebuild the scene every time it changed, we have both live and video sources built into the scene, and simply “hide” the one we don’t need. For example, hymn 1, you’ll see this week is a video source and the “if video” folder is visible.”
Extra scenes for various show starting points
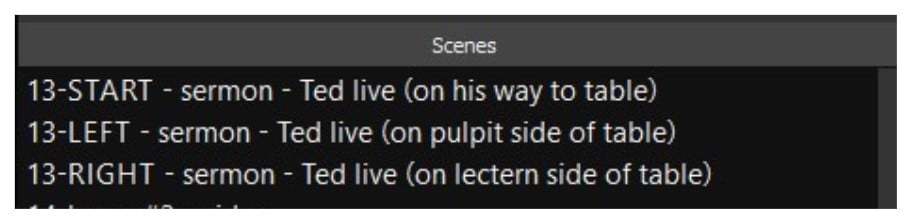
John has also designed various scenes to switch between depending on the start point of the session. John explains, “Our minister moves around during his segments. Using a PTZOptics camera and the HTTP commands we have created several scenes that we use to move the camera. These are virtually identical scenes, with the only difference being the PTZ camera preset that’s called in each scene. The “START” scene has a wide camera setting that’ll allow the minister to move from the pulpit down to the stage. The “LEFT” and “RIGHT” scenes each cover ½ the stage, and allow the tech operator to follow the minister as he moves back and forth.”
example 2 of OBS organized
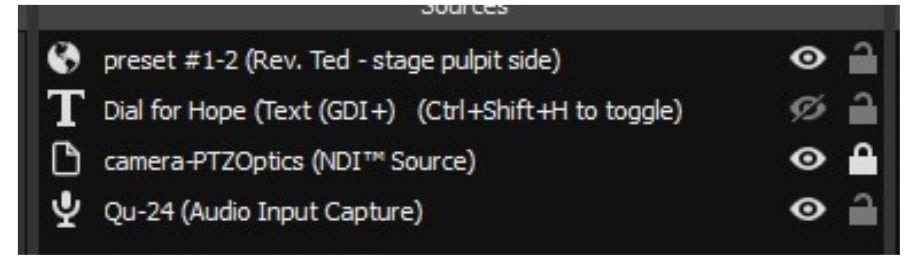
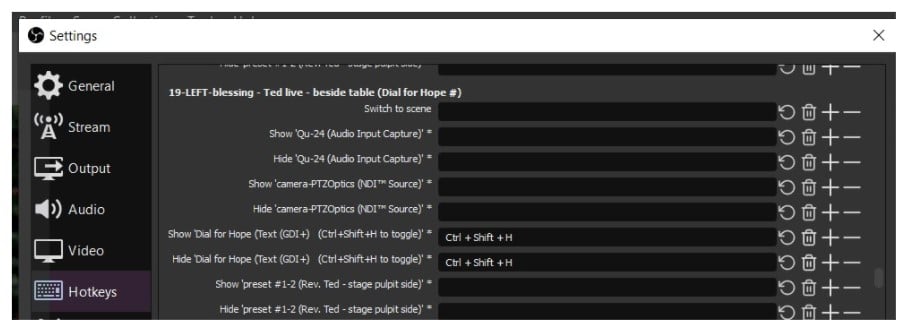
Adding Hotkeys to Source Names
John also uses OBS Hotkeys to toggle special effects on and then off again. In the picture to the right, you’ll see that the “Dial for Hope” source can be toggled with a [Ctrl]+[Shift]+H key combination. This is well labeled so the streaming tech knows what to do.
Hotkeys can do a lot more than this simple task but the integration of the Hotkey sequence into the source title is an innovative way to remind OBS operators which set of keys is needed to use the specific feature in the interface.
customizing OBS hotkeys
Standardization and Cloud Integration
Another tip John shared is the idea of standardization of files and source names. Organizing the files your OBS system uses allows you to easily update and replace files using a cloud-based system such as Google Drive or Dropbox. For example, the
folders in OBS sources
“hymn 1 (Media Source)” refers to an actual file on the computer called “hymn 1.mp4.” By using that name they can easily swap that file with next week’s first hymn. This way there’s nothing to change in the OBS setup. This can be done locally on the computer or set up to sync with files on a shared drive from Dropbox.
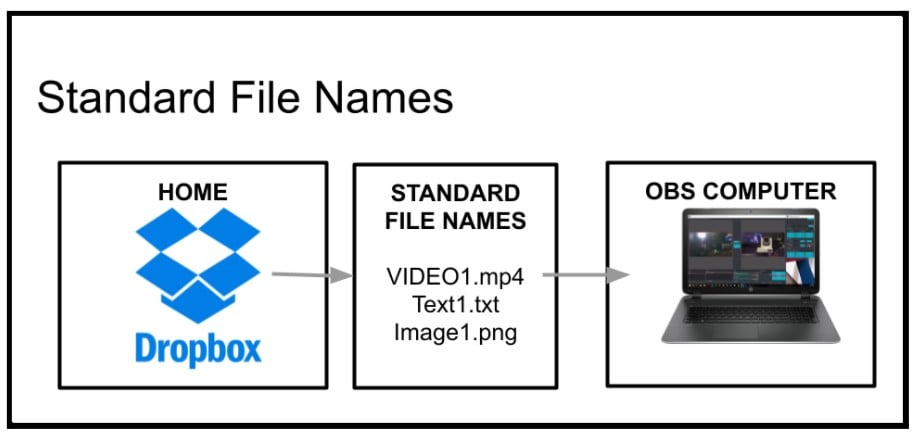
You can remotely update the files your OBS system uses with a cloud-based service such as Google Drive or Dropbox.
This can also be used for text files, which display things like credits for live music, and the date of the service. Those files have self-explanatory names like “prelude.txt,” “postlude.txt,” “hymn 1.mp4,” and “date.txt.”
John explains, “We’ve taken this a step further by using various utilities to get these files in place. I update the files in a directory on my hard drive, which is then synced to my Dropbox, which is then synced to the Streaming PC’s hard drive. So I simply update or replace the file in that folder on my hard drive, and within a few minutes the Streaming PC has the file and is all set.”
As you can see OBS can be tuned to fit the needs of almost any production. The open-source nature of OBS allows you to customize both the interface and the workflow of your project. Some organizational tips are obvious and they can easily improve the efficiency of your video production. Other OBS customizations require plugins which will be covered in the upcoming chapters. However, you plan to use OBS, make the interface your own, by customizing the available themes, interface elements, scenes, and sources to fit your project’s requirements.
Key Takeaways:
- OBS is a highly customizable open-source video production software.
- OBS is open source and you can take the code and customize it to fit your needs.
- The OBS interface in totally configurable and dockable panels allows you to further customize the interface.
- Good old fashion organization can go a long way to making your OBS productions more efficient.
Additional chapters from the OBS Superuser Guidebook
- Chapter 1 - An Update on the Updates here
- Chapter 2 - How to Customize OBS here
- Chapter 3 - How to Optimize OBS here
- Chapter 4 - How to use the core features of OBS here
- Chapter 5 - How to use video filters in OBS here
- Chapter 6 - How to use audio filters in OBS here
- Chapter 7 - The Top 10 OBS Plugins here
- Chapter 8 - The Multiple RTMP Streaming Plugin here
- Chapter 9 - The Automatic Scene Switching Plugin here
- Chapter 10 - How to record multiple sources in OBS here
- Chapter 11 - How to dock sources with live video in OBS here
- Chapter 13 - How to use NDI in OBS here
- Chapter 14 - How to route Audio in and out of OBS here
- Chapter 15 - How to use Virtual Audio cables with OBS here
- Chapter 16 - How to use VST Audio Plugins for OBS here
- Bonus Chapter - How to fix audio sync issues in OBS here
- Chapter 16 - How to use use hotkeys with filters here
Check out our other articles about Open Broadcaster Software below:
- Updated - How to connect OBS and Zoom with VoiceMeeter and Headphone Monitoring - here.
- Learn how to use OBS for remote production here.
- How to connect OBS with Zoom, here
- OBS vs vMix a complete review here.
- How to use Zoom for Church Meetings and Worship here.
- Here are the top 10 OBS features you need to know about
- Getting dropped frames in OBS. Here are some new feature to help with that.
- Take a look at OBS 24 and all the new feature here.
- Increase your productivity with OBS and learn how to use hotkeys here
- Learn how to setup animated stinger transitions in OBS here
- Learn how to install the NDI plugin for OBS (and why you should) here
- Learn more about the latest OBS user interface (UPDATED for 2019) here
- Make your audio in OBS sound great with these VST 2 plugins here
- Learn how to fix the most common OBS issues! Audio and Video Sync! here
- Learn how to use OBS 20+ here
- Learn how to use NDI Cameras with OBS here
- Learn how to use the OBS Multiview here
- Learn OBS quickly with our ZERO to SIXTY tutorial video here
- Learn more about OBS settings and optimizing your settings for live streaming here
- Learn how to record videos using OBS here
- New OBS 24 feature allows broadcasters the ability to pause and restart video recordings. Learn more here.
- Learn how to add live annotations over your OBS productions here
- Learn how to add a webcam and set up a picture in picture scene inside OBS here
- Learn how to crop and rotate inputs inside OBS here
- Learn how to use color correction tools and LUTs here
- Learn the best way to connect OBS and Zoom here
- Learn how to connect OBS and Teams here
- Learn how to use countdown timers in Teams here
- Learn where OBS recordings are saved here
- Learn how to live stream to YouTube and Facebook with OBS for free here
- Learn about OBS 27's new features here

Continue reading