How to Record Multiple Sources in OBS
Written by Paul Richards on February 9, 2022
Source Record allows you to record any source in OBS while simultaneously streaming or recording the main output of OBS. In other software and hardware platforms, this is referred to as an Isolated Output (ISO). ISO recordings are ideal for post-production because they do not feature the overlays and graphics found in a full Scene and therefore can be used to easily recreate new content. Using Source Record, you can record as many sources as your computer can handle independently from the main video recording.
Source Record can be applied as an Effect Filter on available sources.
Whether you are recording the screen and a camera for video gameplay, streaming a sporting event with multiple cameras, recording a class session with various camera angles, or any other application, you may need to make a separate recording of just one source. You may want a clean copy of the screen share for example or a wide shot for post-production editing. In some cases, there are additional camera angles that won’t be used in the primary production, that can be saved in the event they are needed later. The ability to record a “clean-feed” of any source can be a powerful video production tool. Source Record brings this functionality to OBS via an easy to apply filter.
Installing Source Record
Source Record can be downloaded for PC, Mac, and Linux from the OBS website at https://obsproject.com/forum/resources/ Download the version for your system. Depending on your system and the version you download, it may include a self-installer. Otherwise, follow the instruction to place the plug-in files in the correct folder on your computer. Once you are done, restart OBS, and you will be ready to go. Source Record will now be available as a filter for any source.
Setting Up Source Record
Launch OBS normally. If you don’t already have sources and scenes set up, go ahead and add one or two. Otherwise, you can work with the setup you already have.
- Choose the Source or Scene you wish to record by itself. There will be times that you want to record just a source by itself. However, if you’re going to include more than one layer, like an overlay, you will want to set up a Scene with the Source Record filter.
- Right-click on either a Source or the Scene you want and select Filters.
- In this dialog box, click + to add a filter.
- If you installed Source Record correctly, you will see it at the bottom of the list. Select it.
- When you see Source Record in the list of filters, click on the eyeball icon next to it. This will toggle Source Connect off until you are ready.
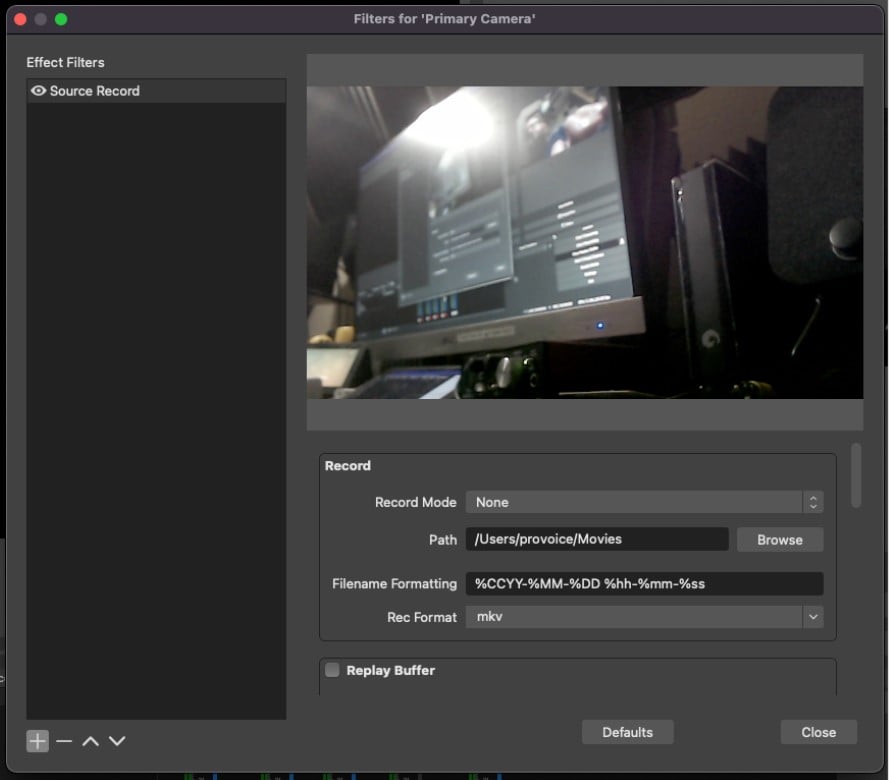
- In the dialog box, choose your Record Mode. This will be the trigger for your recording. For example, if you choose Streaming, Source Record will begin recording your selected source or scene at the same time you start streaming.
- Choose the path to save the files in the correct folder.
- Select your recording format. .mkv is recommended for most applications since, if your computer goes down, it will retain the recording up until that point. With other formats, like MP4, all the data will be lost if the recording is interrupted before it is finalized. MP4 is very popular as well for its high quality to file size ratio.
- Review the additional advanced settings. Note that there is an option to record a separate audio track. This could be useful if you want to record a video source, plus an external microphone.
- When ready, toggle the eye icon back on and press close.
Now, whenever you begin to stream, record, or start whatever action you set as Record Mode, OBS will start recording your selected source or scene. You can repeat this whole process up to two more times to record a total of three isolated recordings. Another plug-in called Filter Hotkeys will allow you to start and stop Source Record with the click of a button.
How is Source Record Being Used?
Gaming
A gamer streaming to a platform like Twitch may want to send a multi-layered output with a screen capture for the gaming system, a camera capturing their reactions as they play, and an overlay with information about the streamer. However, they may also want to be able to record their gameplay at full quality for posting on YouTube. Or, maybe the gamer wants to record full quality video from their camera for use in later post-production. With the Source Record plug-in, any source can be recorded separately at full quality.
Houses of Worship
Houses of worship often use volunteers to produce live video. Unfortunately, inexperienced operators are more prone to the occasional switching or camera operating error. With Source Record, it is simple to create separate recordings of up to three cameras. This way, any glitches can be edited before the service is uploaded for on-demand viewing. Social media teams could also access all the camera angles for sermon clips or music performances.
Sporting Events
Sports streamers have long needed a way to record an isolated output. The raw footage without any overlays is excellent for highlight reels. It is also helpful to record multiple individual cameras to capture the best view of a play. Often, the best angle is not from the camera that was streaming at the moment. With Source Record, up to three cameras can be saved independently for later review and post-production.
Pros and Cons
Pros: It’s free. It adds ISO capability to OBS. It’s easy to use.
Cons: There are glitches for some users and configurations.
Alternatives To Source Record
Currently, there are no other plug-ins that offer this type of functionality. This makes Source Record the only presently available option other than switching to another platform such as Wirecast, ECamm Live, or vMix.
Key Takeaways
- Source Record allows you to record as many sources as you can with your computer using OBS.
- ISO recording is a popular feature in other live streaming platforms, and it adds crucial functionality to OBS.
- It may be a worthwhile addition to OBS, even for those who aren’t currently in need of it. The need to record a source separately could come up at any time.
Additional chapters from the OBS Superuser Guidebook
- Chapter 1 - An Update on the Updates here
- Chapter 2 - How to Customize OBS here
- Chapter 3 - How to Optimize OBS here
- Chapter 4 - How to use the core features of OBS here
- Chapter 5 - How to use video filters in OBS here
- Chapter 6 - How to use audio filters in OBS here
- Chapter 7 - The Top 10 OBS Plugins here
- Chapter 8 - The Multiple RTMP Streaming Plugin here
- Chapter 9 - The Automatic Scene Switching Plugin here
- Chapter 10 - How to record multiple sources in OBS here
- Chapter 11 - How to dock sources with live video in OBS here
- Chapter 13 - How to use NDI in OBS here
- Chapter 14 - How to route Audio in and out of OBS here
- Chapter 15 - How to use Virtual Audio cables with OBS here
- Chapter 16 - How to use VST Audio Plugins for OBS here
- Bonus Chapter - How to fix audio sync issues in OBS here
- Chapter 16 - How to use use hotkeys with filters here
Check out our other articles about Open Broadcaster Software below:
- Updated - How to connect OBS and Zoom with VoiceMeeter and Headphone Monitoring - here.
- Learn how to use OBS for remote production here.
- How to connect OBS with Zoom, here
- OBS vs vMix a complete review here.
- How to use Zoom for Church Meetings and Worship here.
- Here are the top 10 OBS features you need to know about
- Getting dropped frames in OBS. Here are some new feature to help with that.
- Take a look at OBS 24 and all the new feature here.
- Increase your productivity with OBS and learn how to use hotkeys here
- Learn how to setup animated stinger transitions in OBS here
- Learn how to install the NDI plugin for OBS (and why you should) here
- Learn more about the latest OBS user interface (UPDATED for 2019) here
- Make your audio in OBS sound great with these VST 2 plugins here
- Learn how to fix the most common OBS issues! Audio and Video Sync! here
- Learn how to use OBS 20+ here
- Learn how to use NDI Cameras with OBS here
- Learn how to use the OBS Multiview here
- Learn OBS quickly with our ZERO to SIXTY tutorial video here
- Learn more about OBS settings and optimizing your settings for live streaming here
- Learn how to record videos using OBS here
- New OBS 24 feature allows broadcasters the ability to pause and restart video recordings. Learn more here.
- Learn how to add live annotations over your OBS productions here
- Learn how to add a webcam and set up a picture in picture scene inside OBS here
- Learn how to crop and rotate inputs inside OBS here
- Learn how to use color correction tools and LUTs here
- Learn the best way to connect OBS and Zoom here
- Learn how to connect OBS and Teams here
- Learn how to use countdown timers in Teams here
- Learn where OBS recordings are saved here
- Learn how to live stream to YouTube and Facebook with OBS for free here
- Learn about OBS 27's new features here


Continue reading