How to use NDI with OBS
Written by Paul Richards on February 24, 2022
NDI stands for Network Device Interface and it is an IP video production protocol originally developed by NewTek. NDI was released in 2015, and it has since become one of the most popular IP video production connectivity options for professionals around the world. The NDI plugin is available for OBS Studio users on Mac, PC, and Linux computers. The plugin was originally released in June of 2017 by a french developer named Stéphane Lepin with the user name Palakis. As of 2022, OBSProject.com shows the NDI plugin has been downloaded over 1.7 million times. Over the past few years, Palakis has made regular updates and improvements to the plugin.
NDI itself is not open source and therefore it can not be developed into the core OBS application. NDI is royalty-free and the plugin that Palakis has developed uses the royalty-free software development kit (SDK) to add NDI functionality into OBS. Once installed the plugin allows users to bring NDI audio and video sources into OBS and send NDI audio and video sources out of OBS.
Adding NDI sources to OBS
The nice thing about NDI is its ease of use when discovering video sources on your network. You can bring NDI video sources into OBS using the “NDI Source” option available in the sources menu. This allows you to name the NDI source and search through a list of available NDI sources on your network. The current OBS plugin integration allows you to connect to NDI sources in two bandwidth modes “highest” and “lowest.” You can also choose to connect with “audio-only.” An important option to understand when using multiple NDI cameras is called Sync. NDI is able to synchronize multiple cameras or video feeds together using time codes that can come from the device itself or the network. Most NDI video sources can be set up to synchronize with a common Network Time Protocol (NTP) server. Your network should have an NTP server in place or you can use a commonly used server such as time.windows.com or time.google.com. NTP settings are so important to IP video, they will be covered in more detail in an upcoming chapter.
Outputting NDI sources from OBS
You can send NDI video out of OBS easily using the NDI Output Settings found in the Tools dropdown menu. This area allows you to send two main NDI outputs. You can send the “Main Output” which is your “Program” window in OBS Studio and you can send your “Preview Output” which is your “Preview” window. Simply check the outputs you want to send via NDI, give them a name and press OK. Once you have done this your NDI video sources coming from OBS will be discoverable on your local area network (LAN).
The latest version of the NDI plugin for OBS also includes a special NDI filter that can be applied to any audio or video source in OBS. This is an ideal way to take a specific source and make a dedicated NDI output available on your network regardless of whether it is in preview or program. To access this filter, you can right-click on any source and select the “Filters” option. Here you can choose to apply a dedicated NDI output with both audio and video or a dedicated NDI output just audio-only. Once you create a dedicated NDI output filter you can name the NDI source and click “Apply Changes.” Once done, your NDI source will be made available on your network.
It’s worth noting that OBS will never have native support for NDI. All code in the OBS project must be 100% open source. NDI itself is royalty-free, but the code is not open source. Therefore, the plugin provides a legal way for OBS to interface with NDI. So why is OBS so important to the NDI ecosystem overall? NDI essentially opens up thousands of new video input and output opportunities for OBS users. Because OBS is free, it has become a go-to solution for creating NDI video and sending it out into a LAN.
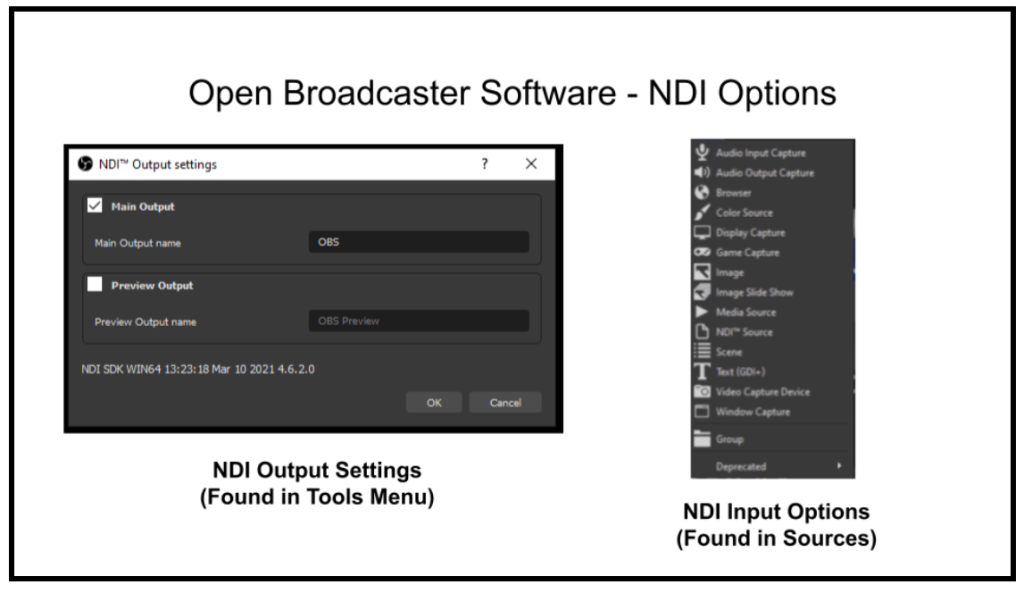
NDI® settings inside OBS.
Example: Using OBS as an NDI® output
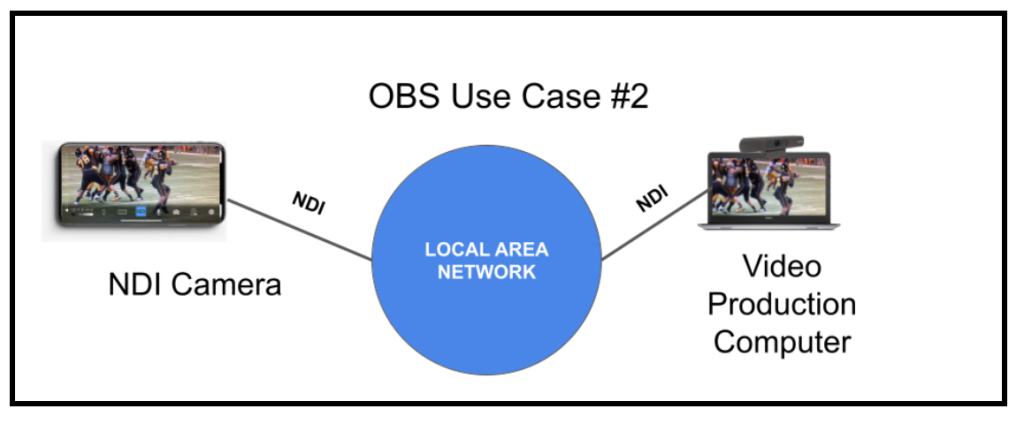
One example of using an NDI output with OBS is a dual computer setup. Many people have multiple computers and they want to stream, record and play video games at the same time. In many cases, one computer is not powerful enough to play computer games and live stream at the same time. So it’s possible to have one computer for playing video games, and another for live streaming and recording the content.

Connect two OBS computers
Connecting two computers with OBS is very easy with NDI. One computer is set up to output NDI and the other simply uses NDI as an input source. As long as both computers are on the same local area network (LAN), the video should be crystal clear and reliable with minimal latency. Another popular use of OBS is to output the production to another computer as a display. In this way, you can use all the tools in OBS to create a dynamic presentation with live video and other sources. The entire production can run on a Mac, PC, or Linux computer and then be distributed across the network to another computer where you want the video to be displayed.
Example: Using NDI® as an input
Perhaps the most popular way to use NDI as an input in OBS is with a smartphone. NDI offers two smartphone applications that can be used to send video in two different ways. NDI Camera turns a smartphone into an NDI camera. NDI Capture captures the screen of a smartphone and makes the video available as NDI. NDI Capture is ideal for mobile video gaming or presentations that happen on a smartphone. NDI Camera is great for sharing live camera video with OBS over a LAN.
NDI Camera used with a video production computer running OBS.
There are multiple benefits to using an NDI Camera instead of a regular webcam. First of all, smartphones are popular and they feature some of the best camera technology available to consumers. Secondly, the NDI® Camera solution uses WiFi and doesn’t take up a USB port as a webcam would. Therefore, the NDI® Camera can be used untethered from the computer it’s used with to provide new and interesting viewpoints.
Mobile phones can be used to send screen captures with NDI® Capture too. While mobile phones are great for playing video games and making presentations, they can be clumsy when used with multimedia applications such as live streaming and video production. Therefore, NDI provides an easy way to incorporate mobile phone connectivity with larger live video productions.
Example: Using NDI® Filters
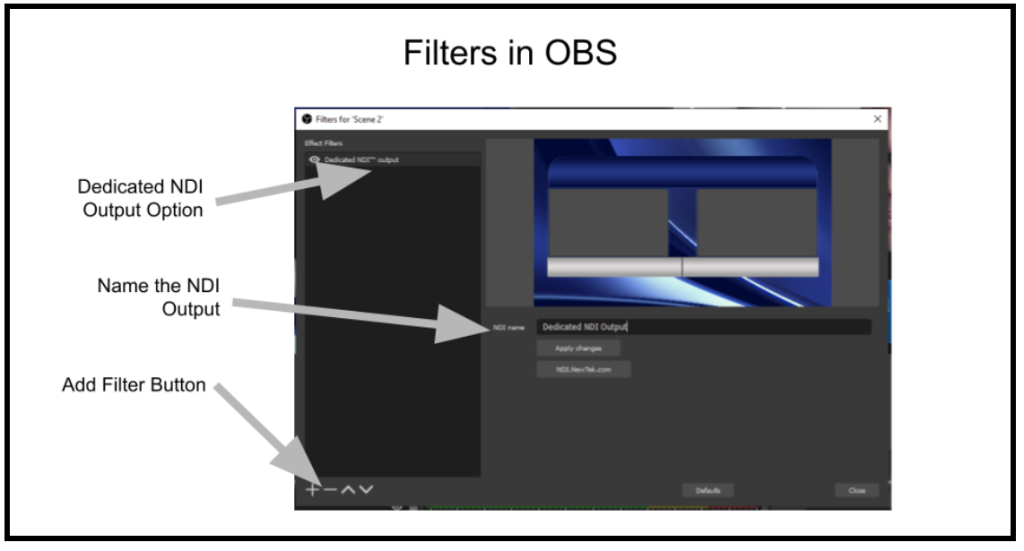
Filters area of OBS.
Once the NDI plugin is installed with OBS, a new filter called “Dedicated NDI® Output” becomes available. This is a great way to create a dedicated NDI® output for any Scene or Source you choose. You can add a filter to any Source or Scene by right-clicking and choosing the Filters option. Once the Filter has been added, you can name your NDI output. This is the name that will be discoverable by other NDI solutions on your LAN.
Once you have stepped into the NDI® ecosystem, you will find a growing number of hardware and software tools available to improve your production workflow and that offer new creative possibilities. Due to the nature of NDI®, there are many software tools that can do as much or more than previous hardware options. NDI® has always offered many resources to developers to add NDI® functionality to their software and hardware systems. The NDI® Software Development Kit (SDK) has helped many developers integrate NDI® into their products over the years since its release.
| NDI® Tools | Streaming Software | Graphics Software |
| NDI® Studio Monitor, NDI® Bridge, NDI® Remote, NDI® Screen Capture, NDI®|HX Driver, NDI® for Adobe® Creative Cloud®, NDI® Webcam Input, NDI® Access Manager, NDI® Import I/O for Adobe CC, NDI® Audio Direct, NDI® Screen Capture HX, NDI® Test Patterns | OBS, vMix, Wirecast, Livestream Studio, MimoLive, Wowza, xSplit, Manycam, NewTek Connect | ProPresenter EasyWorship Panamation Resolume Sportzcast |
| NDI® Hardware | Communications | Smartphone Apps |
| Magewell, Epiphan, LiveU, Teradek, PTZOptics, SONY, Panasonic, HuddleCamHD, NewTek, Cannon, Bluefish444, Tally-Lights LLC, Bird-Dog | Microsoft Teams, LiveToAir by Gnural Net, Skype | NDI® Camera NDI® Capture |
The list above offers some of the most popular NDI® supported software and hardware solutions. Please note this is not a complete list.

Free NDI® Tools
NDI® offers a free set of tools for you to get started. You can download these tools at https://www.ndi.tv/tools/. Below is a list of the most useful NDI® tools you can start using today.
Studio Monitor
Studio Monitor can be used on a Mac or PC computer to quickly display any NDI® video source available on your LAN. This application can quickly display all discoverable NDI® sources on your local area network. Studio Monitor has a long list of features that will be covered in an upcoming chapter. Most importantly, you can view any NDI® source and if the source is a PTZ camera, you can control the PTZ camera with an on-screen control set.
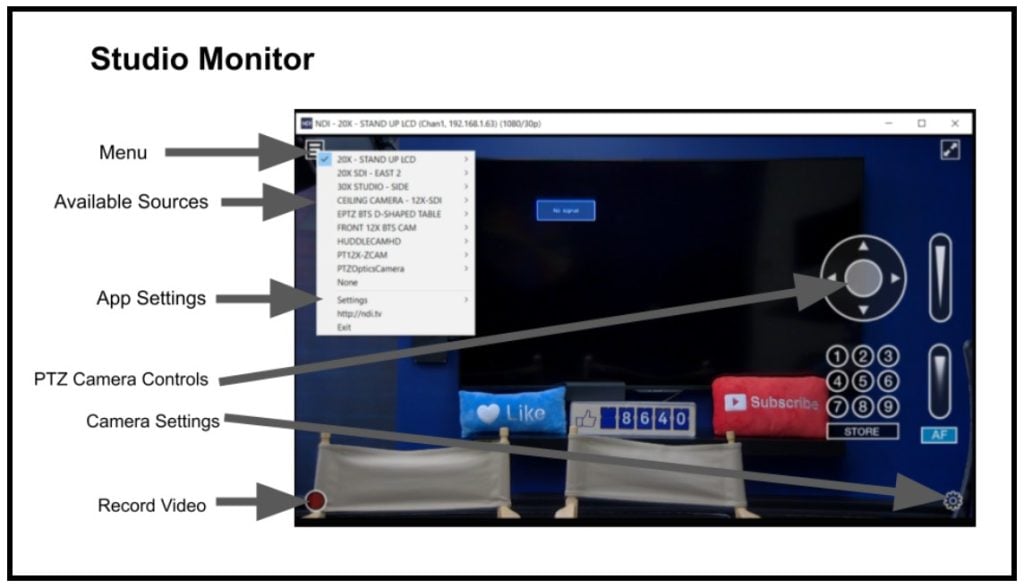
Studio Monitor connected to a PTZ camera will reveal PTZ camera controls.
NDI® Studio Monitor can also be controlled remotely by a web server. The IP address for this web server can be found in the applications settings area. Once you enter this IP address into a web browser on the same LAN, you can access the control for Studio Monitor. This is particularly useful if you are using Studio Monitor to power an LCD screen that is remote to your current location. Applications include digital signage, video for overflow areas, and remote camera control applications. In this way, NDI® Studio Monitor can be used as a router to deliver customized NDI® video content to a number of displays on your network. Here is a summary of NDI® Studio Monitor benefits:
- Independently configurable video source, overlay, and audio per instance.
- Launch, distribute, and manage multiple instances from a single device.
- Support for control and configuration via compatible mobile devices.
- Comprehensive support for multi-monitor video wall and signage installations.
- Remote control of PTZ camera, recording, and configuration for applicable sources.
- Record NDI® files directly from multiple instances with NDI® Studio Monitor.
- Remote control via web server.
- NDI® output allows NDI® Studio Monitor to act as a router and server for delivery to multiple outboard displays.
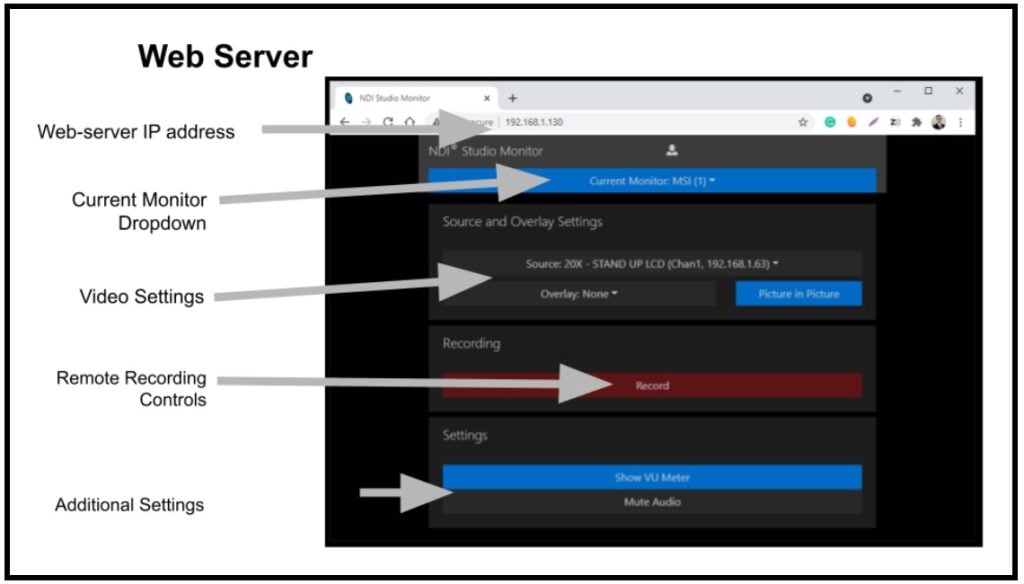
Studio Monitor features a web server that can be used to control the application remotely.
NDI® Webcam Input
The NDI® Webcam Input is a small utility that creates a virtual webcam source from any discoverable NDI® video source on your network. The NDI® virtual webcam is then usable with any software that uses the webcams. This mini-application allows you to select an NDI® source that you would like to use as a webcam source in an application such as Zoom or GoToMeeting. Once selected, you can use any NDI® source on your network as a webcam in any application using the available “NewTek NDI®” virtual webcam selection.
During the installation of NDI® tools, you can choose to have the NDI® Webcam Input “run at startup.” When the application is running it can be found in the system tray. You can click the application to open up a small menu of settings. It is here where you can choose the NDI® video source you would like to make available as a virtual webcam.
The NDI® Webcam Input is compatible with Google Hangouts, GoToMeeting, Skype, Zoom, and more. It supports full frame rate video and audio up to 1080p and 4K UHD at 60 fps.
The Webcam Input application is found in the system tray.
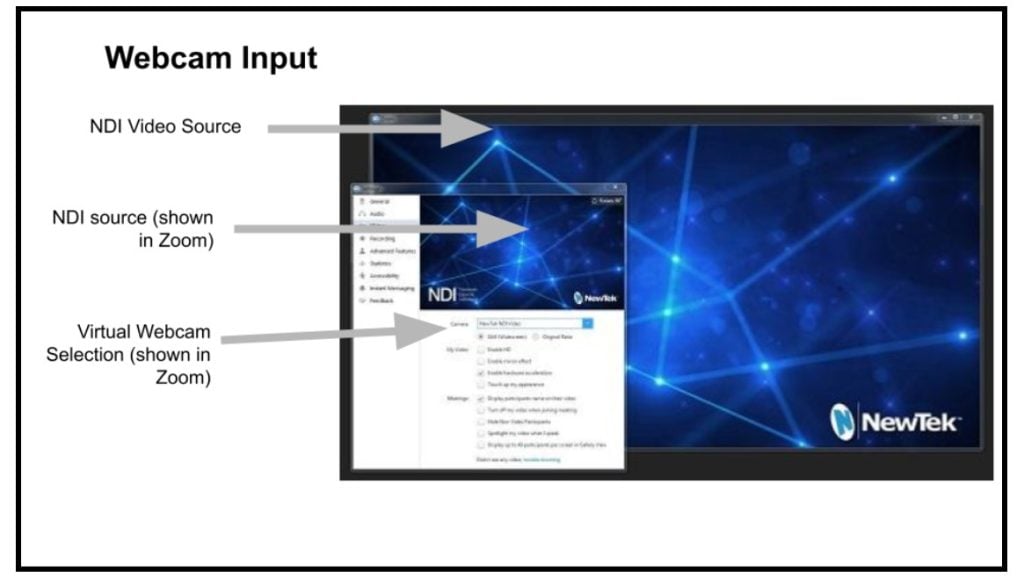
Webcam Input can be used with popular platforms like Zoom.
NDI® Screen Capture
NDI® Screen Capture can capture the screen of the computer it is installed on and make it available as an NDI® video source. NDI® Screen Capture supports the capture of multiple monitors and it also includes the ability to capture a webcam. There are now two versions of NDI® Screen Capture — the original version is called NDI® Screen capture, and a newer version is called NDI® Screen Capture HX. Both versions will be outlined in more detail in an upcoming chapter. The biggest difference is the encoding options which allow NDI|HX® Screen Capture to reduce bandwidth.
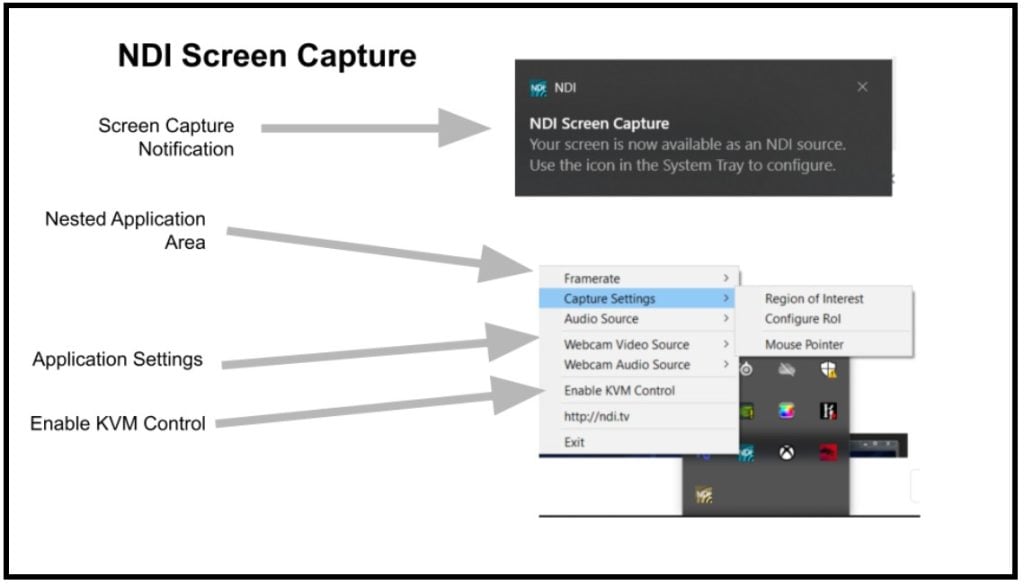
Once NDI® Screen Capture is running on the computer you will receive a notification saying, “Your screen is now available as an NDI® source.” You will also see the NDI® Screen Capture icon in the System Tray. From here you can open up the application settings which include Framerate, Capture Settings, Audio Source, Webcam Video Source, Webcam Audio Source, and Enable KVM Control. Most of these features are self-explanatory, but the KVM control is an interesting feature you can use to take keyboard and mouse control for the computer remotely. Once enabled, the NDI® Studio Monitor application will allow you to control any computer remotely with the NDI® Screen Capture KVM Control feature enabled. Here are a few features the application enables:
- Generate multiple live video sources simultaneously with selectable audio.
- Support for multi-monitor capture, with independent output at up to 60Hz.
- Capture all of your system’s desktops in real-time, at 60Hz and games at 120Hz or above with almost no CPU usage.
- KVM (keyboard, video, mouse) remote control of any workstation running Scan Converter from NDI® Studio Monitor.
- Consumes minimal system resources with no noticeable performance impact.
NDI® for Adobe® Creative Cloud®
NDI® for Adobe Creative Cloud enables users to output NDI® video directly from Adobe products including After Effects and Premiere Pro. This allows video producers to quickly output video directly from the timeline of their projects for review and approval. These applications include Adobe Premiere Pro, Adobe Prelude, Adobe After Effects, and Adobe SpeedGrade. NDI® for Adobe Creative Cloud is:
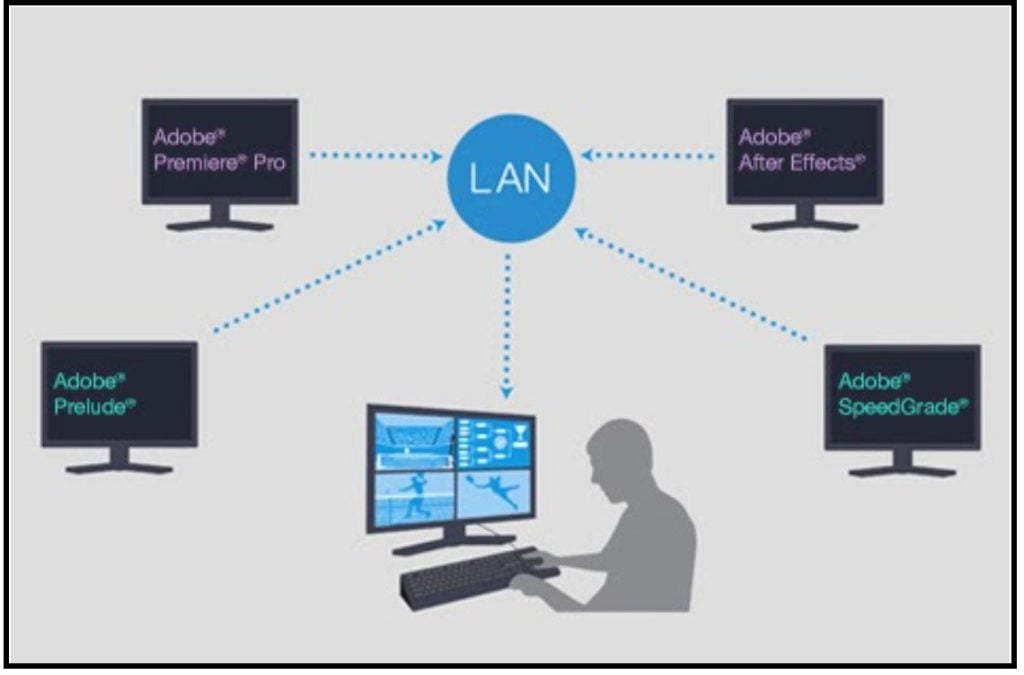
Adobe Creative Cloud products that work with NDI®
- Compatible with Adobe After Effects® CC, Premiere® Pro CC, and more.
- Supports full-resolution, real-time video with audio, and transparency.
- Viewable from any NDI®-enabled receiving device anywhere on the network.
NDI® Access Manager
NDI® Access Manager allows administrators to restrict access to NDI® video sources on their network. The application allows users to manage visibility and accessibility of NDI® sources to specific computers on a network. NDI® Access Manager can easily group NDI® sources together to make them either public or privately discoverable. It also enables administrators to:
- Configure NDI® channels as public or private on the network.
- Group NDI® systems, devices, and applications to preference.
- Connect to and access NDI® channels on other networks via an IP address.
- Connect to and access NDI® channels on other networks via an IP address.
- Advanced controls allow preferences for Transmission Control Protocol (TCP) or User Datagram Protocol (UDP) connections, multicast operation, and optional discovery server support.
NDI® Audio Direct
NDI® Audio Direct is a tool designed to bring NDI® audio sources into Digital Audio Workstation (DAW) software. DAW software solutions are used to record, edit, and produce audio. The NDI® Audio Direct tool leverages two plugins that are designed to transport audio in and out of DAW software solutions. NDI® Audio Direct is compatible with any DAW that supports VST 3 or LV2 audio plug-ins.
NDI® VLC Plugin
VLC is a free open-source video player. VLC’s wide user adoption has led NDI® to support the system with a free plugin. The plugin allows NDI® video sources to be directly accessible with compatible VLC software without the need for transcoding.
- The plugin is compatible with existing and previous versions of VLC Media Player for Windows.
- It makes content accessible without transfer, transcoding, or direct connectivity.
- It supports the encoding of multiple instances of the VLC Media Player simultaneously.
- It offers virtual PTZ control for the pan function and zoom control around VLC output.
As you can see NDI can open up many possibilities for your productions.
Key Takeaways:
- OBS is a completely free video production that continues to improve with each release.
- OBS is open source and the project is supported by a large community of developers.
- There is an NDI® plugin for OBS which provides NDI® connectivity for OBS.
- NDI® can be used as a video input or output with OBS.
- Because OBS is free, it’s a great application to produce NDI®- enabled video content for use with NDI® tools such as Studio Monitor.
Additional chapters from the OBS Superuser Guidebook
- Chapter 1 - An Update on the Updates here
- Chapter 2 - How to Customize OBS here
- Chapter 3 - How to Optimize OBS here
- Chapter 4 - How to use the core features of OBS here
- Chapter 5 - How to use video filters in OBS here
- Chapter 6 - How to use audio filters in OBS here
- Chapter 7 - The Top 10 OBS Plugins here
- Chapter 8 - The Multiple RTMP Streaming Plugin here
- Chapter 9 - The Automatic Scene Switching Plugin here
- Chapter 10 - How to record multiple sources in OBS here
- Chapter 11 - How to dock sources with live video in OBS here
- Chapter 13 - How to use NDI in OBS here
- Chapter 14 - How to route Audio in and out of OBS here
- Chapter 15 - How to use Virtual Audio cables with OBS here
- Chapter 16 - How to use VST Audio Plugins for OBS here
- Bonus Chapter - How to fix audio sync issues in OBS here
- Chapter 16 - How to use use hotkeys with filters here
Check out our other articles about Open Broadcaster Software below:
- Updated - How to connect OBS and Zoom with VoiceMeeter and Headphone Monitoring - here.
- Learn how to use OBS for remote production here.
- How to connect OBS with Zoom, here
- OBS vs vMix a complete review here.
- How to use Zoom for Church Meetings and Worship here.
- Here are the top 10 OBS features you need to know about
- Getting dropped frames in OBS. Here are some new feature to help with that.
- Take a look at OBS 24 and all the new feature here.
- Increase your productivity with OBS and learn how to use hotkeys here
- Learn how to setup animated stinger transitions in OBS here
- Learn how to install the NDI plugin for OBS (and why you should) here
- Learn more about the latest OBS user interface (UPDATED for 2019) here
- Make your audio in OBS sound great with these VST 2 plugins here
- Learn how to fix the most common OBS issues! Audio and Video Sync! here
- Learn how to use OBS 20+ here
- Learn how to use NDI Cameras with OBS here
- Learn how to use the OBS Multiview here
- Learn OBS quickly with our ZERO to SIXTY tutorial video here
- Learn more about OBS settings and optimizing your settings for live streaming here
- Learn how to record videos using OBS here
- New OBS 24 feature allows broadcasters the ability to pause and restart video recordings. Learn more here.
- Learn how to add live annotations over your OBS productions here
- Learn how to add a webcam and set up a picture in picture scene inside OBS here
- Learn how to crop and rotate inputs inside OBS here
- Learn how to use color correction tools and LUTs here
- Learn the best way to connect OBS and Zoom here
- Learn how to connect OBS and Teams here
- Learn how to use countdown timers in Teams here
- Learn where OBS recordings are saved here
- Learn how to live stream to YouTube and Facebook with OBS for free here
- Learn about OBS 27's new features here

Continue reading