How to use video filters in OBS
Written by Paul Richards on February 1, 2022
Video filters can be applied to any Source or Scene by right-clicking on the title and selecting Filters. New Filters can be added to OBS when specific plugins are installed. Similar to Sources, Filters can have their visibility toggled on and off in the Filters management window. By default, OBS organizes Filters into Audio/Video Filters and Effect Filters. You can add a filter by selecting the “+” plus button, which will open the Filter and allow you to adjust the Filter settings. There is a plugin called OBS Filter Hotkeys that will allow you to toggle the visibility on and off for Filters using Hotkeys without having to open the Filters management window.
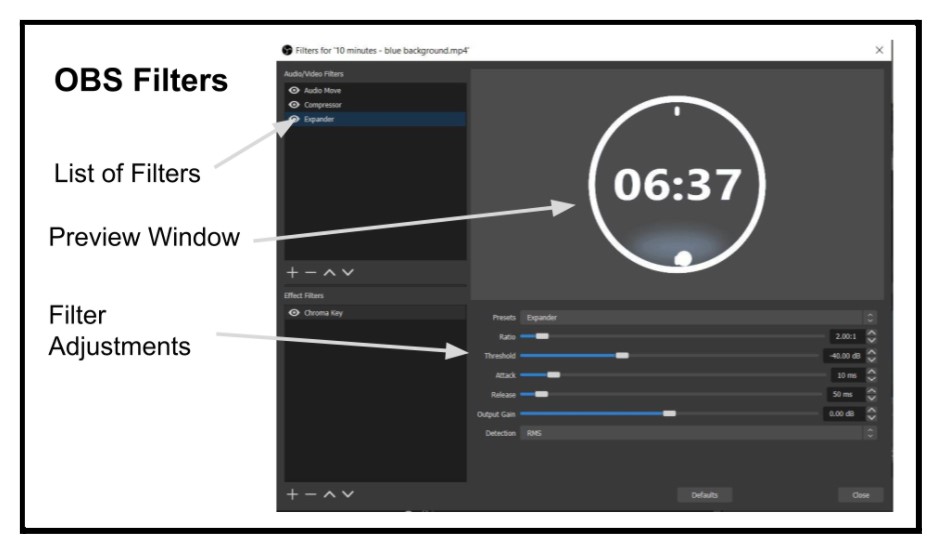
A Filter management window is available for each individual source and scene.
Here is a list of Filters available in OBS by default.
Scene and Source Filters
- Scene and Source Filters
- Image Mask/Blend – This filter can be used to apply a mask to any source. The mask is uploaded to OBS in the form of a file that should only have two colors or transparent background. You can then choose the color or mask/blend type.
- Crop – This filter allows you to resize the input by removing the top/bottom/left/right sides.
- Color Correction – This filter allows you to adjust the colors in your source. This filter is especially useful in combination with the OBS Color Monitor plugin.
- Scroll – This filter will move your input (generally text) across the screen. You can choose between vertical and horizontal movements.
- Color Key & Chroma Key – Color and Chroma Key filters are used to select a color in the source and make it transparent. Both have similar functions but work differently, so experimentation with each is necessary in most cases.
- LUT Filter – LUT stands for Look-Up Table. LUT filters can be applied to sources in order to apply a visual filter to the source.
- Sharpen – This filter can be used to sharpen the source image.
How to make your webcam in OBS a circle overlay
The Image Mask/Blend feature is a great filter to use to add a new level of production quality to your videos. Anyone can set up a simple picture and picture set up with a webcam and screen capture. But those who take the time to set up a custom image mask for their webcam overlays, really show they care about their production quality. An image mask can be added to any source and it will essentially use an image mask file to make all areas of the source transparent where the selected mask color is. For example, if you take an image of a black circle and select black for the image mask color, the filter will make the outside white areas transparent in the source.

Images work well in black and white when applied as an image/mask filter.
An interesting way to use Image Masks is on top of a video file. You can create a black and white image as your mask file to represent a graphical layout for your production. For example, you can draw out a lower third, a chat room area, and perhaps a top-bar area. You can use this image mask file on a video source that has slow colorful movements. The image mask in this case will show the video playing in just the areas of your mask, which can be used as an animated layer in your production.
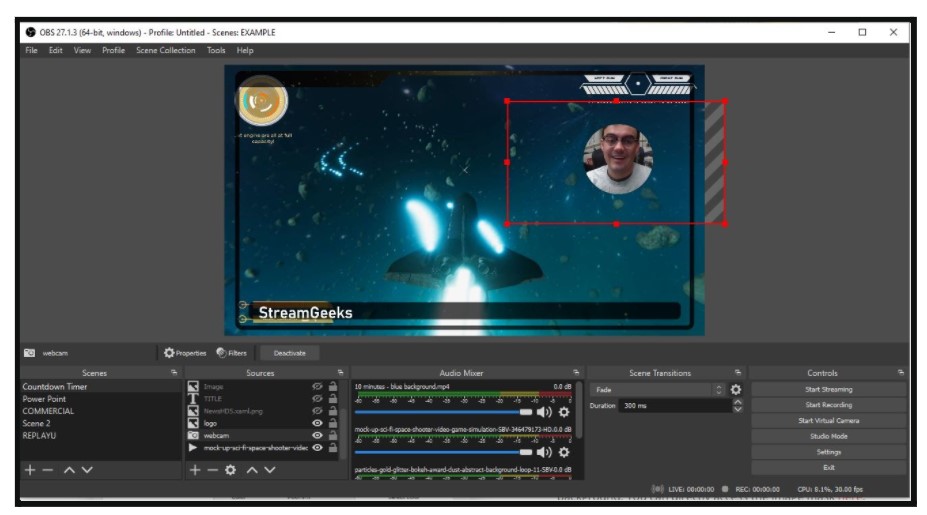
Image mask shown with circle webcam video
Another popular way to use this feature is to change the shape of a webcam input. Try changing the shape of your webcam image and creating an animated background element together. In this way, you can create an animated outline around your webcam image. This is shown in the online course tutorial videos with this book.
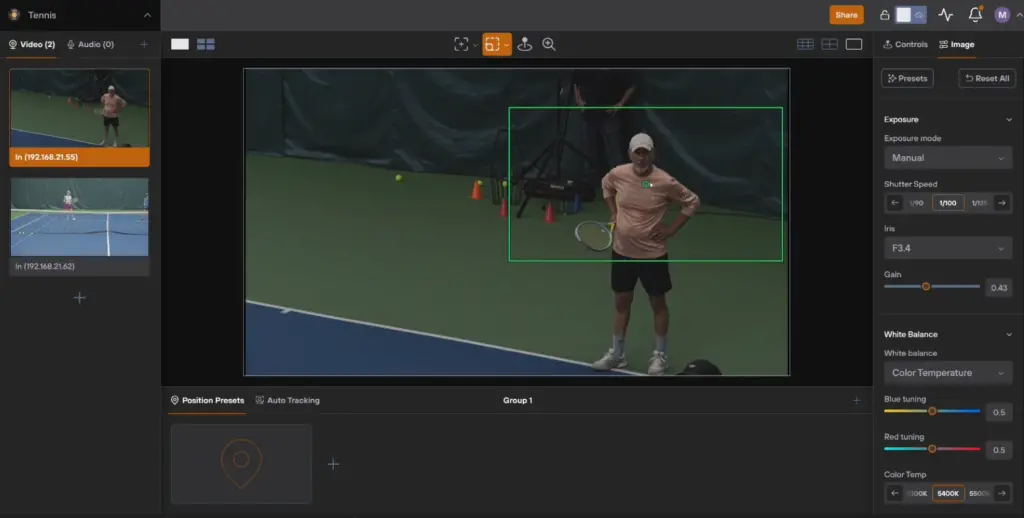
The Color Correction filter is your main tool for color grading and color matching cameras and live video sources in OBS. When you are working with multiple cameras inside of OBS, sometimes you need to match the colors coming into OBS. It’s always best to start with matching the actual on-camera settings. For example, you can make sure each camera is set to the same frame rate, shutter speed, and aperture. Once your cameras are coming into OBS with matching exposure and color balance settings, you can use the OBS Color Monitor plugin to make educated decisions about the camera’s exposure. The OBS Color Monitor plugin will be reviewed in detail in an upcoming chapter, but in short, this plugin will allow you to quickly see graphical information about the exposure and color of video sources. This will allow you to see if your cameras are over-exposed, or need color adjustments. You can then use the Color Correction filter to see how your adjustments are affecting your sources the way professional color grading is done in a production studio. Color grading is technical in nature but it’s a learnable process that takes the guesswork out of color matching multiple cameras.

Color monitoring scopes can be added to the OBS interface as a side panel.
The Color Correction filter gives you access to Gamma, Contrast, Brightness, Saturation, Hue Shift, and Opacity. The Gamma adjustment affects the grayscale in between full black and full white. When adjusting the Color Correction filter it is highly recommended that you use the Color Monitor plugin to see the effects you are having on your selected source. Using the Color Monitor plugin you can check out the Waveform Monitor in OBS to see how Gamma will affect your image. You will see the middle range of your image being lifted or lowered as you adjust the Gamma slider. You can use the Contrast adjustment to affect the gain used to bring the full white and black range either closer together or further apart. Again using the Waveform Monitor, you will be able to see if you are crushing the blacks or clipping the white parts of your image. Brightness is used to adjust the overall brightness of the image. Saturation adjusts the vibrancy of each color and Hue Shift will actually change all colors in the image. Using the Vectorscope Monitor you can see how Saturation and Hue Shift affect the color of your image. Finally, Opacity will adjust the transparency of the entire filter’s effect on the image.
Using LUTs to apply color filters in OBS
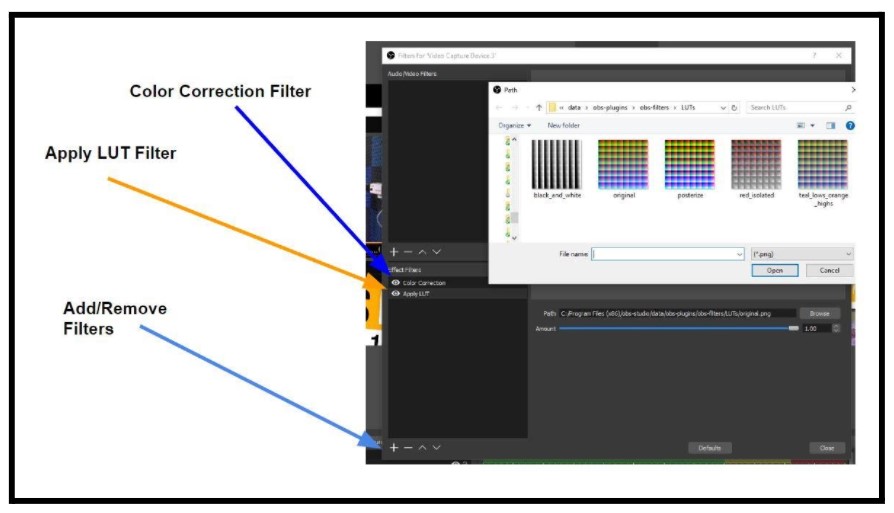
LUT files are stored on your computer and used by OBS to apply the filter.
LUT Filters are a popular tool used by video producers and social media managers. LUT stands for Look-Up Table and they represent colors that can be applied to sources. You can find free LUT filters available for download on OBSProject.com. Once downloaded, in order to stay organized, you should put the LUT Filter files in the OBS program folder inside obs-plugins/obs-filters/LUTs. You can apply a LUT just like any filter and once open you can start by browsing for the LUT you would like to add. Most LUTs are named by the mood they are designed to portray. For example, you can apply a LUT for cinema, teal and orange, documentary-style, and others. Once you have selected a LUT you have one adjustment bar that determines the amount the LUT will be applied to your source video.
Key Takeaways:
- Image Mask filters can be used to hide areas of sources in OBS and create new unique production opportunities.
- New filters can be added to OBS with the addition of plugins.
- LUT filters can be used to change the color scheme or mood of your video sources.
- The visibility status of Filters can be adjusted in the Filters management window. Filter visibility can be toggled on and off using Hotkeys with the Filter Hotkeys plugin.
Additional chapters from the OBS Superuser Guidebook
- Chapter 1 - An Update on the Updates here
- Chapter 2 - How to Customize OBS here
- Chapter 3 - How to Optimize OBS here
- Chapter 4 - How to use the core features of OBS here
- Chapter 5 - How to use video filters in OBS here
- Chapter 6 - How to use audio filters in OBS here
- Chapter 7 - The Top 10 OBS Plugins here
- Chapter 8 - The Multiple RTMP Streaming Plugin here
- Chapter 9 - The Automatic Scene Switching Plugin here
- Chapter 10 - How to record multiple sources in OBS here
- Chapter 11 - How to dock sources with live video in OBS here
- Chapter 13 - How to use NDI in OBS here
- Chapter 14 - How to route Audio in and out of OBS here
- Chapter 15 - How to use Virtual Audio cables with OBS here
- Chapter 16 - How to use VST Audio Plugins for OBS here
- Bonus Chapter - How to fix audio sync issues in OBS here
- Chapter 16 - How to use use hotkeys with filters here
Check out our other articles about Open Broadcaster Software below:
- Updated - How to connect OBS and Zoom with VoiceMeeter and Headphone Monitoring - here.
- Learn how to use OBS for remote production here.
- How to connect OBS with Zoom, here
- OBS vs vMix a complete review here.
- How to use Zoom for Church Meetings and Worship here.
- Here are the top 10 OBS features you need to know about
- Getting dropped frames in OBS. Here are some new feature to help with that.
- Take a look at OBS 24 and all the new feature here.
- Increase your productivity with OBS and learn how to use hotkeys here
- Learn how to setup animated stinger transitions in OBS here
- Learn how to install the NDI plugin for OBS (and why you should) here
- Learn more about the latest OBS user interface (UPDATED for 2019) here
- Make your audio in OBS sound great with these VST 2 plugins here
- Learn how to fix the most common OBS issues! Audio and Video Sync! here
- Learn how to use OBS 20+ here
- Learn how to use NDI Cameras with OBS here
- Learn how to use the OBS Multiview here
- Learn OBS quickly with our ZERO to SIXTY tutorial video here
- Learn more about OBS settings and optimizing your settings for live streaming here
- Learn how to record videos using OBS here
- New OBS 24 feature allows broadcasters the ability to pause and restart video recordings. Learn more here.
- Learn how to add live annotations over your OBS productions here
- Learn how to add a webcam and set up a picture in picture scene inside OBS here
- Learn how to crop and rotate inputs inside OBS here
- Learn how to use color correction tools and LUTs here
- Learn the best way to connect OBS and Zoom here
- Learn how to connect OBS and Teams here
- Learn how to use countdown timers in Teams here
- Learn where OBS recordings are saved here
- Learn how to live stream to YouTube and Facebook with OBS for free here
- Learn about OBS 27's new features here

Continue reading