Core OBS Feature Review
Written by Paul Richards on February 1, 2022
In this chapter, you can learn about the core features of OBS every user should know about. OBS is full of powerful filters and audiovisual enhancements that are available in the core software package without the need for plugins. Many OBS features are overlooked because they are somewhat hidden in a busy interface or otherwise not explained to users. Other features, take a decent amount of know-how to make them useful or require a plugin to make them work smoother for some users. For example, the Image Mask/Blend filter can be used to turn a rectangular webcam video into a circle or another shape. Another example is the Color Correction filter, which can be used with a color-checker card on the camera to color match multiple cameras together.
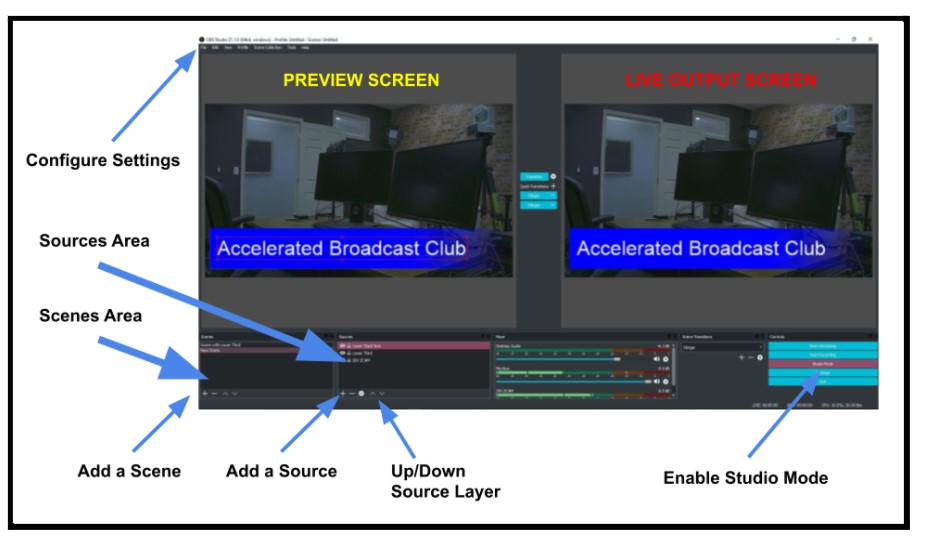
The OBS interface will include a Preview and Output screen side by side when in Studio Mode.
OBS Source Controls
One commonly overlooked area of OBS is the source lock and visibility buttons. These two buttons can be used to toggle between on and off states for locking and viewing an individual source. The lock button is ideal for locking one source in place so that it cannot be accidentally moved. The visibility buttons can be used in a few interesting ways especially with the use of the Move Transitions plugin and Hotkeys. For example, you can set up a move transition animation to slide a source into the screen when the visibility button is clicked.
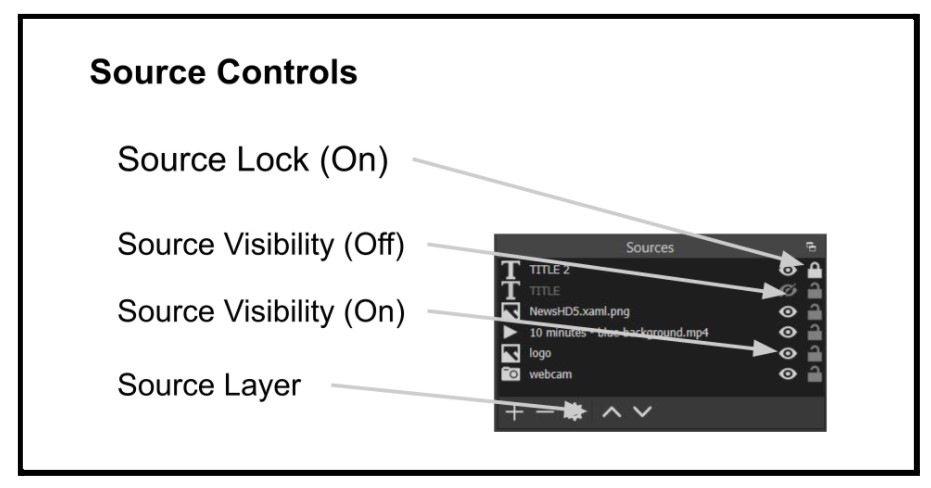
Source controls are found on the right side of the Sources area.
You can also create an animation to remove the source when the visibility state is off. This allows you to animate portions of your OBS production based on visibility states. In an upcoming chapter, you will learn how to use this feature with a variety of remote control applications such as Touch Portal. Touch Portal will allow you to create custom buttons to toggle visibility states on and off which can include animations once you have the Move Transitions plugin setup.
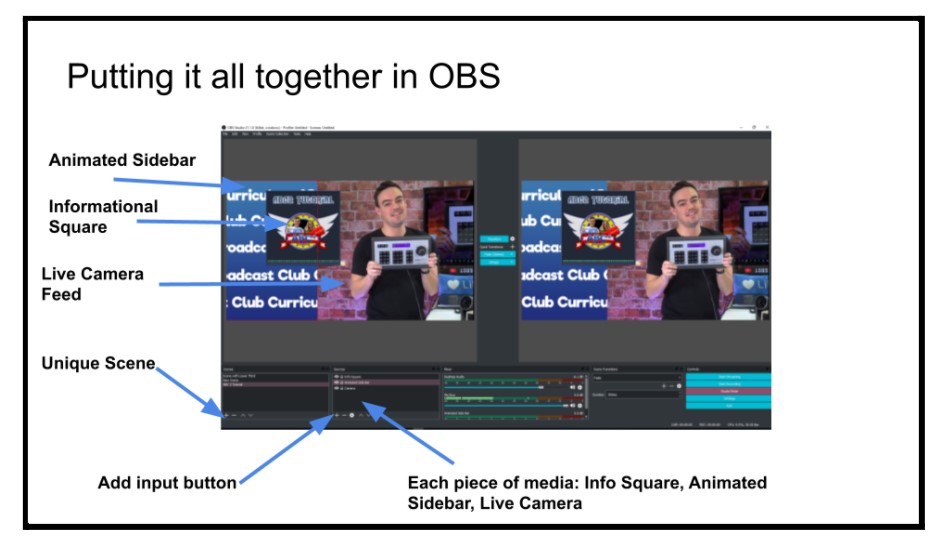
More complicated scenes in OBS can benefit from animations and hotkey controls.
The example above shows a scene with three layers. The bottom layer is a live video feed from a camera. The next layer is a sidebar video which is set to play on loop. The top layer is a PNG file that is used as an informational square displayed to support the content being discussed in the video. These informational squares can have animations that allow you to bring multiple images on and off-screen easily by toggling the visibility status of each. You can manage the order of layers for each source by selecting a source and clicking the up and down arrows in the source management area.
Setting up Hotkeys
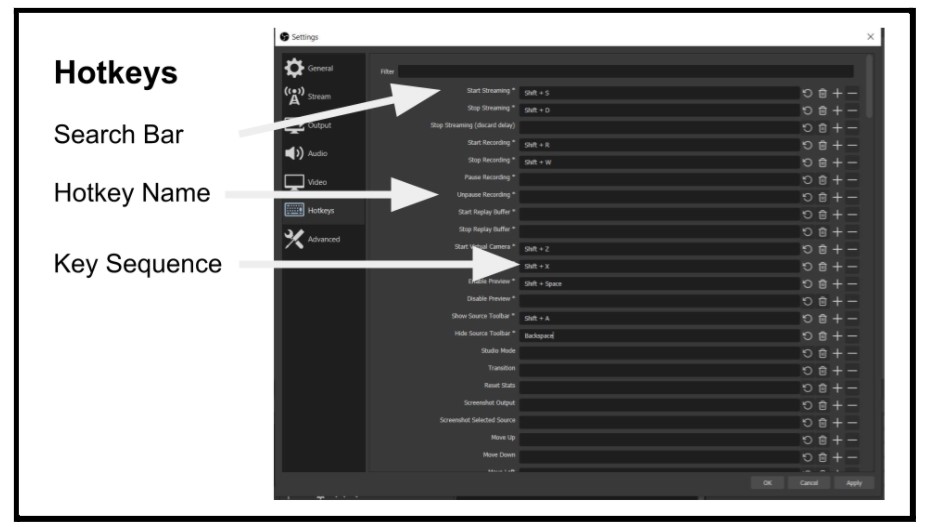
Hotkeys are set up in the Settings area.
Hotkeys are a tool to quickly access functions inside of OBS like streaming or recording from your keyboard or other USB connected input devices. Hotkeys can be set up to do almost any function inside of OBS and each time that you create a scene or add a source, new Hotkey options are added. You can set up Hotkeys in the OBS Settings area. At the top of this section there is a search bar to quickly find the Scene or Source that you would like to control. For example, you can set up a specific key on your keyboard to switch to a specific scene. You can also set up Hotkeys to show or hide individual sources. You should consider using two keys to trigger a Hotkey in order to avoid accidentally triggering a Hotkey. For example, try using SHIFT + another key and putting the key sequence into the source name for easy reference. By default, OBS allows you to start and stop many core functions with Hotkeys including recording and streaming. Plugins that you install may add additional hotkey options for you to use. For example, the Filters Hotkey plugin will allow you to toggle on and off the visibility of filters. Another plugin that will be reviewed later on in the book allows you to use hotkeys to record the video of an individual source.
Using the Multi-view
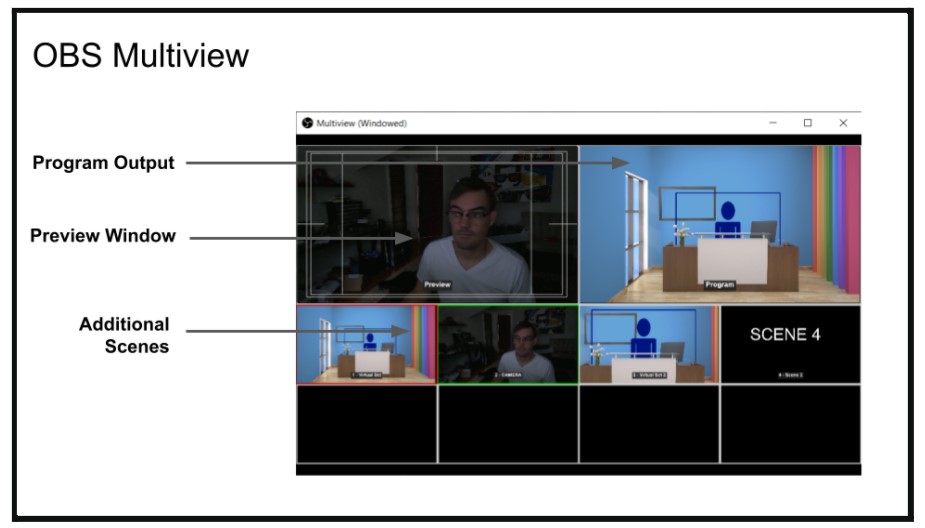
The Multiview shows scenes available in OBS up to eight.
Another tool advanced OBS users generally grow to love is called the Multiview. Multiview is available in the View tab and it can be used in full screen mode or as a resizable window. Multiview allows you to quickly view a mix of source and scenes on a secondary monitor or as a small window on any screen. By right-clicking anywhere on the Multiview you can choose to change the viewing perspective from full-screen to windowed or vice-versa. You can also choose to keep the Multiview “on-top” of all other windows.
There is a new plug-in called Source Docks which allows you to dock a preview of any source inside the OBS interface. By default the Multiviewer will show you your preview and output screens side by side followed by eight scenes for preview purposes.
Using the OBS Audio Mixer
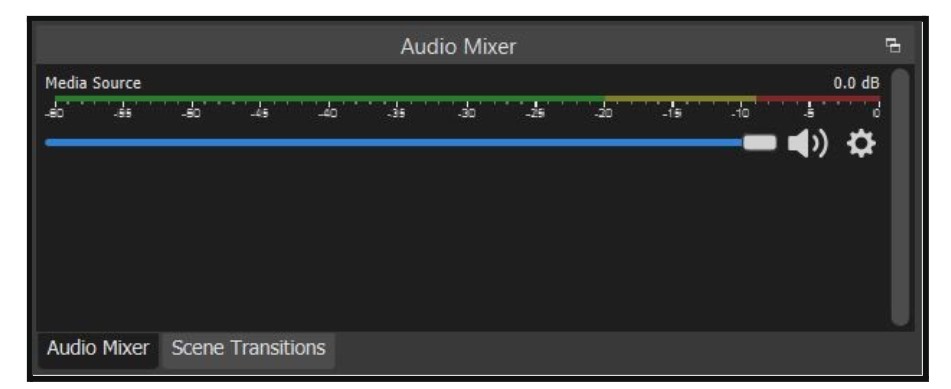
The Audio Mixer is an area of OBS that every superuser should be familiar with. By right-clicking on the Audio Mixer you can choose to change the layout from vertical to horizontal. You can also access the Advanced Audio Properties for each audio source you have inside of OBS. If you right-click on a single audio source you have the ability to lock the volume, manage it’s visibility in the mixer, rename the source and apply audio filters.
Using the OBS Audio Mixer
One common issue many OBS users has to do with audio synchronization. Many times audio is being processed by OBS faster than video sources which require more bandwidth and processing power. To fix this problem, you can simply add delay to the audio source using the “Sync Offset” option. The easy way to do this is to add delay in increments of 25ms. You can record videos of yourself talking and holding up your hand as you count to five.
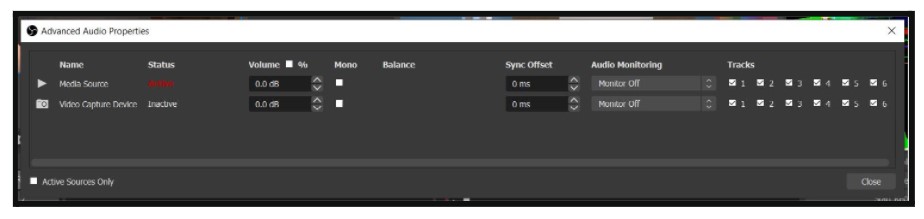
Advanced Audio Properties
In the online course, I have included a video sync tool that you can download properly syncing up audio and video sources inside OBS. This tool will help you figure out how much latency there is between your video and audio sources. With this tool, you will be able to determine how much delay you need to add to your audio sources to make them sync perfectly with the video.
The tool is a video file that includes audio clicks used for measuring latency recorded via OBS. This is a video you can play on a laptop or screen in your space and record it through the camera and microphone you are testing in OBS. Simply point the camera you normally use for your recordings toward the screen where the video is playing and also place your microphone where it can pick up the sound coming from the video.
This audio/video syncing tool is broken up into three parts. The middle section has a vertical scale that measures milliseconds for accuracy. Beside it is a marker that moves from the top of the scale and falls to the zero mark every second. Every time the marker reaches the zero mark on the scale, the clicking sound happens. On the left of the scale, there is a bigger version of the marker that allows you to read the position of the marker on the scale.
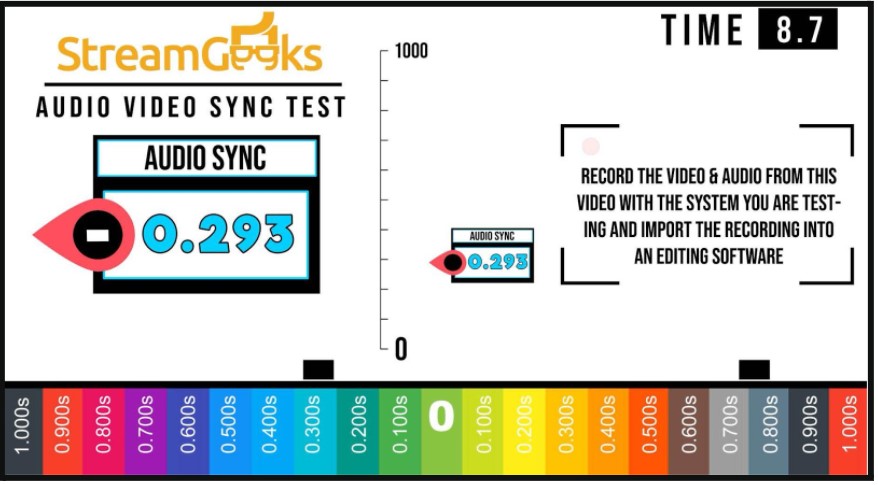
The Audio Video Sync Test tool is a 10-second video that includes information you can use to sync audio and video in OBS.
At the bottom of the screen, there is a row of color-coded boxes that gives you an idea of how far your audio source is from zero. You can use this to visually gauge how much delay you need to add to your audio. Usually, audio is processed faster than video inside your computer. That is because audio demands fewer resources from your computer, and the system can process it faster than it does the video stream. As a result, there may be a mismatch in timing between audio and video. The video will play a clicking sound with every one second that passes, and your microphone should capture that sound. You can use the sound recorded in the test video to sync up your audio and video properly. After the recording has been saved, import the video into a video-editing software.

Inside your video-editing software, look at the audio track from your recording. You should notice several peaks in the sound. All those sound peaks occurred every one second in real time. You can use this information to match those peaks in the soundtrack with the video. The idea is to mark the difference between when the sound peaks occur and when the marker on your scale reaches zero on the video. If they do not match, then you must add a delay.
To add delay in OBS, go into your audio source, and navigate to “Advanced Audio Properties.” Look for “Sync Offset” and based on what you see in the video editing software, enter a number to indicate the amount of latency you want in the audio. Oftentimes around 50-100 milliseconds of latency can be added to sync up audio and video sources.
Key Takeaways:
- Filters can be applied to any source in order to enhance the video or audio in a variety of ways.
- OBS sources can be locked to secure a complicated scene and avoid accidental movement.
- OBS sources can have visibility toggled on and off. This can become a very useful tool when paired to animations and hotkeys.
- Hotkeys allow you to quickly trigger a long list of functions available inside of OBS.
Additional chapters from the OBS Superuser Guidebook
- Chapter 1 - An Update on the Updates here
- Chapter 2 - How to Customize OBS here
- Chapter 3 - How to Optimize OBS here
- Chapter 4 - How to use the core features of OBS here
- Chapter 5 - How to use video filters in OBS here
- Chapter 6 - How to use audio filters in OBS here
- Chapter 7 - The Top 10 OBS Plugins here
- Chapter 8 - The Multiple RTMP Streaming Plugin here
- Chapter 9 - The Automatic Scene Switching Plugin here
- Chapter 10 - How to record multiple sources in OBS here
- Chapter 11 - How to dock sources with live video in OBS here
- Chapter 13 - How to use NDI in OBS here
- Chapter 14 - How to route Audio in and out of OBS here
- Chapter 15 - How to use Virtual Audio cables with OBS here
- Chapter 16 - How to use VST Audio Plugins for OBS here
- Bonus Chapter - How to fix audio sync issues in OBS here
- Chapter 16 - How to use use hotkeys with filters here
Check out our other articles about Open Broadcaster Software below:
- Updated - How to connect OBS and Zoom with VoiceMeeter and Headphone Monitoring - here.
- Learn how to use OBS for remote production here.
- How to connect OBS with Zoom, here
- OBS vs vMix a complete review here.
- How to use Zoom for Church Meetings and Worship here.
- Here are the top 10 OBS features you need to know about
- Getting dropped frames in OBS. Here are some new feature to help with that.
- Take a look at OBS 24 and all the new feature here.
- Increase your productivity with OBS and learn how to use hotkeys here
- Learn how to setup animated stinger transitions in OBS here
- Learn how to install the NDI plugin for OBS (and why you should) here
- Learn more about the latest OBS user interface (UPDATED for 2019) here
- Make your audio in OBS sound great with these VST 2 plugins here
- Learn how to fix the most common OBS issues! Audio and Video Sync! here
- Learn how to use OBS 20+ here
- Learn how to use NDI Cameras with OBS here
- Learn how to use the OBS Multiview here
- Learn OBS quickly with our ZERO to SIXTY tutorial video here
- Learn more about OBS settings and optimizing your settings for live streaming here
- Learn how to record videos using OBS here
- New OBS 24 feature allows broadcasters the ability to pause and restart video recordings. Learn more here.
- Learn how to add live annotations over your OBS productions here
- Learn how to add a webcam and set up a picture in picture scene inside OBS here
- Learn how to crop and rotate inputs inside OBS here
- Learn how to use color correction tools and LUTs here
- Learn the best way to connect OBS and Zoom here
- Learn how to connect OBS and Teams here
- Learn how to use countdown timers in Teams here
- Learn where OBS recordings are saved here
- Learn how to live stream to YouTube and Facebook with OBS for free here
- Learn about OBS 27's new features here

Continue reading