Using Virtual Audio Cables in OBS with Zoom
Written by Paul Richards on February 24, 2022
OBS has become a popular production solution for people who use video communications software such as Microsoft Teams and Zoom. Many people who use video communications software, would like more control over their audio and video, but only have the ability to use a webcam and microphone as audiovisual inputs. This is where virtual video and audio cables come into play with OBS. OBS is capable of outputting a virtual video camera which can be used with software like Zoom as the webcam input. OBS is also capable of using virtual audio cables to connect audio from OBS to other applications on the same computer. These virtual audio and video connections allow you to use OBS with any software that leverages a standard webcam and microphone input.
Use cases for virtual audio and video connections vary widely. One of the most popular ways to use a virtual webcam output from OBS is with software such as Zoom. Zoom does offer some visual enhancements such as blur effects and filters, but OBS offers much more flexibility. The latest version of OBS now includes a usable USB webcam driver by default which you can select inside of any software that uses webcams. Using the Start Virtual Camera button inside of OBS, you can send the video directly from your OBS output to any software that is using the OBS Camera webcam input.
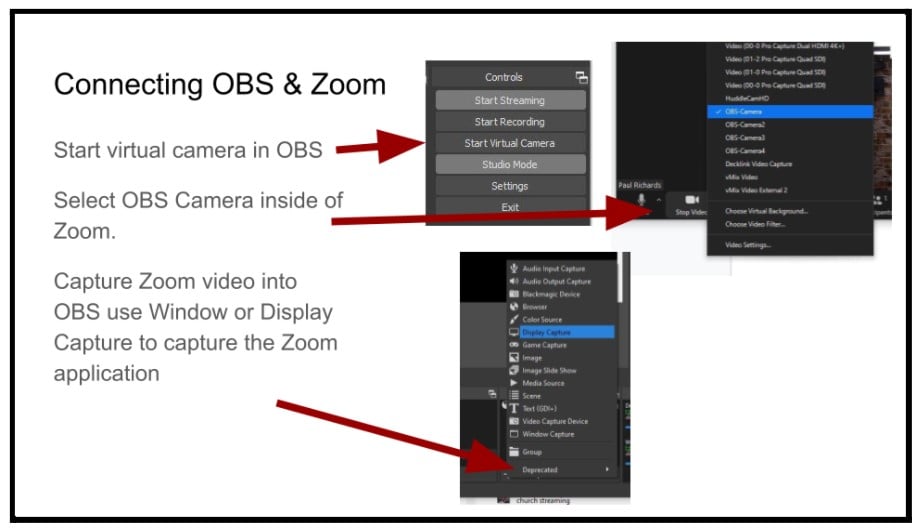
Connecting OBS and Zoom is easiest if you have two monitors.
You can also bring video from Zoom back into OBS for live streaming and recording. To bring video from Zoom back into OBS you can use a desktop or window capture source. Many users prefer recording Zoom meetings and interviews with OBS because they can control the bitrate and therefore the quality of their video recordings. After much testing, the StreamGeeks have determined that most recordings made with Zoom are less than 2 Mbps. For reference, a good quality YouTube video would be at least 4-6 Mbps. Using OBS will allow you to record video in higher quality and record locally on your hard drive without Zoom’s compression settings. You can also record individual sources for use in post-production after an event. This is ideal if you have a nice camera that you do not want to have compressed by Zoom’s cloud-based recording process.
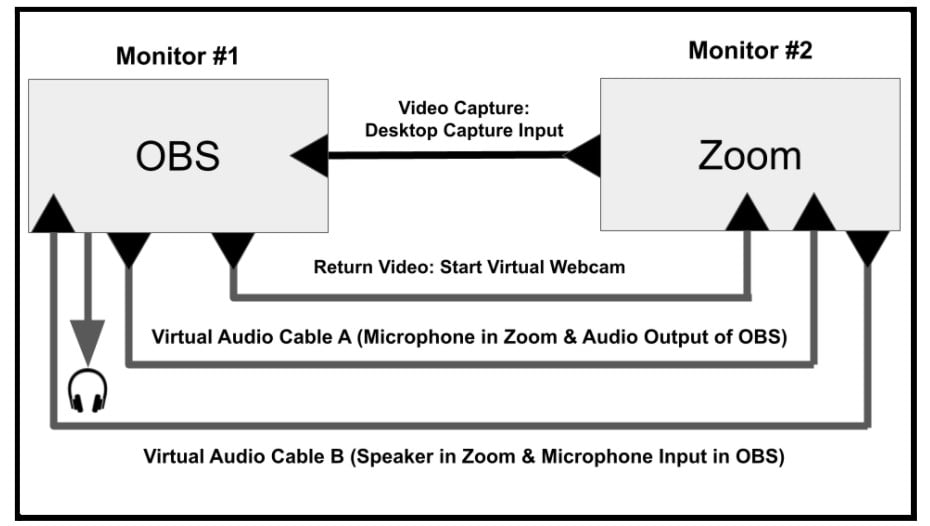
connecting OBS and Zoom with virtual audio cables
Setting up virtual audio cables to work with Zoom and OBS is more complicated than using the built-in virtual camera feature. OBS does not offer built-in virtual audio cable support at this time and therefore, you will need to download virtual audio cables to send audio from OBS to other applications on your computer. By using virtual audio cables, it is possible to record both audio and video from applications such as Zoom and Microsoft Teams. Using virtual audio cables allows you to enhance the audio coming in and out of OBS with audio plugins and tools that are not available in many video communications tools.
You can download two virtual audio cables for free from VB-Audio.com for your Mac or Windows computer. The VB-CABLE drivers are donationware, so they will ask you to make an optional donation to the developers. The default installation package includes two virtual audio cables, because you may require one for sending audio and one for receiving audio. Once they have been installed on your computer, you should restart. The next time you open Zoom or a similar application you will see new virtual audio cables for input and output inside Zoom when you open the microphone and speaker area.
Inside of Zoom, you can select CABLE Input for your microphone and CABLE Output for your speaker. This will allow you to send your microphone audio into Zoom using the virtual CABLE Input and receive audio into Zoom using the CABLE Output. In order to send audio out of OBS you will need a plugin called Audio Monitor. The Audio Monitor plugin adds an important Audio/Video Filter to OBS which allows you to output audio from any number of sources. Find the audio sources you would like to send into Zoom and apply the Audio Monitor Filter. Inside the filter select the CABLE Input option. You have the option to mix audio by reducing the volume of each input that is being sent into the virtual cable.
Next, inside of OBS, you will want to create a microphone input to bring the audio from Zoom into OBS. You can do this by opening an Audio Input Capture source and selecting Cable Output. An easy way to test if everything is working can be done within Zoom’s settings area under Audio. You can click the Test Speaker button to send audio into OBS and make sure you are seeing levels for the audio. When you do this you should be hearing the test audio in your speakers or headphones. If not, check the Audio section of the OBS settings and check which device you have selected as your Monitoring Device. Your Monitoring Device is the device OBS will send the audio to. Next you should check to see if your audio sources from OBS are making it into Zoom. This can be done by playing audio in OBS and checking to see if you are receiving the audio levels inside of Zoom. Zoom has a handy audio monitoring feature inside the microphone to let you know when it’s receiving audio from the selected microphone source.
Connecting OBS and Zoom can significantly increase your video and audio quality for meetings and interviews. If you have a studio or multiple cameras, you can now seamlessly switch between them in Zoom meetings. You can also use animated lower thirds to make your presentations look more professional. Another popular reason to use OBS with Zoom is the ability to play videos directly into Zoom without having to jump into a Screen Share session. In the Udemy course files, there is a transparent meeting countdown timer you can use in an upcoming meeting with this setup. The opportunity to have more fun and look more professional in online meetings is greatly enhanced by the use of OBS.
Key Takeaways:
- OBS can be used to send audio and video directly into software such as Skype and Zoom.
- OBS has a default Virtual Camera feature that allows you to send video to other applications using a virtual webcam.
- OBS does not have a default virtual audio cable solution and therefore a virtual audio cable driver is necessary to send both audio and video from OBS to other applications like Zoom.
Additional chapters from the OBS Superuser Guidebook
- Chapter 1 - An Update on the Updates here
- Chapter 2 - How to Customize OBS here
- Chapter 3 - How to Optimize OBS here
- Chapter 4 - How to use the core features of OBS here
- Chapter 5 - How to use video filters in OBS here
- Chapter 6 - How to use audio filters in OBS here
- Chapter 7 - The Top 10 OBS Plugins here
- Chapter 8 - The Multiple RTMP Streaming Plugin here
- Chapter 9 - The Automatic Scene Switching Plugin here
- Chapter 10 - How to record multiple sources in OBS here
- Chapter 11 - How to dock sources with live video in OBS here
- Chapter 13 - How to use NDI in OBS here
- Chapter 14 - How to route Audio in and out of OBS here
- Chapter 15 - How to use Virtual Audio cables with OBS here
- Chapter 16 - How to use VST Audio Plugins for OBS here
- Bonus Chapter - How to fix audio sync issues in OBS here
- Chapter 16 - How to use use hotkeys with filters here
Check out our other articles about Open Broadcaster Software below:
- Updated - How to connect OBS and Zoom with VoiceMeeter and Headphone Monitoring - here.
- Learn how to use OBS for remote production here.
- How to connect OBS with Zoom, here
- OBS vs vMix a complete review here.
- How to use Zoom for Church Meetings and Worship here.
- Here are the top 10 OBS features you need to know about
- Getting dropped frames in OBS. Here are some new feature to help with that.
- Take a look at OBS 24 and all the new feature here.
- Increase your productivity with OBS and learn how to use hotkeys here
- Learn how to setup animated stinger transitions in OBS here
- Learn how to install the NDI plugin for OBS (and why you should) here
- Learn more about the latest OBS user interface (UPDATED for 2019) here
- Make your audio in OBS sound great with these VST 2 plugins here
- Learn how to fix the most common OBS issues! Audio and Video Sync! here
- Learn how to use OBS 20+ here
- Learn how to use NDI Cameras with OBS here
- Learn how to use the OBS Multiview here
- Learn OBS quickly with our ZERO to SIXTY tutorial video here
- Learn more about OBS settings and optimizing your settings for live streaming here
- Learn how to record videos using OBS here
- New OBS 24 feature allows broadcasters the ability to pause and restart video recordings. Learn more here.
- Learn how to add live annotations over your OBS productions here
- Learn how to add a webcam and set up a picture in picture scene inside OBS here
- Learn how to crop and rotate inputs inside OBS here
- Learn how to use color correction tools and LUTs here
- Learn the best way to connect OBS and Zoom here
- Learn how to connect OBS and Teams here
- Learn how to use countdown timers in Teams here
- Learn where OBS recordings are saved here
- Learn how to live stream to YouTube and Facebook with OBS for free here
- Learn about OBS 27's new features here

Continue reading