How to Optimize OBS
Written by Paul Richards on January 31, 2022
Learn how to optimize OBS
In this chapter, you will learn how to optimize your OBS production by using the settings available in OBS to fit your specific needs. Most users of OBS are using the software for live production, live streaming and/or recording. The more that you plan to do with OBS, the more important it will become to use the correct system settings. In general, OBS will allow you to customize your project to fit almost any resolution or frame rate. Therefore, OBS is capable of pushing your computer beyond its limits and a good understanding of your hardware and its limitations is required to optimize OBS properly. While you are using OBS, you should keep an eye on your computer’s resource management tool. Windows computers can use Task Manager, and Mac OS uses Activity Monitor.
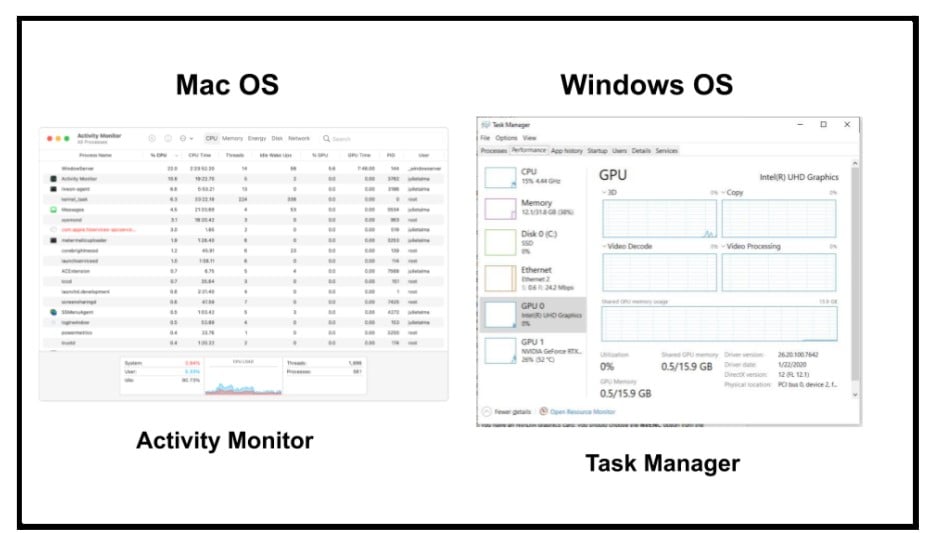
Monitoring your computer resources can be done with Activity Manager on Mac or Task Manager on Windows.
The process of encoding video is very CPU intensive. In fact, you may get a warning from OBS that says “Encoding Overload!” when you have maxed out your computer’s processing capabilities. The first tool you should have open is “Stats.” Stats is a tool that is available from the View dropdown menu which keeps tabs on your CPU usage, disk space availability and memory usage. In the Stats, one area you should keep an eye on is dropped frames. There are two main reasons for dropped frames and OBS breaks them out into “Frames missed due to rendering lag” and “Frames missed due to encoding lag.” Frames missed due to rendering lag are caused by your graphics processing unit (GPU) and this is common when OBS uses a graphics card that is also being used for other graphics intensive software such as video gaming. Frames missed due to rendering lag refers to your computer’s inability to actually create each frame of video in real time. “Skipped frames due to encoding lag” has to do with your computer’s processing capabilities when you are streaming or recording. Encoding is the process of recording or streaming the rendered video inside of OBS. The encoding requires your computer to compress the video you are working with and either stream or record it.
Before you can determine the source of dropped frames or other processing-related issues you must make sure that your OBS system is set up properly. The first step is to put your “Output Mode” into the “Advanced” mode in the Output tab found in Settings. This allows you to have full control over the streaming and recording profiles used for encoding. It is here that you can set the bitrate which is the amount of compression OBS will use to encode your video. The lower the bitrate the lower the quality of your video will be. The first step is to choose the correct Encoder. If you have an NVIDIA graphics card, you should choose the NVENC option from the encoder drop-down menu. If you have an AMD graphics card you should choose AMF. Some newer Intel processors also have a QuickSync option you can use without the need for a dedicated graphics card. If you are relying only on your computer’s CPU for encoding you should choose x264.
Pro Tip: Windows computers will sometimes require you to specifically enable OBS to work with your graphics card. For NVIDIA graphics cards this can be done using the NVIDIA Control Panel. In this control panel, you can click Manage 3D Settings and add OBS to the list of programs that should use the NVIDIA graphics card.
Unless it’s necessary for your production, you should avoid having OBS scaling your video content because it adds unnecessary video processing. Inside the Video tab of the Settings menu, you should set your Base (Canvas) Resolution to the same Output (Scaled) Resolution. In the Video tab you can also set your project’s frame rate. The higher the frame, the more processing power it will take to encode the video. If you do not need 60 frames per second, reduce this frame rate to 30 or 24. Going from 30 frames per second to 60 almost doubles the amount of bandwidth needed to live stream your video.
Pro Tip: Always make sure that your cameras are set to the same resolution and frame rate as your OBS project.
The 180-degree shutter speed rule can be used to match your camera’s shutter speed to the frame rate of your project. If you are using 30fps, set your camera’s shutter speed to 1/60th of a second. If you are using 60fps, set your camera’s shutter speed to 1/120th of a second. This will ensure a natural-looking video with a normal amount of blur.
Once you have settled on your project’s resolution and frame rate, you should consider the bitrate you would like to record and stream with. Many people have to work with a limited amount of bandwidth and therefore need to perform a bandwidth test to determine the maximum amount of bandwidth they can use. If you are limited by bandwidth you can consider recording your project locally at a higher bitrate than you are streaming. This allows you to keep a higher quality file on your computer for distribution after your live stream.
Common Streaming Resolutions:
| Resolution | Pixel Count | Frame Rate | Quality | Bitrate |
| 4K 30fps | 3840×2160 | 30fps | High | 30Mbps |
| 4K 30fps | 3840×2160 | 30fps | Medium | 20Mbps |
| 4K 30fps | 3840×2160 | 30fps | Low | 10Mbps |
| 1080p60fps | 1920×1080 | 60fps | High | 12Mbps |
| 1080p60fps | 1920×1080 | 60fps | Medium | 9Mbps |
| 1080p60fps | 1920×1080 | 60fps | Low | 6Mbps |
| 1080p30fps | 1920×1080 | 30fps | High | 6Mbps |
| 1080p30fps | 1920×1080 | 30fps | Medium | 4.5Mbps |
| 1080p30fps | 1920×1080 | 30fps | Low | 3Mbps |
| 720p30fps | 1280×720 | 30fps | High | 3.5Mbps |
| 720p30fps | 1280×720 | 30fps | Medium | 2.5Mbps |
| 720p30fps | 1280×720 | 30fps | Low | 1.5Mbps |
Example bitrates for streaming in a variety of resolutions and frame rates.
Once you have selected a bitrate for your project you should consider which rate of control you will select in OBS. Constant bitrate (CBR) is the most common rate of control. Constant bitrates do not fluctuate even when OBS may be able to intelligently use less bandwidth for scenes without complexity. Adaptive bitrate (ABR) allows OBS to adapt the bitrate to the scene in which you are streaming and reduce or increase it as necessary. Variable bitrate (VBR) is similar to adaptive bitrate in the sense that it attempts to increase or decrease the bitrate based on what is needed for your given scene. The main issue with ABR and VBR comes when scenes change quickly and there is a split second where the pixels aren’t quite right. If you are using an AMD or NVIDIA graphics card you may have access to the CQP rate of control which can be used for ultra high quality video recordings. As with most high quality recordings, CQP will take up a lot of hard drive space. If you do not have access to CQP the best way to increase your video recording quality is to simply increase the bitrate.

Optimize OBS network settings
In the Advanced section of the OBS settings, there is a Network area. Here you can select “Dynamically change the bitrate to manage congestion” in order to reduce dropped frames. This option allows OBS to automatically adapt the bitrate regardless of the encoding settings you have set in the Output tab. While you are here consider checking the box for “Enable network optimization” as a way to further optimize OBS. You should also always use the “Bind to IP” option to make sure OBS is using your hard-wired ethernet connection instead of a WiFi connection.
Now that you have optimized your settings inside of OBS it’s time to take a closer look at your sources. The best practice rule of thumb is to make sure all of your video sources match the resolution and frame rate of your project. But in some cases, you may not need the full 1920x1080p video from a camera if you are only using it in a picture-in-picture area of a specific scene. It goes without saying that you should remove any sources that are not necessary to your production. If you do not need all your sources at full resolution, reducing their resolution and frame rate can make your production more efficient.

optimize OBS processing
Other computer-wide optimizations include closing programs that are running in the background and taking up precious processing power. If you must run additional programs while you are using OBS, you should increase the Process Priority option in OBS to Above Normal or High. In the Advanced settings section, you can set process priority in OBS to take priority over other applications in use on your computer.
Another small detail for those who are using OBS on a laptop is to look into the Power Settings. Windows computers can be put into “Performance Mode” in the Power Settings which will significantly improve the performance. Another tip is to launch OBS in Administrator Mode to make sure OBS is gaining access to the privilege necessary to operate properly. It is possible to spread more ambitious OBS productions over the processing power of multiple computers using NDI. NDI will be covered in more detail later, but it’s worth noting that multiple computers can be used together. Many video productions now use multiple computers to offload specific tasks such as screen capture or video gaming. The video can then be sent back to the main OBS production computer and therefore spread out the processing power necessary for the entire production.
Key Takeaways:
- OBS can scale to fit almost any production environment. The further you push the software, the most important it becomes to optimize your settings.
- OBS will start to drop frames if your computer’s hardware cannot handle the video processing you have set up.
- OBS has advanced settings that can be used to optimize the software to fit your needs.
- OBS features live statistics you can use to monitor your computer’s resource usage.
Additional chapters from the OBS Superuser Guidebook
- Chapter 1 - An Update on the Updates here
- Chapter 2 - How to Customize OBS here
- Chapter 3 - How to Optimize OBS here
- Chapter 4 - How to use the core features of OBS here
- Chapter 5 - How to use video filters in OBS here
- Chapter 6 - How to use audio filters in OBS here
- Chapter 7 - The Top 10 OBS Plugins here
- Chapter 8 - The Multiple RTMP Streaming Plugin here
- Chapter 9 - The Automatic Scene Switching Plugin here
- Chapter 10 - How to record multiple sources in OBS here
- Chapter 11 - How to dock sources with live video in OBS here
- Chapter 13 - How to use NDI in OBS here
- Chapter 14 - How to route Audio in and out of OBS here
- Chapter 15 - How to use Virtual Audio cables with OBS here
- Chapter 16 - How to use VST Audio Plugins for OBS here
- Bonus Chapter - How to fix audio sync issues in OBS here
- Chapter 16 - How to use use hotkeys with filters here
Check out our other articles about Open Broadcaster Software below:
- Updated - How to connect OBS and Zoom with VoiceMeeter and Headphone Monitoring - here.
- Learn how to use OBS for remote production here.
- How to connect OBS with Zoom, here
- OBS vs vMix a complete review here.
- How to use Zoom for Church Meetings and Worship here.
- Here are the top 10 OBS features you need to know about
- Getting dropped frames in OBS. Here are some new feature to help with that.
- Take a look at OBS 24 and all the new feature here.
- Increase your productivity with OBS and learn how to use hotkeys here
- Learn how to setup animated stinger transitions in OBS here
- Learn how to install the NDI plugin for OBS (and why you should) here
- Learn more about the latest OBS user interface (UPDATED for 2019) here
- Make your audio in OBS sound great with these VST 2 plugins here
- Learn how to fix the most common OBS issues! Audio and Video Sync! here
- Learn how to use OBS 20+ here
- Learn how to use NDI Cameras with OBS here
- Learn how to use the OBS Multiview here
- Learn OBS quickly with our ZERO to SIXTY tutorial video here
- Learn more about OBS settings and optimizing your settings for live streaming here
- Learn how to record videos using OBS here
- New OBS 24 feature allows broadcasters the ability to pause and restart video recordings. Learn more here.
- Learn how to add live annotations over your OBS productions here
- Learn how to add a webcam and set up a picture in picture scene inside OBS here
- Learn how to crop and rotate inputs inside OBS here
- Learn how to use color correction tools and LUTs here
- Learn the best way to connect OBS and Zoom here
- Learn how to connect OBS and Teams here
- Learn how to use countdown timers in Teams here
- Learn where OBS recordings are saved here
- Learn how to live stream to YouTube and Facebook with OBS for free here
- Learn about OBS 27's new features here

Continue reading