Routing Audio in OBS
Written by Paul Richards on February 24, 2022
OBS is a great tool, but it has some limitations, especially when it comes to audio monitoring and control. An audio feature desired by many streamers has been a way to create a separate headphone mix that will allow users to monitor and send any source within OBS to any audio device they choose.
Over the years, there have been several workarounds, but the Audio Monitor plugin for OBS offers all the functionality producers need in an easy-to-use interface. Audio Monitor gives you the ability to send the audio of any OBS source to any audio device just by adding the Audio Monitor filter to the source. With this, you can create your own custom headphone or monitor mix or even create a separate mix to feed your host or guests headphones. The Audio Monitor plugin will be shown with several examples in this book including how to use OBS with Zoom and also creating closed captions with Web Captioner.

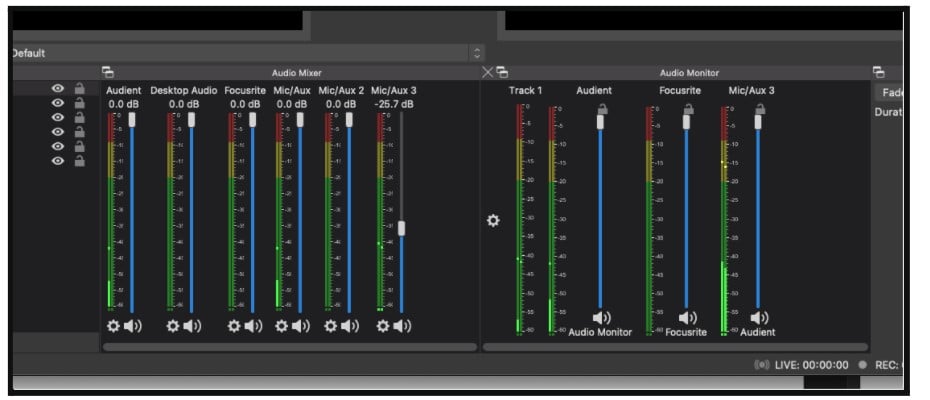
Audio Monitor can be shown as a dock inside the OBS interface.
Installing Audio Monitor
Audio Monitor can be downloaded for PC and Mac, from the OBS website https://obsproject.com/forum/resources/audio-monitor.1186/. Download the version for your system. Depending on your system and the version you download, it may include a self-installer. Otherwise, follow the instruction to place the plugin files in the correct folder on your computer. Once you are done, restart OBS, and you will be ready to go.
Using Audio Monitor
- Select any source with audio in the Audio Mixer.
- Click on the settings icon at the bottom of the source in Audio Mixer.
- Select Filters.
- Under Audio Filters or Audio/Video Filters, Press the + and add Audio Monitor.
- Select the device to which you wish to send the audio from that source. You can send it to any device connected to your system. That includes audio interfaces and even virtual options like a Virtual Audio Cable.
- You can adjust the volume levels. This level will only impact the level of the source to the selected device.
- You can add as many Audio Monitor filters as you wish and send any source to as many devices as you want.
Adding the Audio Mixer Dock
Go to the View menu and click Docks and select Audio Monitor. The Audio Monitor panel can be docked within the OBS interface just like any other panel. You can also move it to the same panel as the default mixer and use a tab to switch between them. While the two audio mixers look similar, the Audio Monitor panel has an extra gear icon and meter on the left. By pressing the gear icon, you can choose to display all available audio sources or just those available in the current scene.
Within the Audio Monitor panel, the sliders can adjust the output levels from that source to your selected audio device. That is unless you locked the level when you set up the filter. There are additional options within the settings menu. One handy feature is found by clicking on the gear icon and selecting Outputs. As OBS allows you to record up to six audio tracks, this feature will enable you to preview and control the output levels for each track.
How is Audio Monitor Being Used?
Gaming
Audio Monitor is a great tool for gamers streaming to Twitch, YouTube, or other platforms since it allows them to send one mix to the stream and another to their monitors or headphones. Most gamers would like to control exactly what is going into their headphones and make it different from what viewers will hear. For example, gamers may or may not want to listen to their own vocals. They might want a different level for game audio. Some might even want to add music to the stream but leave it out of their mix.
Video Podcasts and Programs
Any production with a guest or multiple hosts can benefit from Audio Monitor. If the host is also operating OBS, they may need to be able to monitor some audio that the guest does not need to hear in their headphones. Audio Monitor allows users to set up a separate mix assigned only to the audio device feeding the guest’s headphones. The host can also set up their own custom mix that may differ from what listeners will hear.
Live Entertainment
Live-streamed music and entertainment are more popular than ever. Audio Monitor gives OBS the functionality to handle the unique challenges of live events, especially music. With Audio Monitor and the proper audio devices, you could provide separate monitor mixes for musicians, vocalists, hosts, and producers, all within OBS.
Pros and Cons
Pros: It’s free. It’s easy to install and has a great dockable interface. It’s easy to use it with virtual audio cables with software like Skype or Zoom.
Cons: The layout and function of the interface can take some time to understand. As a relatively new plugin, there are still some bugs.
Alternatives To Audio Monitor
VoiceMeeter Virtual Audio Mixer – Prior to the release of the Audio Monitor plugin VoiceMeeter was the standard for many users. Unfortunately, it was more challenging to set up and operate. Also, as opposed to being a plugin running within OBS, VoiceMeeter is a stand-alone application.
Key Takeaways
- If you want greater control of your audio monitoring in OBS, Audio Monitor is a great plugin.
- It can take a little time to learn but is far less complicated than VoiceMeeter.
- Audio Monitor is ideal for complex workflows such as connecting OBS with Zoom.
Additional chapters from the OBS Superuser Guidebook
- Chapter 1 - An Update on the Updates here
- Chapter 2 - How to Customize OBS here
- Chapter 3 - How to Optimize OBS here
- Chapter 4 - How to use the core features of OBS here
- Chapter 5 - How to use video filters in OBS here
- Chapter 6 - How to use audio filters in OBS here
- Chapter 7 - The Top 10 OBS Plugins here
- Chapter 8 - The Multiple RTMP Streaming Plugin here
- Chapter 9 - The Automatic Scene Switching Plugin here
- Chapter 10 - How to record multiple sources in OBS here
- Chapter 11 - How to dock sources with live video in OBS here
- Chapter 13 - How to use NDI in OBS here
- Chapter 14 - How to route Audio in and out of OBS here
- Chapter 15 - How to use Virtual Audio cables with OBS here
- Chapter 16 - How to use VST Audio Plugins for OBS here
- Bonus Chapter - How to fix audio sync issues in OBS here
- Chapter 16 - How to use use hotkeys with filters here
Check out our other articles about Open Broadcaster Software below:
- Updated - How to connect OBS and Zoom with VoiceMeeter and Headphone Monitoring - here.
- Learn how to use OBS for remote production here.
- How to connect OBS with Zoom, here
- OBS vs vMix a complete review here.
- How to use Zoom for Church Meetings and Worship here.
- Here are the top 10 OBS features you need to know about
- Getting dropped frames in OBS. Here are some new feature to help with that.
- Take a look at OBS 24 and all the new feature here.
- Increase your productivity with OBS and learn how to use hotkeys here
- Learn how to setup animated stinger transitions in OBS here
- Learn how to install the NDI plugin for OBS (and why you should) here
- Learn more about the latest OBS user interface (UPDATED for 2019) here
- Make your audio in OBS sound great with these VST 2 plugins here
- Learn how to fix the most common OBS issues! Audio and Video Sync! here
- Learn how to use OBS 20+ here
- Learn how to use NDI Cameras with OBS here
- Learn how to use the OBS Multiview here
- Learn OBS quickly with our ZERO to SIXTY tutorial video here
- Learn more about OBS settings and optimizing your settings for live streaming here
- Learn how to record videos using OBS here
- New OBS 24 feature allows broadcasters the ability to pause and restart video recordings. Learn more here.
- Learn how to add live annotations over your OBS productions here
- Learn how to add a webcam and set up a picture in picture scene inside OBS here
- Learn how to crop and rotate inputs inside OBS here
- Learn how to use color correction tools and LUTs here
- Learn the best way to connect OBS and Zoom here
- Learn how to connect OBS and Teams here
- Learn how to use countdown timers in Teams here
- Learn where OBS recordings are saved here
- Learn how to live stream to YouTube and Facebook with OBS for free here
- Learn about OBS 27's new features here


